05 September 2014

Make a Kids Headboard
Project Guide:
- Difficulty: Beginner/Novice
- Estimated time: 6-8 hours
- Cost: R200-R300
What you will need:
- SA pine: 96×22 – 4.5m; 144×12 – 2.4m; quarter sheet – 610x1220mm – 3mm ply;
- Eight 8mm dowels,
- Glue,
- Finish of your choice – we chose a water-base childproof paint.
- Small bag of 25mm panel pins;
- Four 30mm wood screws;
- Four 20mm screws
- *Note: The wood used here are stock sizes, but these are nominal, so a length of wood nominally 86×22 in cross-section, can be (as it was in this case) 95x22mm. Hence, you might have to adjust the dimensions given here – if only by a millimetre or so.
These materials are available at Selected Mica Stores. To find out which is your closest Mica and whether or not they stock the items required, please go to www.mica.co.za, find your store and call them. If your local Mica does not stock exactly what you need they will be able to order it for you or suggest an alternative product or a reputable source.
Method:
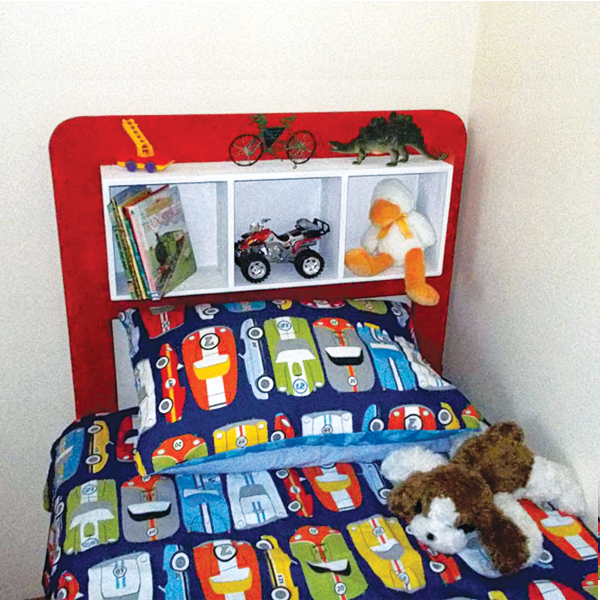
- One of the great ways to encourage a child to read is by ensuring that books are always ready at hand. A good book encourages a child to imagine, and it transports them into another world. In short, with a book, you need never be alone. But having said that, what about bedtime toys, and all the other goodies that kids like around bedtime? This headboard has plenty of storage space of all the goodies kids may need before bedtime.
A single bed is just on 900mm wide, and the headboard is scaled to fit that. Measure off the top crossbeam at 900mm and then the lower beam. This is 900 minus the uprights, which are 95mm wide* (See Note, above). Then measure off the lower crosspiece, which in this case was 710mm long. - Cut both; the more accurate your cutting, the better the joins and the sturdier the headboard.
- The basic frame laid out on grass to give you a better idea of it.
- Now for the box section: Cut two horizontals, each 710mm long, and four uprights, each 220mm long. Assemble the box as shown, using glue to secure the joins, and allow the glue to cure. Ensure that the box is perfectly square – i.e., the angles are all 90º, and that the two separators in the middle are properly positions, to prove three compartments each with internal dimensions of 220x220mm.
- Then used 2500 panel pins to reinforce the joins.
- Trace out the backing panel on your quarter sheet of 3mm ply (Masonite is an alternative backing) and apply glue.
- Again, I reinforced the join with panel pins.
- The completed box.
- Dry-fit the main frame around the box and mark off the position of the lower crosspiece.
- Use a can with a suitable diameter to mark off the curve of the top member, and cut it using the jigsaw.
- Mark off the center line on the top member and drill two holes for dowels, about 20mm in from each end, and to a depth of about that will accept on half of the dowel with a couple of millimetres to spare. (The dowel holes need to be deep enough in each side of the join to accept half of the dowel, but not too deep on either side that the dowel ends up protruding just a few millimetres into one side of the join; penetration needs to be roughly equal for a strong join.)
- Having drilled one pair of holes, insert a dowel marker into each, position the pieces accurately, and tap the two together. This will make two indents in the timber, allowing you to drill accurately.
- Dry-fit the dowels before gluing; note that you should label each join A-A, B-B, C-C and D-D, to ensure each pair of dowels are heading for their correct sockets.
- Clamp the main frame together and check that the box fits.
- Then apply glue to the dowels and surfaces and assemble the main frame – go wild with the clamps; you can never have too many. (Never, however, use a clamp to force a bad join… it will fail in time.)
- Use a couple of offcuts to make two braces for the joins and attach them as shown, using glue and two 30mm screw to secure the join. These braces also ensure that the headboard stands vertical – at its feet, the skirting board means the feet do not stand flush with the wall.
- Tap the box into position within the main frame and use four 20mm screws to secure it in position. The box therefore extends over the bed some 122mm (144-22mm for the frame). Give a final sanding, ensuring that you round off all sharp corners, and then apply the finish of your choice.
- The Completed Project


