09 March 2017

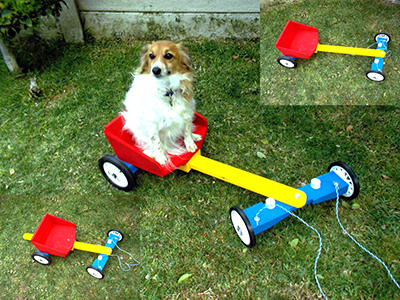
A Cart That Just Grows and Grows
A Cart That Just Grows and Grows
Many of us grew up knowing the delights of riding a soapbox cart, wind in your hair and steering only with a piece of rope. If you never had the pleasure, you definitely missed out. The trouble is that children come in many shapes and sizes and while some sit with their knees against their ears, others have to stretch their legs out and can only just reach the front axle with the tips of their toes.
To combat this, we are showing you how to build a gro-cart that can grow, or shrink, as necessary to accommodate your growing kids, or the passing down to younger siblings.
Materials:
- SA pine: Two 22×69 (1.83m) | One 12×144 (1.83m) | One 22×222 (1.83m)
- Two 150mmØ wheels
- Two 180mmØ wheels
- One bag 40mm screws
- 10mmØ steel rod (2m)
- Eight 10mm washers
- Four cotter pins or split rings
- One 10mmØ bolt (75mm) plus lock-nut
- Two 10mm washers
- Two 45mmØ fender washers (10mm)
- One 6mmØ gutter bolt (75mm) and lock nut
- One 6mm washer
- Two doorstops and screws
- Two 6mmØ gutter bolts (50mm)
- Six 20mmØ gutter washers
- Ski-rope (or similar) for the steering rope – 2m
- Wood glue
- Finish of your choice
Tools required:
- Jigsaw
- Sander
- Drill
- Adjustable spanners
Method:
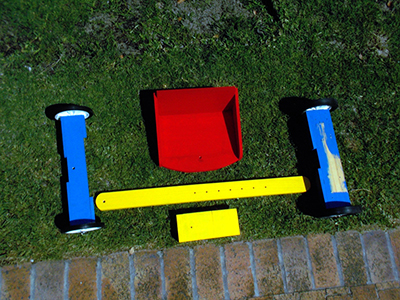
- Here you have some of the basic components. The wheels each have a load capacity of 25kg, so they will take a child’s weight without any problem.

- We made use of split rings (usually used in relation to keys) as it means that removing the wheels for cleaning and/or oiling the axle would not require the use of pliers.

- A neat result, but if you wish, you can substitute cotter pins for the rings. Take note that they will require pliers to remove them.

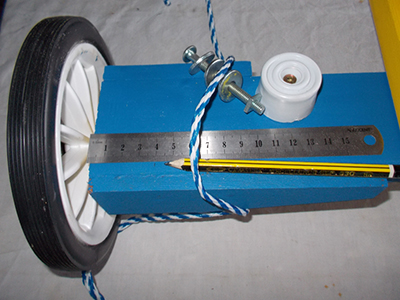
- Begin by cutting the two 10mmø axles, each 500mm long with a 4mm hole drilled through each end for the split rings. Then cut the axle support beams, each 22x69mm and 430mm long, and two locking blocks for each – 69x69mm square.

- Clamping the pairs together, drill a 10mm hole down the centre of each, across the grain.
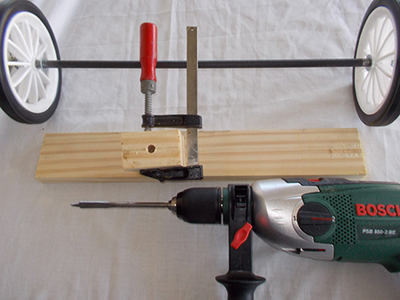
- Mark off four screw positions and fix the axle in position on its support beam. Note that the locking blocks are attached with their grain at 90° to the grain of the beam. This ensures a firm clamping action without the locking blocks possibly cracking – which they could do if their grain is aligned with the axle.

- The front axle complete; make up the rear axle the same way.

- A view along the front support beam showing how the recess drilled through the locking block anchors the axle in position.

- Drill the 10mmø hole for the front axle centre bolt. Note that the hole is aligned just to the front of the axle (which is centred on its support beam).

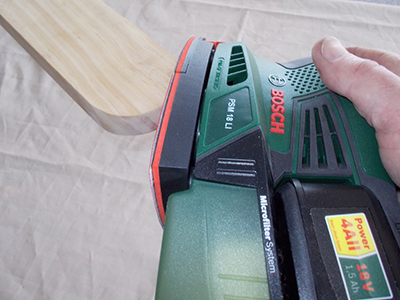
- Next for the 22x69mm linking beam, cut it to a length of 900mm. You can use a paint container as a guide and mark off and cut a curve on each end.

- Sand down the ends for a neat finish (and to remove any sharp corners on which shins can be barked).
- Mark off the centreline of the linking beam.

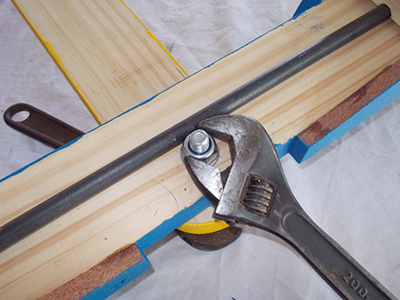
- Drill the 10mm hole for the centre bolt and check that the bolt fits in next to the axle.

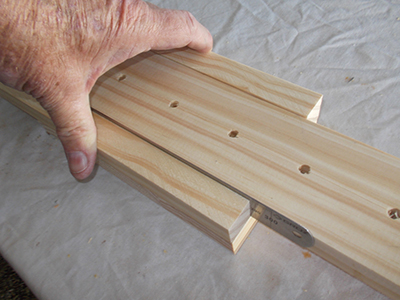
- Drill 6mm holes down the length of the linking beam. Where you place them is pretty much up to you, but we spaced them at 50mm centres, starting 400mm from the front of the beam and drilling eight. This allows the length of the cart to be adjusted a total of 400mm to make it suitable for a tiny tot to a terrible teen.

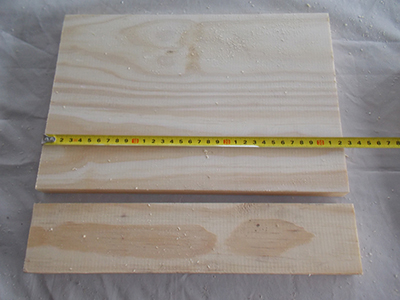
- Now for the seat – We made it 320mm wide by 290mm long.
- To make the length, glue a 320mm length of 22×69 to the leading edge of the seat, reinforcing the join…

- … With a 200mm length of 12×144, as shown here.
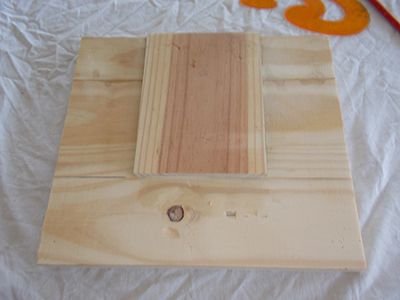
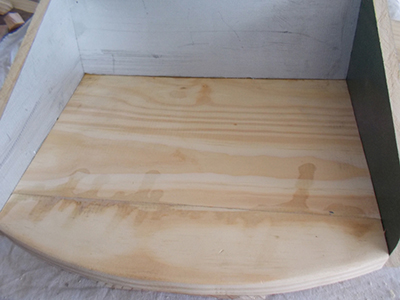
- Mark off the front of the seat using a French curve.

- There is no real need for the leading edge of the seat to be curved, but it gives the cart a little style – or not!

- We cut a seat back from the 22x222mm length, angling the cut at 15° to give the seat back a little recline.
- Use glue and screws to attach the seat back to the rear edge of the seat base and sand the join down as shown.

- Then cut two sides from the 12x144mm, each being 235mm in length at the base, and fix them to the seat base and backrest using glue and screws to secure the join and create a very strong seat.
- Almost there… now what is needed is the box channel in which the linking beam must slide; its internal size needs to be just a millimetre or so larger than the 22x69mm linking beam so that the latter is held snugly without too much play, but can still be easily moved. So the side supports we cut were 23mm high, as shown here.

- To space them on their base, use a length of the remaining 22×222 cut to 200x111mm wide, and to allow space for the linking beam, use a steel rule as shown to provide a channel width of a fraction more than the 69mm width of the linking beam.
- Use glue and screws to secure the channel sides in position and then position the linking beam in the channel as a guide for the locking bolt hole; naturally it is vital that the spacing holes in the linking beam line up precisely with the locking bolt hole.

- Next use the last of the 12×144, cut to length, to top off the channel and with it clamped firmly in place, check that the linking beam is able to move easily but without excessive play. Having checked that, glue the top to the channel and secure with a couple of screws on either side (making sure to avoid meeting the screws already in place that secure the channel sides).

- We used 12×144 offcuts to pretty-up the axles, hiding the locking blocks. This is not essential, however.

- The cart’s five building blocks – front axle assembly, seat, linking beam and channel assembly, and rear axle assembly. The rear axle and channel assembly are attached to the underside of the seat, using glue and screws to secure them in position. The glue needs a wood-on-wood bond, which is why the top surface of the seat has not been completely painted. In passing, it is much easier to paint the components and then assemble the cart – no ragged edges where one colour meets another.
- Attach the front axle to the underside of the linking beam, sandwiching the two 40mmØ gutter washers between them. Note that the axle is behind the centre bolt. This tends to help the cart run in a straight line.
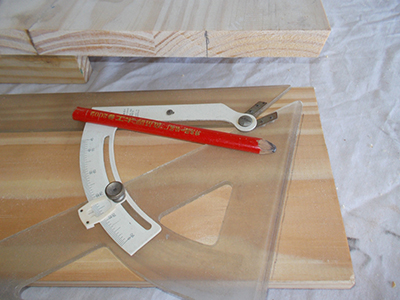
- What you don’t want is for the front axle to turn so far that the wheels get jammed under the linking bar, so use a bevel to set a desired maximum angle of deflection.

- Then add a doorstop on each side to limit the deflection to the maximum you have selected, and position the 6mm gutter bolts for the steering rope.
- The steering rope ends are tied around the gutter bolts and sandwiched tightly between two washers, with a third washer being used on the underside – making a total of six 20mmØ washers in all.

Hey, guys… Check out my new ride!