22 January 2015

How to Install a Fan
Caution:
Any electrical work demands at least a basic knowledge of how electricity works and how your home’s electrical system is arranged so unless you are absolutely sure of what you are doing, do not try this project on your own, but rather call in a qualified, registered electrician to install the fan for you.
Please exercise caution with this project, if you’re not sure of how to go about it DON’T!
Project Guide:
Difficulty: Intermediate (reasonably skilled)
Estimated time: 1-2 hours
Cost: R600
Wiring Guide:
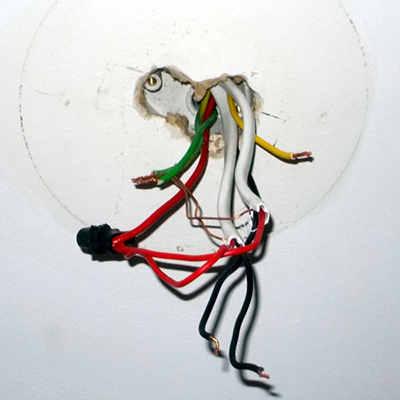
Before we show you how… it is a matter of colour:
Fixed wiring in a home follows this convention:
RED = LIVE
BLACK = NEUTRAL
GREEN/BARE BRASS = EARTH
The matching/equivalent colour coding for appliance wiring is as follows:
BROWN = LIVE
BLUE = NEUTRAL
GREEN-YELLOW = EARTH
So when you have a need to connect to connect appliance wiring, as here, to fixed wiring, as here, you need to match the RED to the BROWN, the BLACK to the BLUE and the GREEN/BARE BRASS to the GREEN–YELLOW
To help you remember, we have highlighted a memory hint in bold and underlined it.
Materials:
One fan and (optional) block connector and *(if necessary – four stout offcuts of timber to fit between two roof trusses).
Tools:
- Stepladder
- volt-ohm multimeter
- wire strippers
- screwdriver (cordless is your best bet)
- wireman’s pliers
*All materials are available at Selected Mica Stores. To find your nearest Mica and to enquire about availability, please go to www.mica.co.za, to use our store locator. If your local Mica does not stock exactly what you need they will be able to order or suggest an alternative product or a reputable source.
Method:
- Turn off the relevant circuit-breakers on your distribution board. If you are unsure as to which circuit-breakers are the right ones, then turn off all of them, including your mains switch. As a safety precaution stick a large notice up over the board; if you are working on anything electrical and the power goes on, it could result in fatal injuries. So two precautions too many rather than one too few.
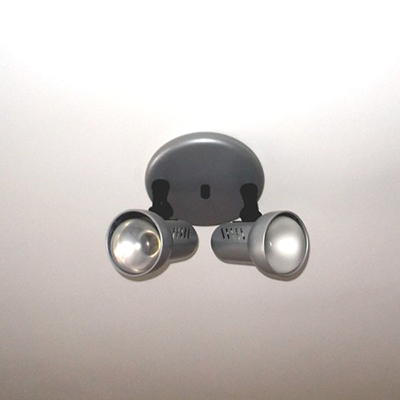
- Position your stepladder as close as you can to the fitting point as will be comfortable for you. Never try to overreach. Remove the existing fitting – in this case a double swivelling fitting.
- Remove any mounting bracket.
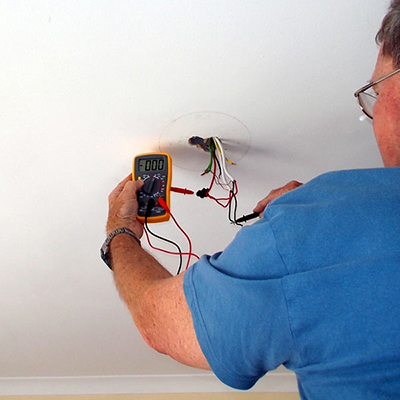
- Double-check that the power is off.
- Pulling the wires to one side, attach the fan support bracket to the batten above the ceiling board… *for more on this, see the fitting illustration in this article.
- Slip the fan support column into its seating, ensuring that the groove in the half-ball is seated on the protrusion in the bracket (this will ensure that fan will not twist in the bracket, possibly pulling wires free and causing a short.
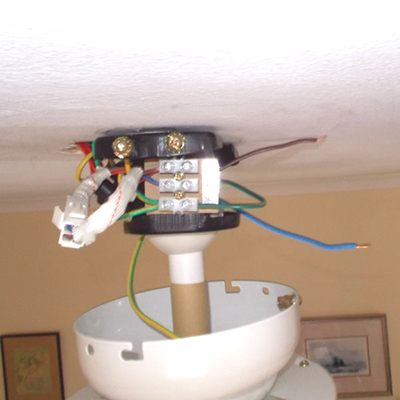
- In this model, you have to connect the fan light and motor to the bracket electrical fitting; this uses a male/female connector that can be connected only one way… it employs three circular connections and one square one. It is also colour-coded.
- Now comes the crafty part… fixed wiring is stiff and hard to manoeuvre about so make it easy on yourself: make up a block as shown, and connect the fixed wiring to it. In this case, and as mentioned above… RED to the BROWN on the left, GREEN/BARE BRASS to GREEN-YELLOW = EARTH in the centre, and BLACK to BLUE on the right. Use the multimeter to confirm the connections are good, and then tuck these wires back above the ceiling board, leaving only the three long lengths of flexible wiring protruding.
- The flexible wires are easily connected to the fan’s electrical fitting on the bracket – ensuring that all three are connected as per Caption 9.
- The completed electrical connections. Now all you have to do is remove that bit of brown paper protection on the fan’s shaft, loosen and remove the locking screws as required on the mounting bracket, move the cup fitting up and lock it in place. Turn the power back on and check that the light and fan are working. If they work, turn everything off again and finish off by fitting the blades. These have a white finish on one surface and light wood finish on the other – take your pick.
- We fitted the blades (in this model there is a cutout in the lamp body and it allows you to insert a screwdriver up to the screws fixing the blades in position. Once the blades are attached, fit the bulb and then the shade. DO NOT overtighten the three screws: as the glass heats up it expands and if the attachment screws are too tight, the glass shade will shatter. Tighten them up with your fingers only until the shade is unable to fall free, but can still rotate … that means there is sufficient play between the screw heads and glass shade and the latter can expand without any danger of damage. …
- The completed installation
- MICA-FIT-A-FAN-ATTACHMENT-TO-CEILING
*Ceiling board is a gypsum mix sandwiched between two layers of paper and it will not take the weight of a fan and it stands to reason you must ensure the fitting is secure and anchored to a sound wood foundation. The ideal is to be able to attach the mounting bracket to a batten or ideally, right through a batten and into a roof truss horizontal beam.If you cannot, then you need to make up a support. This is very easily done: selecting a length of stout timber long enough to fit between two trusses, firmly attach two vertical supports that are in turn attached firmly to a second horizontal support. This latter piece should rest on the upper surface of the ceiling board and is the timber to which the fan bracket will be attached. Don’t have it hanging above the ceiling board… if you overtighten the attachment screws, the bracket could be pulled through the ceiling board, damaging it.
Naturally, you will need to carry wiring from an existing light fitting to where you now wish to position your fan, and you will need to bore a hole through the timber support for this wiring to be able to pass through and out of the ceiling space, so you can make the required electrical fittings to the fan itself.