06 February 2023

All about drill bits – and more: Part 1 – drills
The drill is one of the most ancient of tools, in fact they have been around for around 5000 years – as far back as the Harappan civilisation of the Indus Valley, which peaked around 2500BCE and encompassed an area comprising the whole of modern-day Pakistan and parts of modern-day India and Afghanistan…
But enough history… In this series we are going to look first at the more common types of drills you are likely to come across and use and then at the many and varied bits, attachments and accessories you can use with a drill to enhance their versatility.
Nowadays there is a whole range of bits available for a wide range of applications. However, in addition to bits, over time a very wide range of attachments have also been devised, which make the drill even more versatile. So in addition to bits – designed to make holes – we now also have accessories that can be used to sand, grind, shape and even cut almost any material.
In this series we will be showing you a reasonably comprehensive range what’s available (and growing pretty much all the time), where and how used – plus hints and tips to make your drill tasks easier, quicker and more accurate…
But first… drills…
As you can see from the introduction, drills go back a long, long way – and are used in a vast range of fields – from tiny drills and drill bits used in dentistry and surgery to massive drills used for drilling for water, oil and natural gas, and even boring tunnels… and much, much more.
Search just about every middle-class home in this country and you’ll be likely to find a drill – one of the most useful tools you will ever own. In some cases you may find a muscle-powered hand-brace or two, but in this article we’re concentrate on power drills – mains and cordless, so before we get into the nitty-gritty, let’s get safety out of the way:
PIC 1
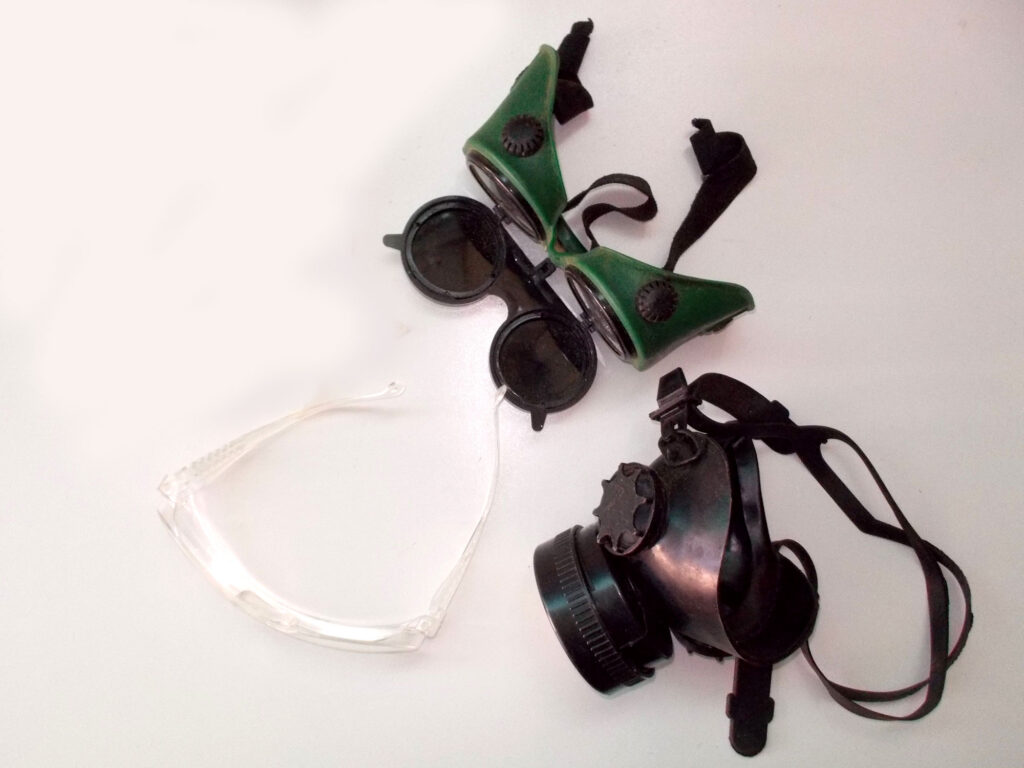
Drill safety
Power tools are great labour-savers, but are deadly if misused or abused. Designed to make light work of just about any drilling task, they generally make short work of the material to which they have been applied, be it wood, metal, masonry or whatever. The trouble it… both of those materials are a great deal harder and more resilient than flesh and bone, which means tools can go through your fingers like a hot knife through butter, and a great deal more… very painfully. The following safety tips apply to all power tools, though in this case the emphasis is on drills.
So, not necessarily in order of importance…
- Always adopt the right stance before working – it’s when you have to shuffle forward and then trip or stumble that problems can arise.
- Always use a drill defensively, and read and follow the instructions carefully before use and learn to use it by practising on scrap wood or metal, an old wall or whatever before getting down to actually working with it – one basic rule it to hold it properly and where a second handle is provided for extra control, for example when drilling into masonry, use it.
- Always use drills only as intended by the manufacturers and for the purpose for which they were designed.
- Be brave! Forget your mobile phone!
- Check drills before and after use and unplug them when you finish for the day.
- Clear the work area of bits and pieces that could distract you.
- Concentrate!
- Do not wear loose clothing – particularly tops with loose, long-sleeves – and particularly when using a drill press. Loose clothing such as loose sleeves can be snagged by the spinning chuck and/or bit and drag your arm – and you – into the tool. At worst you could have a bruise or two and bruised ego. At worst you could be seriously injured.
- Don’t have a radio or TV going; yet another Protea out for a duck could have you saying ‘Oh… dear!’ – closely followed by ‘Oh… gosh!’ as you experience a mishap.
- Don’t mess about with the safety features of any drill.
- Drilling, as with any cutting, shaping, grinding or sanding operation, can throw up a lot of debris, so it is a good idea to wear eye and airway protection – and in the case of some hammer drilling operations – ear protection.
- Ensure the cord is behind the machine and that you are working away from it; never work towards the cord.
- High-quality drills are well insulated, but do not tempt fate by working with a mains-powered drill out of doors in the rain, or while standing in a wet patch on the floor.
- If distracted, stop what you are doing and switch off – do not try to continue working while reprimanding the kids or helping decide what’s for dinner.
- If you inadvertently overload the drill and get that ‘electric smell’, running the machine flat out under no load for a few seconds will cool it down.
- Never change any accessory such as drill bit without turning the machine off and unplugging it.
- Secure the work-piece securely before you start work.
Drill press safety
The rules that apply to hand-held drills also apply to drill presses, and vice-versa, but there are some precautions you need to observe when using a drill press…
- Always clamp the workpiece securely to the drill table.
- Always ensure that if drilling right through the material, that you centre the drill table directly under the drill. It has a hole to allow the end of the bit to pass through safely, but if it is off centre, you will end up damaging not only the drill table, but also possibly the drill bit itself.
- Always remove the drill spindle* key from the spindle immediately after using it.
- Always use the correct drill bit for the material being drilled, and run the drill at correct speed for the diameter of the drill bit and the material being drilled.
- Always switch off the power before trying to loosen the drill spindle.
- Don’t use excessive pressure and if the drill starts to labour, ease off a little.
- Ease up on drilling pressure as the drill starts to break through the bottom of the material. It is best for a clean exit hole if drilling into wood that you have the workpiece clamped on to a piece of scrap – and then drill right through and into that.
- If drilling into metal, always use the correct cutting fluid.
- If the drill bit binds in a hole, to release it, stop the machine and turn the spindle backwards by hand while allowing the spring-loaded spindle to rise (drill presses have a return spring that raises the spindle to its resting position when the operating handle is released.
- Let the spindle stop of its own accord after turning the power off. Never try to stop the spindle with your hand – you are likely to get a friction burn.
- Make up a shallow wooden tray and place it on the drill table to reduce the chance of damaging a drill bit as it is released; if you have correctly centred the spindle over the press table, the bit with go straight through and hit the press’ base – and possibly be damaged as a result.
- Never clean a machine while it is in motion!
- Never wear loose clothing, particularly loose sleeved tops, and if you have long hair, tie it well back – if necessary wear a shower cap or hair net. You might look a bit dof, but far better than you would look if you were scalped!
- Remove debris with a brush or vacuum, and never by hand.
- Wear safety eye protection while drilling.
- When drilling a deep hole withdraw the drill bit frequently to clear chips and lubricate the bit when drilling into metal.
*The spindle is another name for the chuck and commonly used when discussing hand-held drills, but for some weird and wonderful reason, we often use the term ‘spindle’ when discussing the drill press component with the same purpose as the chuck. And, no, I don’t know why either.
Power sources
Generally when we think of power tools, we think of electricity as the energy source and that is what we will stick to here as this is the power source – Eskom permitting – that we use to power various kitchen accessories and tools and other items.
In industry, pneumatic tools are widely used as they are less likely to be pilfered, simply because in order to make use of them, one needs a compressor – and these are far less common in the average home than electrical outlets!
What drill?
There is a whole range of drills of all different sizes and power ratings available, from mains to cordless, large to small – and to very small. But bear in mind that when it comes to drills, size does matter – but bigger might not necessarily be better, depending on the task at hand…
Having said that, if you put a lower-powered drill to a task that calls for a more powerful drill, you could damage it. When drilling into masonry, for example, it is probably better to use a 710W or larger drill to drill large holes – +16mmØ – rather than a lower-powered drill that might struggle.
Are you going in the right direction?
Just a word of caution… most if not all modern cordless and mains drills today have a reverse function, so that they can be used to remove screws, for instance.
However, it happens to the best of us that sometimes when attempting to drill into a material, we have forgotten that we last used the machine for the above-mentioned purpose. So before you rush off to the shop spitting mad because the drill bit you just bought ‘is blunt and useless and a piece of … junk’ do yourself a favour and confirm you do not have the machine operating in reverse. It could save you a blush or three.
Let’s take a quick look at the more common types of drills themselves and which you may well end up using…
But first –
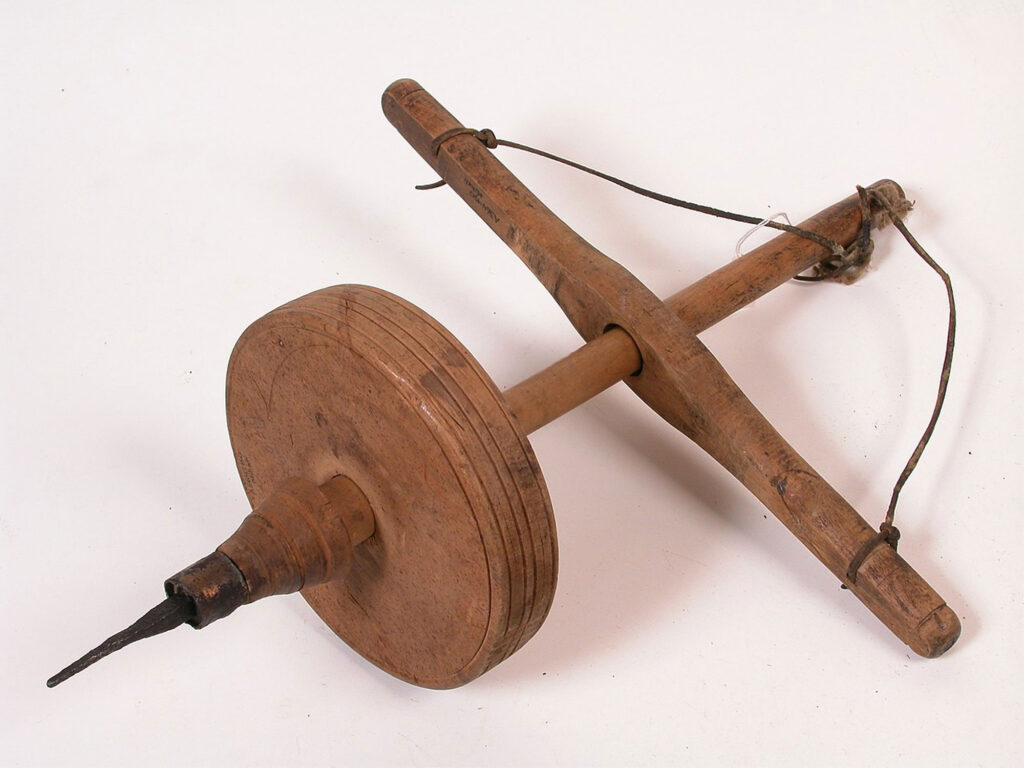

Two examples of drills used in the distant past. The [Public domain] one with a wooden flywheel is called a pump drill and operates by moving the loosely fitting handle up and down rapidly, spinning the drill first one way and then the other. Users would have a piece of wet wood or concave stone as a pivot point for the top of the spindle so that pressure can be applied on the bit (and, naturally to avoid burning the palm of one’s hand). The bow saw is also and ancient design but is still found today – being used as a fire-starter by the Bear Grylls of this world. In this guise, as shown here, it is used not as a drill per se, but rather as a means to rapidly spin a straight piece of wood first one way and then the other against a piece of kindling so that the point, working on the firewood, creates heat through friction and therefore glowing embers – from which a fire can be started. Obviously it would also have a concave stone or pebble or wet wood pad to exert pressure on the rotating point and protect the user’s hand.
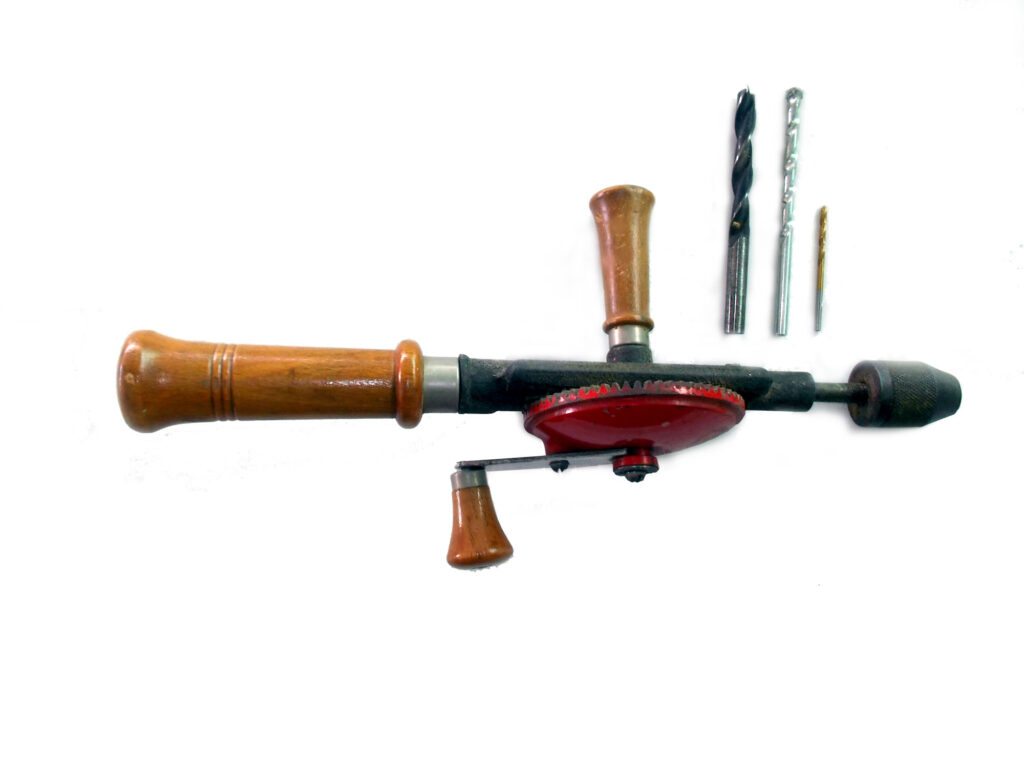
This is a hand-operated drill, also known as an eggbeater drill, for its resemblance to a manual eggbeater used in the kitchen. For small jobs it can be gripped by the main handle. For heavier jobs such as drilling into a wall, a cloth pad between the user’s chest or shoulder and the handle and control with the side handle would probably be required. It is labour-intensive, but you are not subject to electricity blackouts or flat batteries. I suppose the other advantage is that you get some exercise.

This is an illustration of a heavy duty fully enclosed hand drill with breast plate. It incorporates a gear mechanism comprising a number of toothed cogs operated by a crank on one side (some versions feature a double crank – rather like bicycle pedals)
The breast plate enables the user is able to apply more pressure on the drill bit making them better suited for drilling hard materials such as metal.
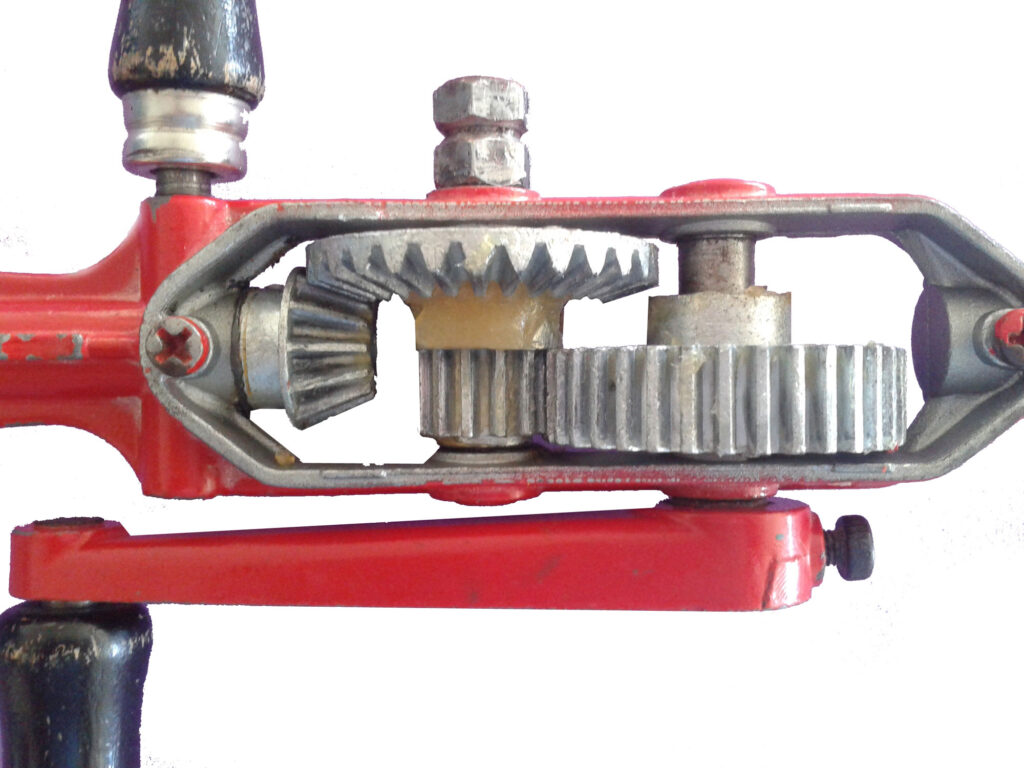
This shows the inner workings of this type of drill.

This is a brace, also known as a brace & bit. Again, around for a very long time – but still widely used today. They are ideal for precision drilling of large holes as they epitomise ‘slow and steady’ … so the user has excellent control over the depth of the hole being drilled. These drills are designed for use with awls, augers and screwdrivers with square, tapered tangs. When used a screwdriver, the brace allows the user to exert great leverage on the screw head and as the speed is governed by the user’s arm, slow and steady means that at the first hint of the screwdriver blade lifting out of the screw head, the user can stop. Shown here are some of the awls, augers, countersink bits and screwdriver bits that can be used with a brace. Note the adjustable hole-cutter at the bottom of the image.

The parts of a brace.

This brace has two jaws, but some have four and the tang is clamped firmly in place simply with hand pressure when turning the shell (in other drill types known as the chuck) down tight.

This is the ratchet mechanism that allows the user to lock the shell or to select clockwise or counter-clockwise rotation. This is particularly useful when operating in a very confined space where the brace cannot be rotated a full 360°. Then the ratchet is set to the required setting and the brace rotated back and forth to accomplish the required task in increments.
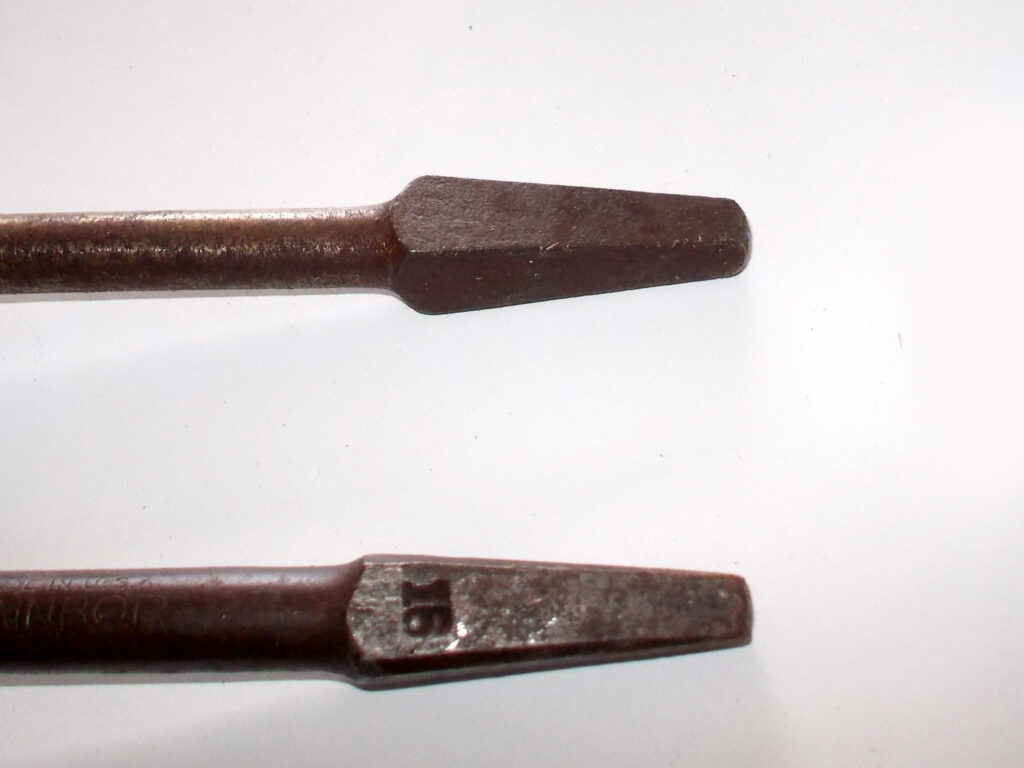
This shows the square cross-section tapered tangs of two augers designed for use with a brace. These bits should never be used with any drill with three jaws – the standard for almost every – or every – drill.
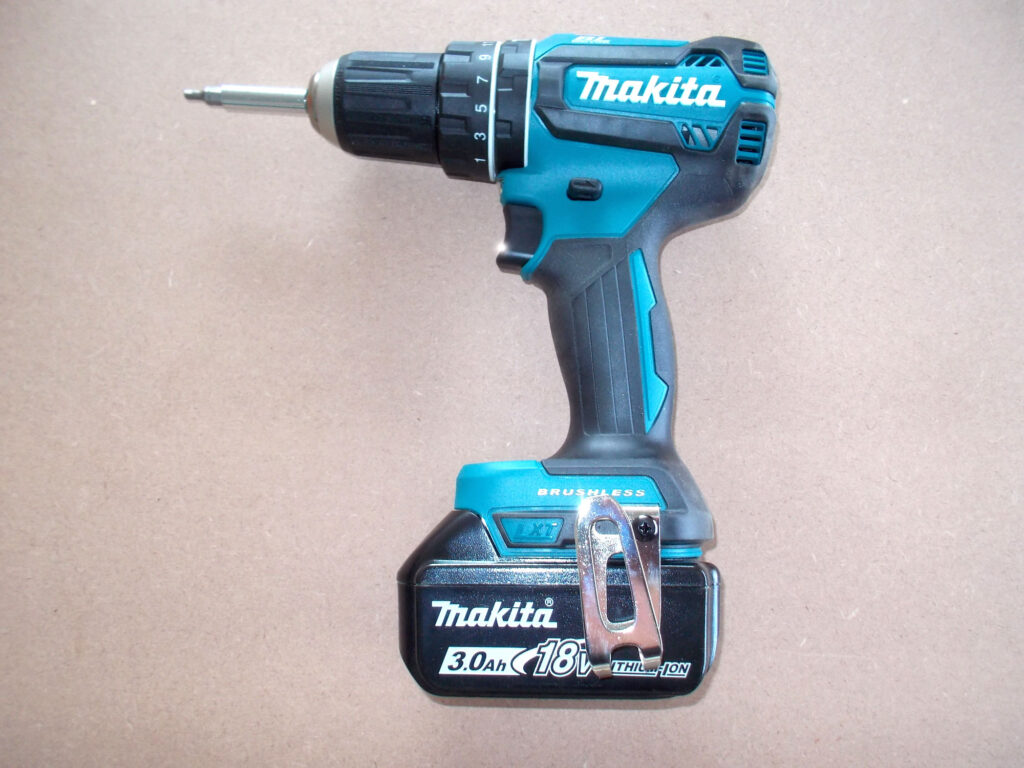
On to the powered drills – so much easier on the muscles… This is an example of cordless drill/driver. Cordless drills/drivers are available in 3.6, 7.2, 10.2, 12, 14.4, 18.8 volt (often the 14.4V and 18.8V are simply referred to a 14V and 18V respectively) and now even larger battery capacities. Some brands double up on the batteries to provide the necessary power – a pair of 18V batteries to provide 36V, for example; others have developed specific larger capacity batteries for their tools. Whatever their power rating and capability, cordless tools give you mobility options mains power tools do not, but obviously, being battery-powered, they do not usually deliver the same brute power as the latter. But they’re very useful to have around and many have a range of features to enhance their versatility – such as these… This feature (https://www.mica.co.za/its-time-to-talk-the-torque/) shows you how to make use of the features – such as the torque control – of a cordless drill/driver.
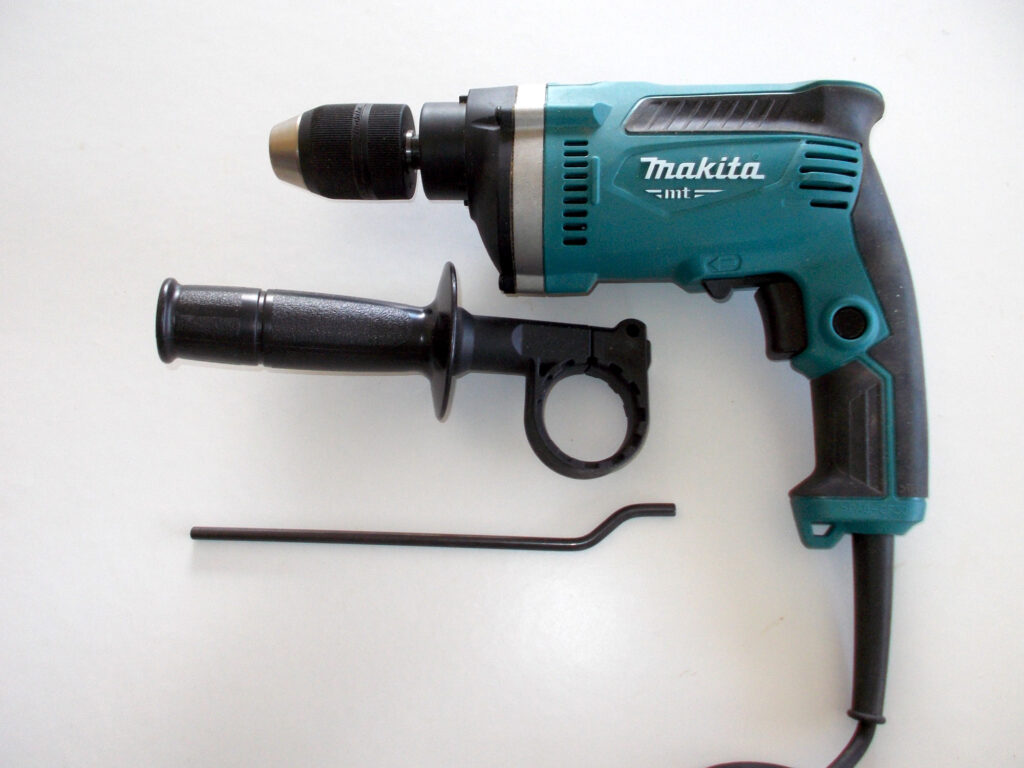
This is a 710W mains drill with no-load speed controllable between 0-3200rpm, and a selectable hammer function producing 48000ipm (impacts per minute) and a reverse function. A drill in this power range is a good midpoint choice as it will handle virtually every task you throw at it. It is rated to handle masonry bits up to 16mmØ and twist drill bits up to 13mmØ. Its drilling capacity is: Concrete: 16mm, steel: 13mm, wood: 30mm. Note the auxiliary side handle and depth stop. Use them! They will help you drill more accurately.
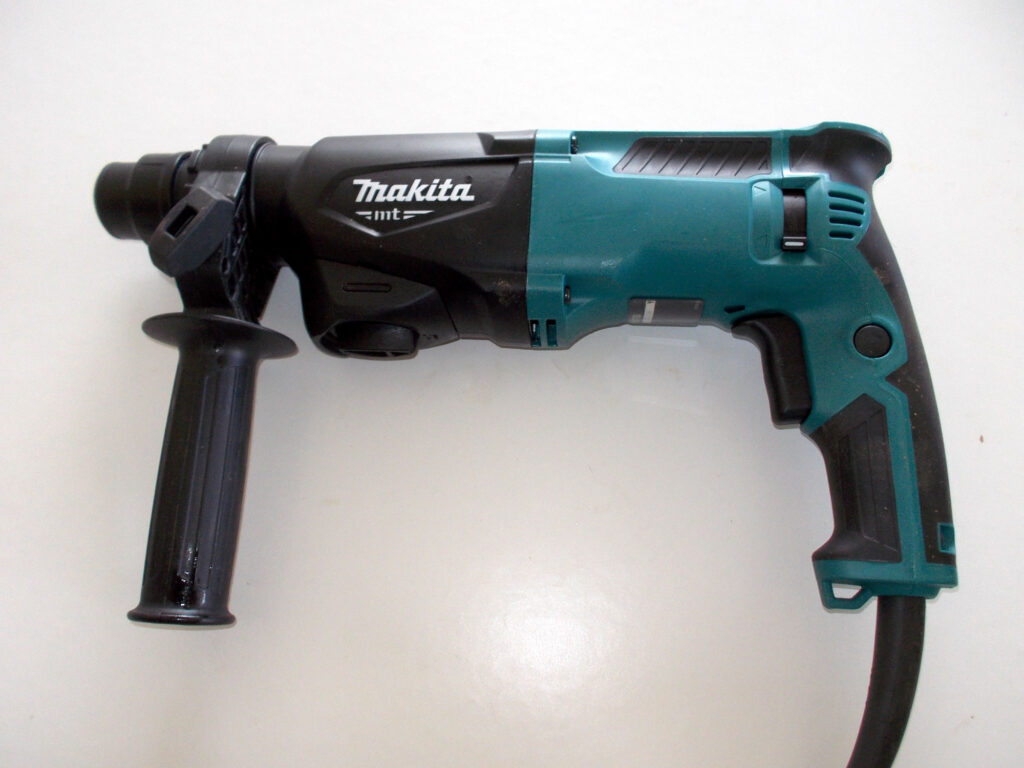
This is a 710W mains rotary hammer with no-load speed controllable between 0-1100rpm, and a selectable hammer function producing 4350ipm (impacts per minute) and a reverse function. It is rated to handle masonry bits up to 22mmØ and twist drill bits up to 13mmØ. It is also supplied with auxiliary side handle and depth stop. Its drilling capacity is: Concrete: 22mm, steel: 13mm, wood: 32mm.
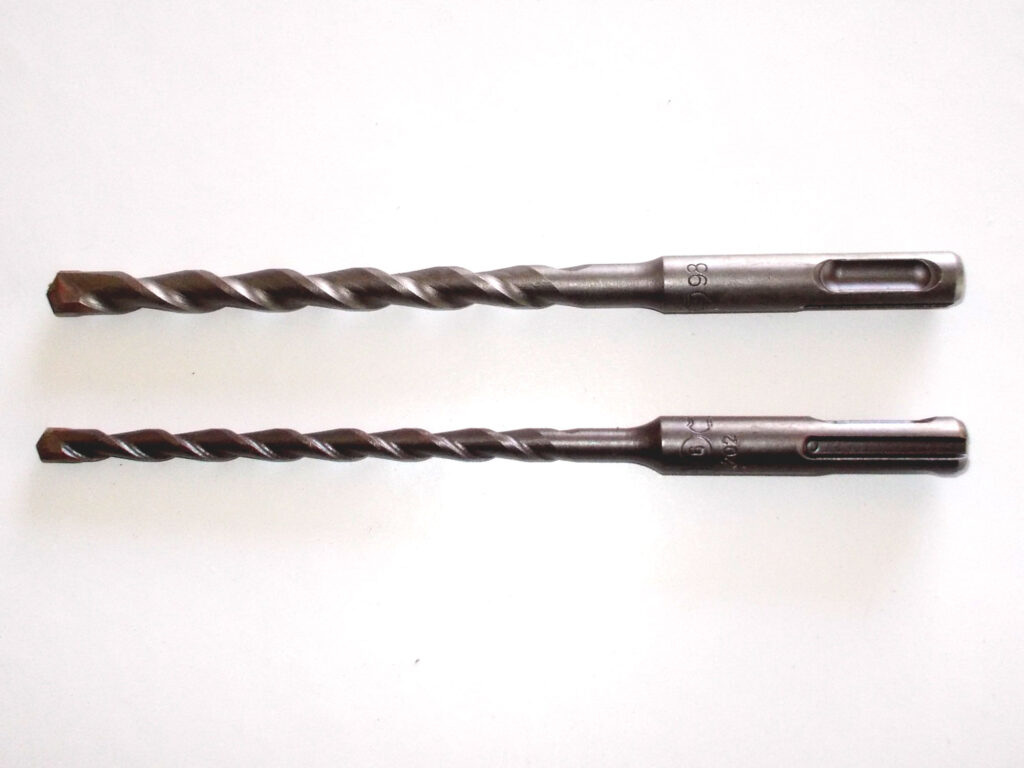
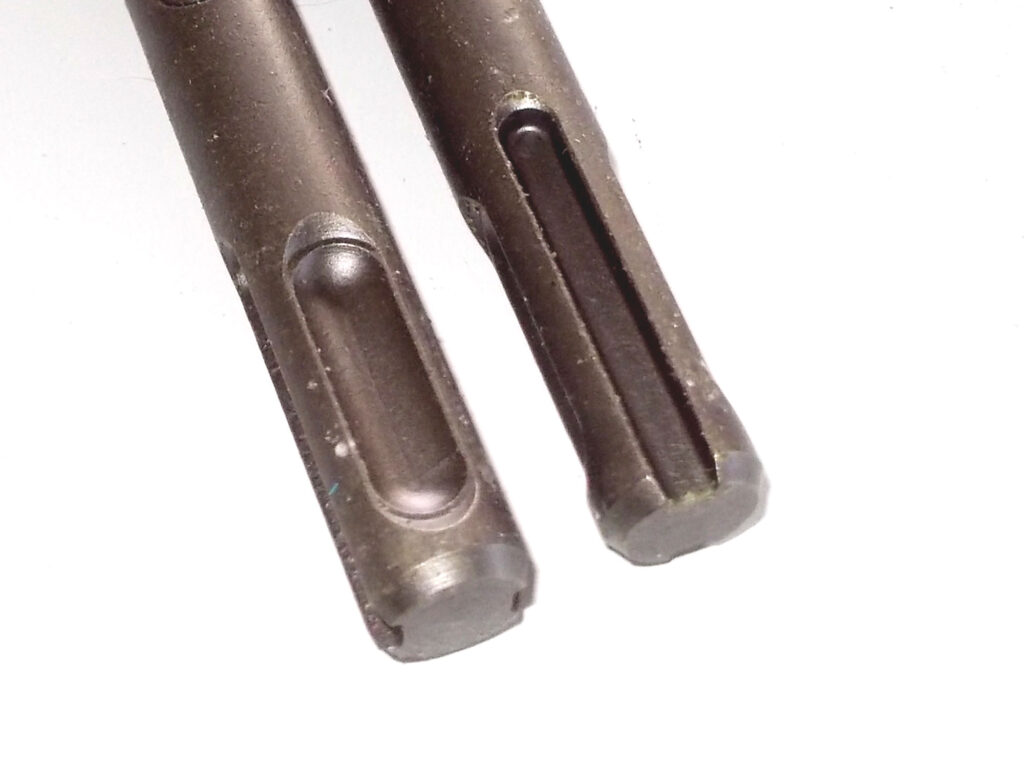
Note that rotary hammers use SDS drill bits, which are not compatible with the 3-jawed chucks used to secure drill bits with smooth or hexagonal tangs or shafts on drills such as the cordless drill and mains drill just above the rotary hammer. You will notice that the SDS has deep flutes and recesses and is fitted into the rotary hammer chuck simply by pulling the chuck collar back and inserting the SDS bit and then releasing the chuck collar to lock the bit in place. Removing the bit is simply the reverse… pull the collar back and remove the SDS bit.
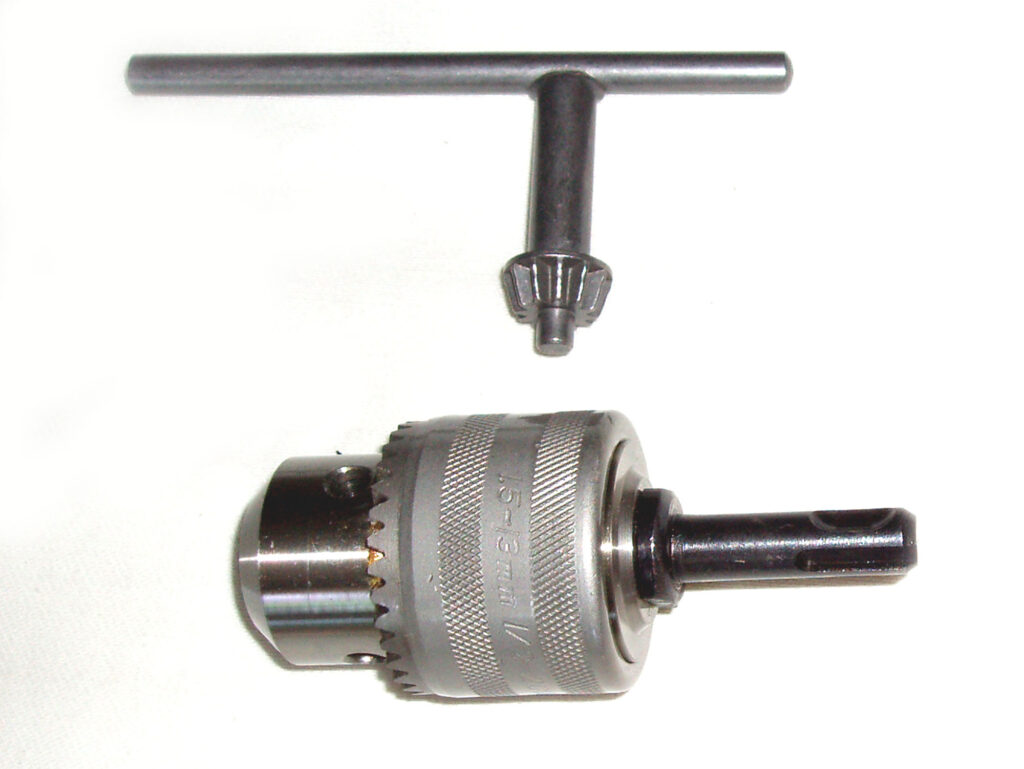
By the same token twist drill bits with a smooth or hexagonal tang or shaft cannot be used in a chuck designed for use with an SDS bit. But there is a solution… you can buy a keyed adaptor chuck, which features an SDS attachment shaft that is inserted into the rotary hammer’s chuck exactly as an SDS bit is. Then, however, you can fit the required twist drill bit with a smooth or hexagonal tang or shaft to the adaptor chuck and use the key to secure it. You can then use the rotary hammer as an ordinary drill – but, please note, without the hammer function being engaged… some manufacturers state that the adaptor should NOT be used with the hammer function engaged. Check the product package and/or instructions to confirm this. A hint: When tightening a keyed chuck, ensure the drill bit’s tang or shaft is centred between the three jaws and then tighten it by hand until the bit is held in position – only then use the key to tighten the jaws… if you use the key first and if the bit is not centred, you could end up damaging the jaws.
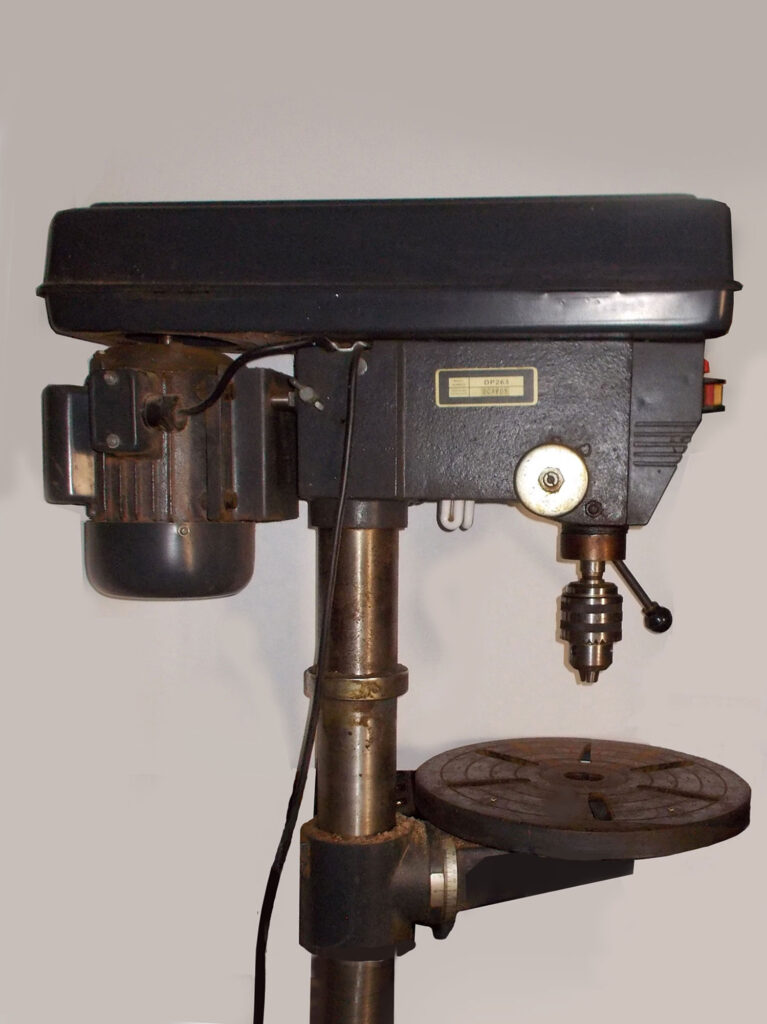
This is a drill press and a great asset to any workshop as it allows the user to drill holes to a very precise depth and spacing. This particular model has 16 spindle speeds, namely 220rpm, 280rpm, 320rpm, 410rpm, 480rpm, 520rpm, 620rpm, 650rpm, 720rpm, 860rpm, 1310rpm, 1430rpm, 1910rpm, 2080rpm, 2400rpm, 3480rpm. These are adjusted by positioning two belts – rather like motor car fan belts on three pulleys in the top casing. The drill table is moved up and down using a hand crank on a rack and pinion system and can be swung to one side if necessary for certain jobs, or set at an angle if that is required. This machine, like many if not most – or all of its peers – does not have a reverse function, but it does have a light that can illuminate the workpiece in low-light conditions. The drill spindle is moved down to the work surface using a three- armed lever on the far side (the end of one is visible just to the right of the spindle), and the return spring returns the spindle to its resting position when the lever is released. This is a floor-standing pedestal version, but bench-mounted versions are also available. Smaller versions of drill presses are bench-mounted and often have five speeds, rather than the 16 in this case. Hint: even though there is a rubber pad to prevent damage if the handle is released, it is best to control the spindle’s rise and allow it to return – under pressure from its return spring – to its resting position relatively gently.
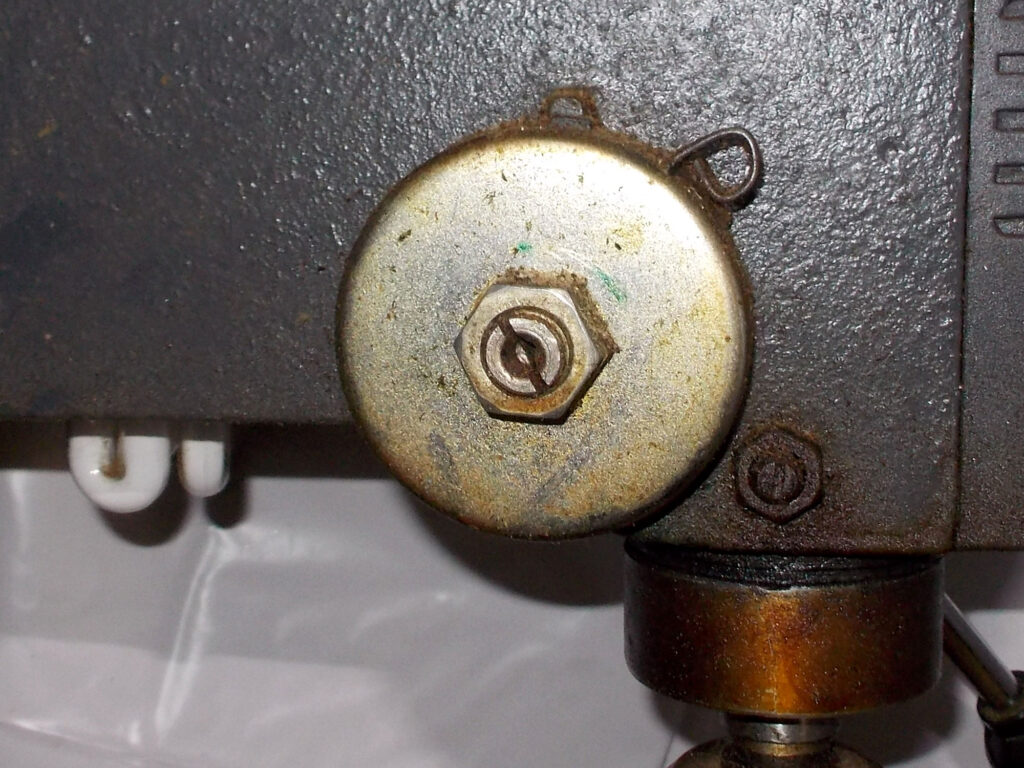
This is a close-up of the return spring – notice also the CFU light fitting just visible to the left.
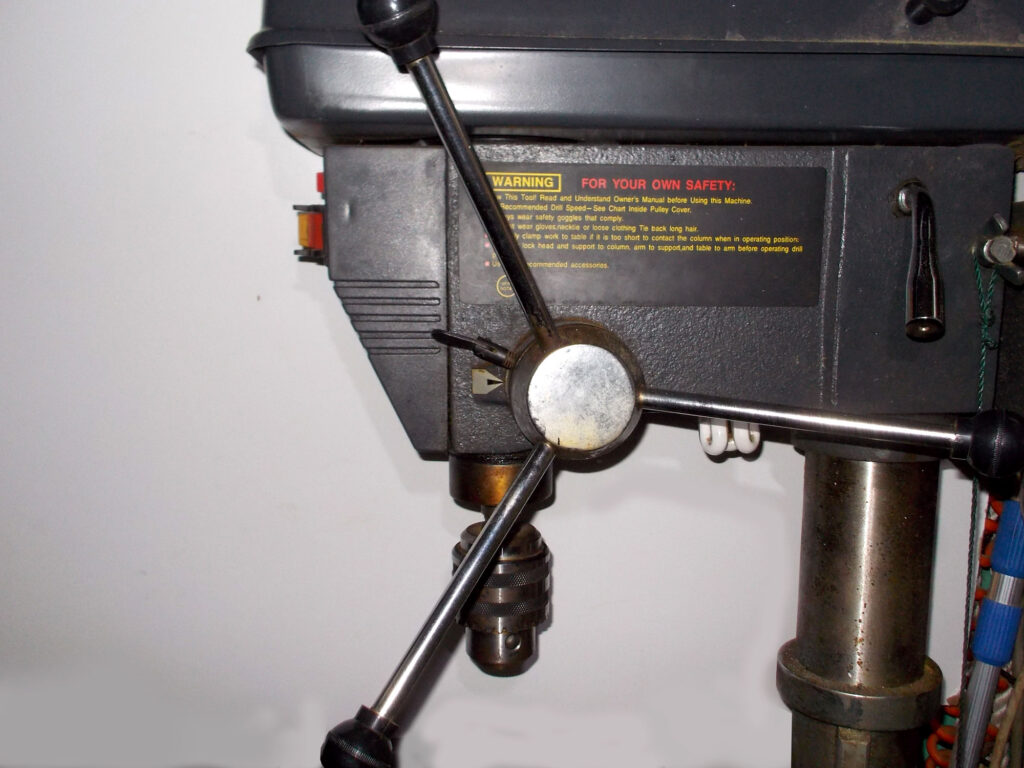
This is a clearer view of the three-armed lever used to move the spindle down towards the workpiece. Also note the depth stop. This is rotated to the required position and then locked with the locking screw. It allows the drilling depth to be controlled extremely finely.

In the centre, Mr Venter – otherwise you will damage the drilling table and possibly the bit as well – particularly if you are using a brad bit to drill into wood – when it hits the drill table, you may as well throw it away – and the same applies if you are using a masonry bit, to drill through a ceramic tile, for example.
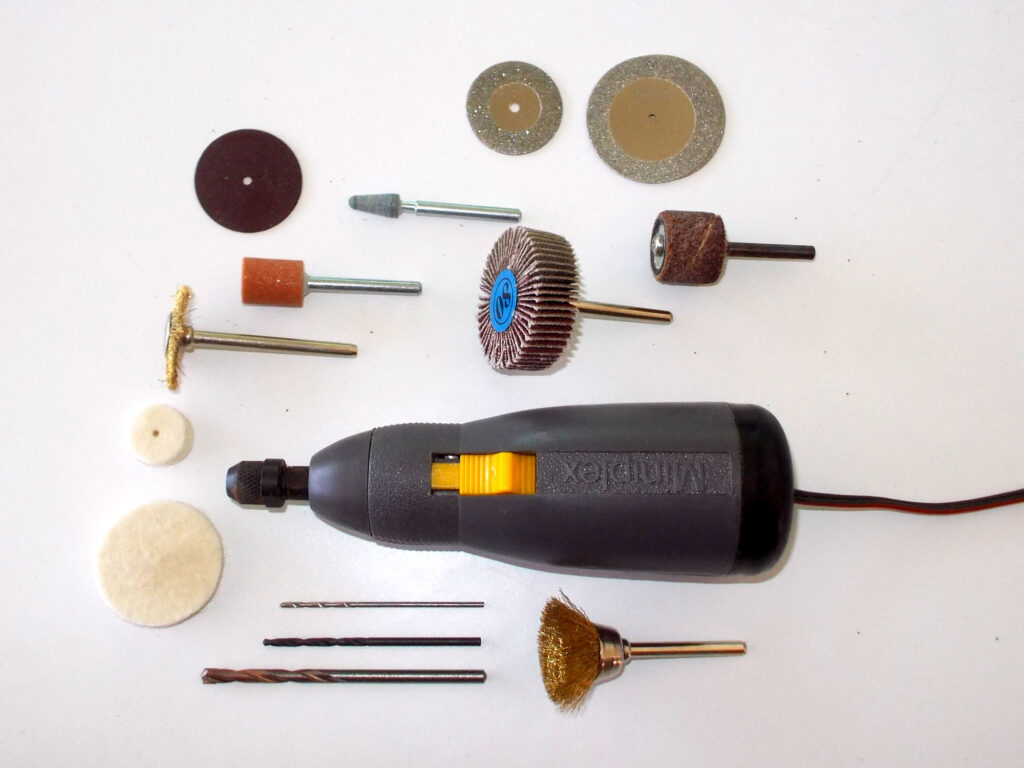
From the large to the small… this is an example of a mini-drill (sometimes referred to as a mini-tool), with just a few of the many drill bits, brushes, polishing disks, grinding disks, sanding disks, etching bits and even milling bits that can be used with these tools. The drill bits (just three shown lower left) usually range from a maximum of 3.2mmØ down to 0.8mmØ or smaller. These mini-drills are ideal for crafters, jewellers and modellers who often work on very small items where fine control and precision is required. Some mini-drills are battery operated, as in this case, but slightly larger version may also be mains-powered. Battery-powered versions are usually in the lower range of battery powers – from 3.6V or so up to around 10.2V 3, but seldom if ever as high as 14.4 or 18V.
Next month… drill bits!
Panel:
Mica Stores carry a range of power drills, hand drills and bits and accessories. To find your closest Mica and whether or not they stock the items required, please go to www.mica.co.za, find your store and call them. If your local Mica does not stock exactly what you need they will be able to order it for you or suggest an alternative product or a reputable source.