07 October 2020

Boost your home security with sliding door locks
While no security system is absolutely 100% effective – not even the most secure bank is 100% secure – there are measures you can take to make your home just that little more secure. In this case, we’re doing it with a pair of sliding door locks fitted to an ordinary swinging door.
One can fit ‘traditional’ door bolts, and there is nothing wrong with doing that, but the advantage of sliding door locks like the ones shown here are that they lock and require a key to release them. The ‘traditional’ door bolt is secure and very effective, but if an intruder can reach it, he or she can open it very easily.
This ease of opening is not necessarily a bad thing as the bolt is quickly and easily released in an emergency, or keeps a door securely shut when whatever behind the door is not valuable.
The downside, such as it is, of the lockable sliding door bolt is that you need the key to open it – so the key needs to be kept close for when needed, but not so close where an intruder can see it and reach it – or left in the lock, which negates the whole purpose of fitting the sliding door lock in the first place.

This illustration shows the parts of a ‘traditional’ door bolt, with the Keep/Catch shown separately for clarity. The door is closed and the bolt barrel pushed out and through the Keep/Catch and the Grip/Handle is turned through 90° once past the Slit/Middle keep. This then locks the bolt shut. As mentioned above, however, if an intruder can reach it, it is easily opened.
- We selected a set of two locks, which cost about R140 for the pair. They are supplied with four keys, all of which operate both locks. (A pair of brass or chromed ‘traditional’ bolts coast about R95 each – so our choice is a little cheaper.)

- First of all, check the reach of the person/s who will be opening and closing the door and select a height that is comfortable and convenient; there’s no point in placing it so high that no one can reach it. We fitted both locks to the same door – one towards the top of the door and the other about 600mm from the floor. Again, at a convenient height so that no one has to grovel about trying to open or close it. A height of 600mm from the floor is also about the height at which anyone trying to kick the door would impact it, so that’s a good place to brace the door.

- A good way to mark the height of each lock is with some masking tape, which will not only help you align the locking plate but also allows the position to be fine-tuned without marking the door jamb.

- A quick check with the locking plate confirmed that the door shuts absolutely flush with the jamb – important to know when fitting the plate and ensuring it is positioned correctly.

- With the lock body held on the door jamb and the barrel centred in the locking plate hole, a second piece of tape is used to mark the plate’s position very clearly. The plate is fixed in position with two screws – we used 40mm screws rather than the screws supplied with the locks as this enhances their resistance to being broken out of the door jamb… there’s more ‘screw length’ driven into the jamb, which means more wood is keeping the plate in place.

- With the plate secured, it’s a simple task to fit the lock body.

- You can recess the plate if you wish, but in this case the space between the edge of the door and the jamb was very tight anyway, so we simply sanded out a recess in the edge of the door.

- We then touched up the sanded section with mahogany varnish to match the door.

- The completed installation of the top lock; the lower one was fitted in exactly the same fashion.
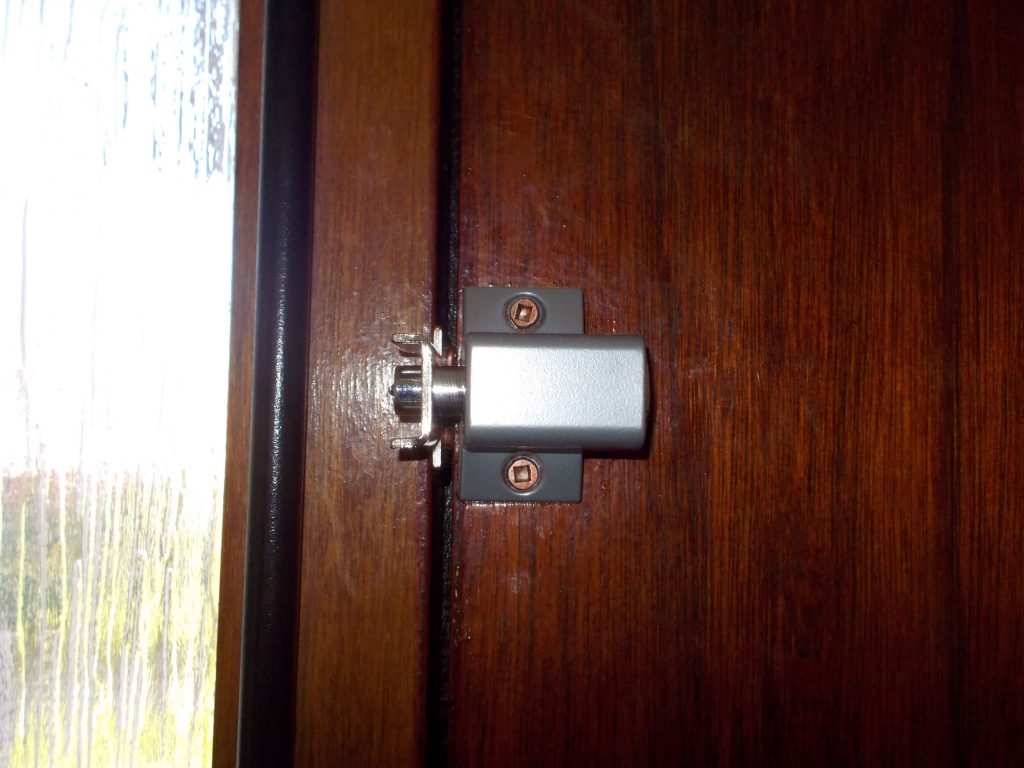
- The locks are released when the key is turned through 90°. This installation is a quick and economical way in which to enhance your home’s security.

Hint:
Instead of using a brush for small jobs like the touch-up required for this fitting this, why not simply use a clothes-peg to hold a small section of sponge (used as packing for a bottle of pills) to apply the finish and then simply discard it. Job done – and no brush cleaning required!