LnRiLWdhbGxlcnkgdWx7bGlzdC1zdHlsZTpub25lO21hcmdpbjowIDAgMS41ZW0gMDtwYWRkaW5nOjB9LnRiLWdhbGxlcnlfX2NlbGx7bWFyZ2luOjAgIWltcG9ydGFudDtwb3NpdGlvbjpyZWxhdGl2ZX0udGItZ2FsbGVyeS0tZ3JpZHtkaXNwbGF5OmdyaWQ7Z3JpZC1hdXRvLXJvd3M6YXV0byAhaW1wb3J0YW50fS50Yi1nYWxsZXJ5LS1ncmlkOm5vdCgudGItZ2FsbGVyeS0tZ3JpZC0tbm9jcm9wKSAudGItYnJpY2tfX2NvbnRlbnR7aGVpZ2h0OjEwMCU7cG9zaXRpb246YWJzb2x1dGU7dG9wOjB9LnRiLWdhbGxlcnktLWdyaWQ6bm90KC50Yi1nYWxsZXJ5LS1ncmlkLS1ub2Nyb3ApIC50Yi1nYWxsZXJ5X19jZWxse2dyaWQtcm93LWVuZDp1bnNldCAhaW1wb3J0YW50O3Bvc2l0aW9uOnJlbGF0aXZlfS50Yi1nYWxsZXJ5LS1ncmlkOm5vdCgudGItZ2FsbGVyeS0tZ3JpZC0tbm9jcm9wKSAudGItZ2FsbGVyeV9fY2VsbDo6YmVmb3Jle2NvbnRlbnQ6IiI7ZGlzcGxheTppbmxpbmUtYmxvY2s7cGFkZGluZy1ib3R0b206MTAwJX0udGItZ2FsbGVyeS0tZ3JpZDpub3QoLnRiLWdhbGxlcnktLWdyaWQtLW5vY3JvcCkgLnRiLWdhbGxlcnlfX2NlbGw6Om1hcmtlcntjb250ZW50OiIifS50Yi1nYWxsZXJ5LS1ncmlkOm5vdCgudGItZ2FsbGVyeS0tZ3JpZC0tbm9jcm9wKSBpbWd7d2lkdGg6MTAwJTtoZWlnaHQ6MTAwJTstby1vYmplY3QtZml0OmNvdmVyO29iamVjdC1maXQ6Y292ZXJ9LnRiLWdhbGxlcnktLWdyaWQtLW5vY3JvcCBpbWd7aGVpZ2h0OmF1dG8gIWltcG9ydGFudDt3aWR0aDphdXRvICFpbXBvcnRhbnR9LnRiLWdhbGxlcnktLWdyaWQtLW5vY3JvcCAudGItZ2FsbGVyeV9fY2VsbHthbGlnbi1zZWxmOmVuZH0udGItZ2FsbGVyeS0tZ3JpZC0tbm9jcm9wIC50Yi1icmlja19fY29udGVudHtoZWlnaHQ6MTAwJX0udGItZ2FsbGVyeS0tY29sbGFnZXtkaXNwbGF5OmdyaWQ7Z3JpZC10ZW1wbGF0ZS1jb2x1bW5zOnJlcGVhdCgxMiwgMWZyKX0udGItZ2FsbGVyeS0tY29sbGFnZSAudGItYnJpY2tfX2NvbnRlbnR7aGVpZ2h0OjEwMCV9LnRiLWdhbGxlcnktLWNvbGxhZ2UgaW1ne2hlaWdodDoxMDAlICFpbXBvcnRhbnR9LnRiLWdhbGxlcnktLW1hc29ucnl7ZGlzcGxheTpncmlkO2dyaWQtcm93LWdhcDowO2dyaWQtYXV0by1yb3dzOjFweDtvcGFjaXR5OjB9LnRiLWdhbGxlcnktLW1hc29ucnkgLnRiLWJyaWNrX19jb250ZW50e3Bvc2l0aW9uOnJlbGF0aXZlfS50Yi1nYWxsZXJ5LS1tYXNvbnJ5IC50Yi1icmlja19fY29udGVudCBpbWcsLnRiLWdhbGxlcnktLW1hc29ucnkgLnRiLWJyaWNrX19jb250ZW50IGlmcmFtZSwudGItZ2FsbGVyeS0tbWFzb25yeSAudGItYnJpY2tfX2NvbnRlbnQgdmlkZW97LW8tb2JqZWN0LWZpdDpjb3ZlcjtvYmplY3QtZml0OmNvdmVyO3dpZHRoOjEwMCUgIWltcG9ydGFudDtkaXNwbGF5OmJsb2NrfS50Yi1nYWxsZXJ5X19jYXB0aW9ue3Bvc2l0aW9uOmFic29sdXRlO2JvdHRvbTowO3dpZHRoOjEwMCU7YmFja2dyb3VuZDpyZ2JhKDI1NSwyNTUsMjU1LDAuNik7cGFkZGluZzo1cHggMnB4O3RleHQtYWxpZ246Y2VudGVyO2NvbG9yOiMzMzN9LnRiLWdhbGxlcnlfX2NhcHRpb246ZW1wdHl7YmFja2dyb3VuZDp0cmFuc3BhcmVudCAhaW1wb3J0YW50fS50Yi1nYWxsZXJ5IC50Yi1icmlja19fY29udGVudCBmaWd1cmV7aGVpZ2h0OjEwMCV9LnRiLWdhbGxlcnkgaW1ne3dpZHRoOjEwMCU7aGVpZ2h0OjEwMCU7LW8tb2JqZWN0LWZpdDpjb3ZlcjtvYmplY3QtZml0OmNvdmVyO3ZlcnRpY2FsLWFsaWduOmJvdHRvbX0jbGVmdC1hcmVhIHVsLnRiLWdhbGxlcnl7bGlzdC1zdHlsZS10eXBlOm5vbmU7cGFkZGluZzowfSAudGItZ2FsbGVyeVtkYXRhLXRvb2xzZXQtYmxvY2tzLWdhbGxlcnk9IjRkNTMyNDlkZDEyMjJlMmJjZTUxMWJiYTIyNzhjNGZiIl0gLnRiLWdhbGxlcnktLWdyaWQgeyBncmlkLXRlbXBsYXRlLWNvbHVtbnM6IG1pbm1heCgwLCAxZnIpIG1pbm1heCgwLCAxZnIpIG1pbm1heCgwLCAxZnIpIG1pbm1heCgwLCAxZnIpIG1pbm1heCgwLCAxZnIpO2dyaWQtcm93LWdhcDogMTVweDtncmlkLWNvbHVtbi1nYXA6IDE1cHg7IH0gLnRiLWdhbGxlcnkgdWx7bGlzdC1zdHlsZTpub25lO21hcmdpbjowIDAgMS41ZW0gMDtwYWRkaW5nOjB9LnRiLWdhbGxlcnlfX2NlbGx7bWFyZ2luOjAgIWltcG9ydGFudDtwb3NpdGlvbjpyZWxhdGl2ZX0udGItZ2FsbGVyeS0tZ3JpZHtkaXNwbGF5OmdyaWQ7Z3JpZC1hdXRvLXJvd3M6YXV0byAhaW1wb3J0YW50fS50Yi1nYWxsZXJ5LS1ncmlkOm5vdCgudGItZ2FsbGVyeS0tZ3JpZC0tbm9jcm9wKSAudGItYnJpY2tfX2NvbnRlbnR7aGVpZ2h0OjEwMCU7cG9zaXRpb246YWJzb2x1dGU7dG9wOjB9LnRiLWdhbGxlcnktLWdyaWQ6bm90KC50Yi1nYWxsZXJ5LS1ncmlkLS1ub2Nyb3ApIC50Yi1nYWxsZXJ5X19jZWxse2dyaWQtcm93LWVuZDp1bnNldCAhaW1wb3J0YW50O3Bvc2l0aW9uOnJlbGF0aXZlfS50Yi1nYWxsZXJ5LS1ncmlkOm5vdCgudGItZ2FsbGVyeS0tZ3JpZC0tbm9jcm9wKSAudGItZ2FsbGVyeV9fY2VsbDo6YmVmb3Jle2NvbnRlbnQ6IiI7ZGlzcGxheTppbmxpbmUtYmxvY2s7cGFkZGluZy1ib3R0b206MTAwJX0udGItZ2FsbGVyeS0tZ3JpZDpub3QoLnRiLWdhbGxlcnktLWdyaWQtLW5vY3JvcCkgLnRiLWdhbGxlcnlfX2NlbGw6Om1hcmtlcntjb250ZW50OiIifS50Yi1nYWxsZXJ5LS1ncmlkOm5vdCgudGItZ2FsbGVyeS0tZ3JpZC0tbm9jcm9wKSBpbWd7d2lkdGg6MTAwJTtoZWlnaHQ6MTAwJTstby1vYmplY3QtZml0OmNvdmVyO29iamVjdC1maXQ6Y292ZXJ9LnRiLWdhbGxlcnktLWdyaWQtLW5vY3JvcCBpbWd7aGVpZ2h0OmF1dG8gIWltcG9ydGFudDt3aWR0aDphdXRvICFpbXBvcnRhbnR9LnRiLWdhbGxlcnktLWdyaWQtLW5vY3JvcCAudGItZ2FsbGVyeV9fY2VsbHthbGlnbi1zZWxmOmVuZH0udGItZ2FsbGVyeS0tZ3JpZC0tbm9jcm9wIC50Yi1icmlja19fY29udGVudHtoZWlnaHQ6MTAwJX0udGItZ2FsbGVyeS0tY29sbGFnZXtkaXNwbGF5OmdyaWQ7Z3JpZC10ZW1wbGF0ZS1jb2x1bW5zOnJlcGVhdCgxMiwgMWZyKX0udGItZ2FsbGVyeS0tY29sbGFnZSAudGItYnJpY2tfX2NvbnRlbnR7aGVpZ2h0OjEwMCV9LnRiLWdhbGxlcnktLWNvbGxhZ2UgaW1ne2hlaWdodDoxMDAlICFpbXBvcnRhbnR9LnRiLWdhbGxlcnktLW1hc29ucnl7ZGlzcGxheTpncmlkO2dyaWQtcm93LWdhcDowO2dyaWQtYXV0by1yb3dzOjFweDtvcGFjaXR5OjB9LnRiLWdhbGxlcnktLW1hc29ucnkgLnRiLWJyaWNrX19jb250ZW50e3Bvc2l0aW9uOnJlbGF0aXZlfS50Yi1nYWxsZXJ5LS1tYXNvbnJ5IC50Yi1icmlja19fY29udGVudCBpbWcsLnRiLWdhbGxlcnktLW1hc29ucnkgLnRiLWJyaWNrX19jb250ZW50IGlmcmFtZSwudGItZ2FsbGVyeS0tbWFzb25yeSAudGItYnJpY2tfX2NvbnRlbnQgdmlkZW97LW8tb2JqZWN0LWZpdDpjb3ZlcjtvYmplY3QtZml0OmNvdmVyO3dpZHRoOjEwMCUgIWltcG9ydGFudDtkaXNwbGF5OmJsb2NrfS50Yi1nYWxsZXJ5X19jYXB0aW9ue3Bvc2l0aW9uOmFic29sdXRlO2JvdHRvbTowO3dpZHRoOjEwMCU7YmFja2dyb3VuZDpyZ2JhKDI1NSwyNTUsMjU1LDAuNik7cGFkZGluZzo1cHggMnB4O3RleHQtYWxpZ246Y2VudGVyO2NvbG9yOiMzMzN9LnRiLWdhbGxlcnlfX2NhcHRpb246ZW1wdHl7YmFja2dyb3VuZDp0cmFuc3BhcmVudCAhaW1wb3J0YW50fS50Yi1nYWxsZXJ5IC50Yi1icmlja19fY29udGVudCBmaWd1cmV7aGVpZ2h0OjEwMCV9LnRiLWdhbGxlcnkgaW1ne3dpZHRoOjEwMCU7aGVpZ2h0OjEwMCU7LW8tb2JqZWN0LWZpdDpjb3ZlcjtvYmplY3QtZml0OmNvdmVyO3ZlcnRpY2FsLWFsaWduOmJvdHRvbX0jbGVmdC1hcmVhIHVsLnRiLWdhbGxlcnl7bGlzdC1zdHlsZS10eXBlOm5vbmU7cGFkZGluZzowfSAudGItZ2FsbGVyeVtkYXRhLXRvb2xzZXQtYmxvY2tzLWdhbGxlcnk9IjMxYmExYzU1Zjk3ZmZlODgyOTExMTRlODdjNzZlZDE5Il0gLnRiLWdhbGxlcnktLWdyaWQgeyBncmlkLXRlbXBsYXRlLWNvbHVtbnM6IG1pbm1heCgwLCAxZnIpIG1pbm1heCgwLCAxZnIpIG1pbm1heCgwLCAxZnIpIG1pbm1heCgwLCAxZnIpIG1pbm1heCgwLCAxZnIpO2dyaWQtcm93LWdhcDogMTVweDtncmlkLWNvbHVtbi1nYXA6IDE1cHg7IH0gLnRiLWdhbGxlcnkgdWx7bGlzdC1zdHlsZTpub25lO21hcmdpbjowIDAgMS41ZW0gMDtwYWRkaW5nOjB9LnRiLWdhbGxlcnlfX2NlbGx7bWFyZ2luOjAgIWltcG9ydGFudDtwb3NpdGlvbjpyZWxhdGl2ZX0udGItZ2FsbGVyeS0tZ3JpZHtkaXNwbGF5OmdyaWQ7Z3JpZC1hdXRvLXJvd3M6YXV0byAhaW1wb3J0YW50fS50Yi1nYWxsZXJ5LS1ncmlkOm5vdCgudGItZ2FsbGVyeS0tZ3JpZC0tbm9jcm9wKSAudGItYnJpY2tfX2NvbnRlbnR7aGVpZ2h0OjEwMCU7cG9zaXRpb246YWJzb2x1dGU7dG9wOjB9LnRiLWdhbGxlcnktLWdyaWQ6bm90KC50Yi1nYWxsZXJ5LS1ncmlkLS1ub2Nyb3ApIC50Yi1nYWxsZXJ5X19jZWxse2dyaWQtcm93LWVuZDp1bnNldCAhaW1wb3J0YW50O3Bvc2l0aW9uOnJlbGF0aXZlfS50Yi1nYWxsZXJ5LS1ncmlkOm5vdCgudGItZ2FsbGVyeS0tZ3JpZC0tbm9jcm9wKSAudGItZ2FsbGVyeV9fY2VsbDo6YmVmb3Jle2NvbnRlbnQ6IiI7ZGlzcGxheTppbmxpbmUtYmxvY2s7cGFkZGluZy1ib3R0b206MTAwJX0udGItZ2FsbGVyeS0tZ3JpZDpub3QoLnRiLWdhbGxlcnktLWdyaWQtLW5vY3JvcCkgLnRiLWdhbGxlcnlfX2NlbGw6Om1hcmtlcntjb250ZW50OiIifS50Yi1nYWxsZXJ5LS1ncmlkOm5vdCgudGItZ2FsbGVyeS0tZ3JpZC0tbm9jcm9wKSBpbWd7d2lkdGg6MTAwJTtoZWlnaHQ6MTAwJTstby1vYmplY3QtZml0OmNvdmVyO29iamVjdC1maXQ6Y292ZXJ9LnRiLWdhbGxlcnktLWdyaWQtLW5vY3JvcCBpbWd7aGVpZ2h0OmF1dG8gIWltcG9ydGFudDt3aWR0aDphdXRvICFpbXBvcnRhbnR9LnRiLWdhbGxlcnktLWdyaWQtLW5vY3JvcCAudGItZ2FsbGVyeV9fY2VsbHthbGlnbi1zZWxmOmVuZH0udGItZ2FsbGVyeS0tZ3JpZC0tbm9jcm9wIC50Yi1icmlja19fY29udGVudHtoZWlnaHQ6MTAwJX0udGItZ2FsbGVyeS0tY29sbGFnZXtkaXNwbGF5OmdyaWQ7Z3JpZC10ZW1wbGF0ZS1jb2x1bW5zOnJlcGVhdCgxMiwgMWZyKX0udGItZ2FsbGVyeS0tY29sbGFnZSAudGItYnJpY2tfX2NvbnRlbnR7aGVpZ2h0OjEwMCV9LnRiLWdhbGxlcnktLWNvbGxhZ2UgaW1ne2hlaWdodDoxMDAlICFpbXBvcnRhbnR9LnRiLWdhbGxlcnktLW1hc29ucnl7ZGlzcGxheTpncmlkO2dyaWQtcm93LWdhcDowO2dyaWQtYXV0by1yb3dzOjFweDtvcGFjaXR5OjB9LnRiLWdhbGxlcnktLW1hc29ucnkgLnRiLWJyaWNrX19jb250ZW50e3Bvc2l0aW9uOnJlbGF0aXZlfS50Yi1nYWxsZXJ5LS1tYXNvbnJ5IC50Yi1icmlja19fY29udGVudCBpbWcsLnRiLWdhbGxlcnktLW1hc29ucnkgLnRiLWJyaWNrX19jb250ZW50IGlmcmFtZSwudGItZ2FsbGVyeS0tbWFzb25yeSAudGItYnJpY2tfX2NvbnRlbnQgdmlkZW97LW8tb2JqZWN0LWZpdDpjb3ZlcjtvYmplY3QtZml0OmNvdmVyO3dpZHRoOjEwMCUgIWltcG9ydGFudDtkaXNwbGF5OmJsb2NrfS50Yi1nYWxsZXJ5X19jYXB0aW9ue3Bvc2l0aW9uOmFic29sdXRlO2JvdHRvbTowO3dpZHRoOjEwMCU7YmFja2dyb3VuZDpyZ2JhKDI1NSwyNTUsMjU1LDAuNik7cGFkZGluZzo1cHggMnB4O3RleHQtYWxpZ246Y2VudGVyO2NvbG9yOiMzMzN9LnRiLWdhbGxlcnlfX2NhcHRpb246ZW1wdHl7YmFja2dyb3VuZDp0cmFuc3BhcmVudCAhaW1wb3J0YW50fS50Yi1nYWxsZXJ5IC50Yi1icmlja19fY29udGVudCBmaWd1cmV7aGVpZ2h0OjEwMCV9LnRiLWdhbGxlcnkgaW1ne3dpZHRoOjEwMCU7aGVpZ2h0OjEwMCU7LW8tb2JqZWN0LWZpdDpjb3ZlcjtvYmplY3QtZml0OmNvdmVyO3ZlcnRpY2FsLWFsaWduOmJvdHRvbX0jbGVmdC1hcmVhIHVsLnRiLWdhbGxlcnl7bGlzdC1zdHlsZS10eXBlOm5vbmU7cGFkZGluZzowfSAudGItZ2FsbGVyeVtkYXRhLXRvb2xzZXQtYmxvY2tzLWdhbGxlcnk9IjhjZTQ5ZWU4MGJkNGE0Y2YxZjU3ZjhkYjY3ODM4OWUxIl0gLnRiLWdhbGxlcnktLWdyaWQgeyBncmlkLXRlbXBsYXRlLWNvbHVtbnM6IG1pbm1heCgwLCAxZnIpIG1pbm1heCgwLCAxZnIpIG1pbm1heCgwLCAxZnIpIG1pbm1heCgwLCAxZnIpIG1pbm1heCgwLCAxZnIpO2dyaWQtcm93LWdhcDogMTVweDtncmlkLWNvbHVtbi1nYXA6IDE1cHg7IH0gLnRiLWdhbGxlcnkgdWx7bGlzdC1zdHlsZTpub25lO21hcmdpbjowIDAgMS41ZW0gMDtwYWRkaW5nOjB9LnRiLWdhbGxlcnlfX2NlbGx7bWFyZ2luOjAgIWltcG9ydGFudDtwb3NpdGlvbjpyZWxhdGl2ZX0udGItZ2FsbGVyeS0tZ3JpZHtkaXNwbGF5OmdyaWQ7Z3JpZC1hdXRvLXJvd3M6YXV0byAhaW1wb3J0YW50fS50Yi1nYWxsZXJ5LS1ncmlkOm5vdCgudGItZ2FsbGVyeS0tZ3JpZC0tbm9jcm9wKSAudGItYnJpY2tfX2NvbnRlbnR7aGVpZ2h0OjEwMCU7cG9zaXRpb246YWJzb2x1dGU7dG9wOjB9LnRiLWdhbGxlcnktLWdyaWQ6bm90KC50Yi1nYWxsZXJ5LS1ncmlkLS1ub2Nyb3ApIC50Yi1nYWxsZXJ5X19jZWxse2dyaWQtcm93LWVuZDp1bnNldCAhaW1wb3J0YW50O3Bvc2l0aW9uOnJlbGF0aXZlfS50Yi1nYWxsZXJ5LS1ncmlkOm5vdCgudGItZ2FsbGVyeS0tZ3JpZC0tbm9jcm9wKSAudGItZ2FsbGVyeV9fY2VsbDo6YmVmb3Jle2NvbnRlbnQ6IiI7ZGlzcGxheTppbmxpbmUtYmxvY2s7cGFkZGluZy1ib3R0b206MTAwJX0udGItZ2FsbGVyeS0tZ3JpZDpub3QoLnRiLWdhbGxlcnktLWdyaWQtLW5vY3JvcCkgLnRiLWdhbGxlcnlfX2NlbGw6Om1hcmtlcntjb250ZW50OiIifS50Yi1nYWxsZXJ5LS1ncmlkOm5vdCgudGItZ2FsbGVyeS0tZ3JpZC0tbm9jcm9wKSBpbWd7d2lkdGg6MTAwJTtoZWlnaHQ6MTAwJTstby1vYmplY3QtZml0OmNvdmVyO29iamVjdC1maXQ6Y292ZXJ9LnRiLWdhbGxlcnktLWdyaWQtLW5vY3JvcCBpbWd7aGVpZ2h0OmF1dG8gIWltcG9ydGFudDt3aWR0aDphdXRvICFpbXBvcnRhbnR9LnRiLWdhbGxlcnktLWdyaWQtLW5vY3JvcCAudGItZ2FsbGVyeV9fY2VsbHthbGlnbi1zZWxmOmVuZH0udGItZ2FsbGVyeS0tZ3JpZC0tbm9jcm9wIC50Yi1icmlja19fY29udGVudHtoZWlnaHQ6MTAwJX0udGItZ2FsbGVyeS0tY29sbGFnZXtkaXNwbGF5OmdyaWQ7Z3JpZC10ZW1wbGF0ZS1jb2x1bW5zOnJlcGVhdCgxMiwgMWZyKX0udGItZ2FsbGVyeS0tY29sbGFnZSAudGItYnJpY2tfX2NvbnRlbnR7aGVpZ2h0OjEwMCV9LnRiLWdhbGxlcnktLWNvbGxhZ2UgaW1ne2hlaWdodDoxMDAlICFpbXBvcnRhbnR9LnRiLWdhbGxlcnktLW1hc29ucnl7ZGlzcGxheTpncmlkO2dyaWQtcm93LWdhcDowO2dyaWQtYXV0by1yb3dzOjFweDtvcGFjaXR5OjB9LnRiLWdhbGxlcnktLW1hc29ucnkgLnRiLWJyaWNrX19jb250ZW50e3Bvc2l0aW9uOnJlbGF0aXZlfS50Yi1nYWxsZXJ5LS1tYXNvbnJ5IC50Yi1icmlja19fY29udGVudCBpbWcsLnRiLWdhbGxlcnktLW1hc29ucnkgLnRiLWJyaWNrX19jb250ZW50IGlmcmFtZSwudGItZ2FsbGVyeS0tbWFzb25yeSAudGItYnJpY2tfX2NvbnRlbnQgdmlkZW97LW8tb2JqZWN0LWZpdDpjb3ZlcjtvYmplY3QtZml0OmNvdmVyO3dpZHRoOjEwMCUgIWltcG9ydGFudDtkaXNwbGF5OmJsb2NrfS50Yi1nYWxsZXJ5X19jYXB0aW9ue3Bvc2l0aW9uOmFic29sdXRlO2JvdHRvbTowO3dpZHRoOjEwMCU7YmFja2dyb3VuZDpyZ2JhKDI1NSwyNTUsMjU1LDAuNik7cGFkZGluZzo1cHggMnB4O3RleHQtYWxpZ246Y2VudGVyO2NvbG9yOiMzMzN9LnRiLWdhbGxlcnlfX2NhcHRpb246ZW1wdHl7YmFja2dyb3VuZDp0cmFuc3BhcmVudCAhaW1wb3J0YW50fS50Yi1nYWxsZXJ5IC50Yi1icmlja19fY29udGVudCBmaWd1cmV7aGVpZ2h0OjEwMCV9LnRiLWdhbGxlcnkgaW1ne3dpZHRoOjEwMCU7aGVpZ2h0OjEwMCU7LW8tb2JqZWN0LWZpdDpjb3ZlcjtvYmplY3QtZml0OmNvdmVyO3ZlcnRpY2FsLWFsaWduOmJvdHRvbX0jbGVmdC1hcmVhIHVsLnRiLWdhbGxlcnl7bGlzdC1zdHlsZS10eXBlOm5vbmU7cGFkZGluZzowfSAudGItZ2FsbGVyeVtkYXRhLXRvb2xzZXQtYmxvY2tzLWdhbGxlcnk9Ijc0YWM4MTIzMDEzYzY1ZjUxZjViZTZjZWQxNzI3ODk5Il0gLnRiLWdhbGxlcnktLWdyaWQgeyBncmlkLXRlbXBsYXRlLWNvbHVtbnM6IG1pbm1heCgwLCAxZnIpIG1pbm1heCgwLCAxZnIpIG1pbm1heCgwLCAxZnIpIG1pbm1heCgwLCAxZnIpIG1pbm1heCgwLCAxZnIpO2dyaWQtcm93LWdhcDogMTVweDtncmlkLWNvbHVtbi1nYXA6IDE1cHg7IH0gLnRiLWdhbGxlcnkgdWx7bGlzdC1zdHlsZTpub25lO21hcmdpbjowIDAgMS41ZW0gMDtwYWRkaW5nOjB9LnRiLWdhbGxlcnlfX2NlbGx7bWFyZ2luOjAgIWltcG9ydGFudDtwb3NpdGlvbjpyZWxhdGl2ZX0udGItZ2FsbGVyeS0tZ3JpZHtkaXNwbGF5OmdyaWQ7Z3JpZC1hdXRvLXJvd3M6YXV0byAhaW1wb3J0YW50fS50Yi1nYWxsZXJ5LS1ncmlkOm5vdCgudGItZ2FsbGVyeS0tZ3JpZC0tbm9jcm9wKSAudGItYnJpY2tfX2NvbnRlbnR7aGVpZ2h0OjEwMCU7cG9zaXRpb246YWJzb2x1dGU7dG9wOjB9LnRiLWdhbGxlcnktLWdyaWQ6bm90KC50Yi1nYWxsZXJ5LS1ncmlkLS1ub2Nyb3ApIC50Yi1nYWxsZXJ5X19jZWxse2dyaWQtcm93LWVuZDp1bnNldCAhaW1wb3J0YW50O3Bvc2l0aW9uOnJlbGF0aXZlfS50Yi1nYWxsZXJ5LS1ncmlkOm5vdCgudGItZ2FsbGVyeS0tZ3JpZC0tbm9jcm9wKSAudGItZ2FsbGVyeV9fY2VsbDo6YmVmb3Jle2NvbnRlbnQ6IiI7ZGlzcGxheTppbmxpbmUtYmxvY2s7cGFkZGluZy1ib3R0b206MTAwJX0udGItZ2FsbGVyeS0tZ3JpZDpub3QoLnRiLWdhbGxlcnktLWdyaWQtLW5vY3JvcCkgLnRiLWdhbGxlcnlfX2NlbGw6Om1hcmtlcntjb250ZW50OiIifS50Yi1nYWxsZXJ5LS1ncmlkOm5vdCgudGItZ2FsbGVyeS0tZ3JpZC0tbm9jcm9wKSBpbWd7d2lkdGg6MTAwJTtoZWlnaHQ6MTAwJTstby1vYmplY3QtZml0OmNvdmVyO29iamVjdC1maXQ6Y292ZXJ9LnRiLWdhbGxlcnktLWdyaWQtLW5vY3JvcCBpbWd7aGVpZ2h0OmF1dG8gIWltcG9ydGFudDt3aWR0aDphdXRvICFpbXBvcnRhbnR9LnRiLWdhbGxlcnktLWdyaWQtLW5vY3JvcCAudGItZ2FsbGVyeV9fY2VsbHthbGlnbi1zZWxmOmVuZH0udGItZ2FsbGVyeS0tZ3JpZC0tbm9jcm9wIC50Yi1icmlja19fY29udGVudHtoZWlnaHQ6MTAwJX0udGItZ2FsbGVyeS0tY29sbGFnZXtkaXNwbGF5OmdyaWQ7Z3JpZC10ZW1wbGF0ZS1jb2x1bW5zOnJlcGVhdCgxMiwgMWZyKX0udGItZ2FsbGVyeS0tY29sbGFnZSAudGItYnJpY2tfX2NvbnRlbnR7aGVpZ2h0OjEwMCV9LnRiLWdhbGxlcnktLWNvbGxhZ2UgaW1ne2hlaWdodDoxMDAlICFpbXBvcnRhbnR9LnRiLWdhbGxlcnktLW1hc29ucnl7ZGlzcGxheTpncmlkO2dyaWQtcm93LWdhcDowO2dyaWQtYXV0by1yb3dzOjFweDtvcGFjaXR5OjB9LnRiLWdhbGxlcnktLW1hc29ucnkgLnRiLWJyaWNrX19jb250ZW50e3Bvc2l0aW9uOnJlbGF0aXZlfS50Yi1nYWxsZXJ5LS1tYXNvbnJ5IC50Yi1icmlja19fY29udGVudCBpbWcsLnRiLWdhbGxlcnktLW1hc29ucnkgLnRiLWJyaWNrX19jb250ZW50IGlmcmFtZSwudGItZ2FsbGVyeS0tbWFzb25yeSAudGItYnJpY2tfX2NvbnRlbnQgdmlkZW97LW8tb2JqZWN0LWZpdDpjb3ZlcjtvYmplY3QtZml0OmNvdmVyO3dpZHRoOjEwMCUgIWltcG9ydGFudDtkaXNwbGF5OmJsb2NrfS50Yi1nYWxsZXJ5X19jYXB0aW9ue3Bvc2l0aW9uOmFic29sdXRlO2JvdHRvbTowO3dpZHRoOjEwMCU7YmFja2dyb3VuZDpyZ2JhKDI1NSwyNTUsMjU1LDAuNik7cGFkZGluZzo1cHggMnB4O3RleHQtYWxpZ246Y2VudGVyO2NvbG9yOiMzMzN9LnRiLWdhbGxlcnlfX2NhcHRpb246ZW1wdHl7YmFja2dyb3VuZDp0cmFuc3BhcmVudCAhaW1wb3J0YW50fS50Yi1nYWxsZXJ5IC50Yi1icmlja19fY29udGVudCBmaWd1cmV7aGVpZ2h0OjEwMCV9LnRiLWdhbGxlcnkgaW1ne3dpZHRoOjEwMCU7aGVpZ2h0OjEwMCU7LW8tb2JqZWN0LWZpdDpjb3ZlcjtvYmplY3QtZml0OmNvdmVyO3ZlcnRpY2FsLWFsaWduOmJvdHRvbX0jbGVmdC1hcmVhIHVsLnRiLWdhbGxlcnl7bGlzdC1zdHlsZS10eXBlOm5vbmU7cGFkZGluZzowfSAudGItZ2FsbGVyeVtkYXRhLXRvb2xzZXQtYmxvY2tzLWdhbGxlcnk9IjE5OTViOWM3MzM4NGQ3MjE5NDFiNDZhMGJhZjkyYzQ0Il0gLnRiLWdhbGxlcnktLWdyaWQgeyBncmlkLXRlbXBsYXRlLWNvbHVtbnM6IG1pbm1heCgwLCAxZnIpIG1pbm1heCgwLCAxZnIpIG1pbm1heCgwLCAxZnIpIG1pbm1heCgwLCAxZnIpIG1pbm1heCgwLCAxZnIpO2dyaWQtcm93LWdhcDogMTVweDtncmlkLWNvbHVtbi1nYXA6IDE1cHg7IH0gLnRiLWdhbGxlcnkgdWx7bGlzdC1zdHlsZTpub25lO21hcmdpbjowIDAgMS41ZW0gMDtwYWRkaW5nOjB9LnRiLWdhbGxlcnlfX2NlbGx7bWFyZ2luOjAgIWltcG9ydGFudDtwb3NpdGlvbjpyZWxhdGl2ZX0udGItZ2FsbGVyeS0tZ3JpZHtkaXNwbGF5OmdyaWQ7Z3JpZC1hdXRvLXJvd3M6YXV0byAhaW1wb3J0YW50fS50Yi1nYWxsZXJ5LS1ncmlkOm5vdCgudGItZ2FsbGVyeS0tZ3JpZC0tbm9jcm9wKSAudGItYnJpY2tfX2NvbnRlbnR7aGVpZ2h0OjEwMCU7cG9zaXRpb246YWJzb2x1dGU7dG9wOjB9LnRiLWdhbGxlcnktLWdyaWQ6bm90KC50Yi1nYWxsZXJ5LS1ncmlkLS1ub2Nyb3ApIC50Yi1nYWxsZXJ5X19jZWxse2dyaWQtcm93LWVuZDp1bnNldCAhaW1wb3J0YW50O3Bvc2l0aW9uOnJlbGF0aXZlfS50Yi1nYWxsZXJ5LS1ncmlkOm5vdCgudGItZ2FsbGVyeS0tZ3JpZC0tbm9jcm9wKSAudGItZ2FsbGVyeV9fY2VsbDo6YmVmb3Jle2NvbnRlbnQ6IiI7ZGlzcGxheTppbmxpbmUtYmxvY2s7cGFkZGluZy1ib3R0b206MTAwJX0udGItZ2FsbGVyeS0tZ3JpZDpub3QoLnRiLWdhbGxlcnktLWdyaWQtLW5vY3JvcCkgLnRiLWdhbGxlcnlfX2NlbGw6Om1hcmtlcntjb250ZW50OiIifS50Yi1nYWxsZXJ5LS1ncmlkOm5vdCgudGItZ2FsbGVyeS0tZ3JpZC0tbm9jcm9wKSBpbWd7d2lkdGg6MTAwJTtoZWlnaHQ6MTAwJTstby1vYmplY3QtZml0OmNvdmVyO29iamVjdC1maXQ6Y292ZXJ9LnRiLWdhbGxlcnktLWdyaWQtLW5vY3JvcCBpbWd7aGVpZ2h0OmF1dG8gIWltcG9ydGFudDt3aWR0aDphdXRvICFpbXBvcnRhbnR9LnRiLWdhbGxlcnktLWdyaWQtLW5vY3JvcCAudGItZ2FsbGVyeV9fY2VsbHthbGlnbi1zZWxmOmVuZH0udGItZ2FsbGVyeS0tZ3JpZC0tbm9jcm9wIC50Yi1icmlja19fY29udGVudHtoZWlnaHQ6MTAwJX0udGItZ2FsbGVyeS0tY29sbGFnZXtkaXNwbGF5OmdyaWQ7Z3JpZC10ZW1wbGF0ZS1jb2x1bW5zOnJlcGVhdCgxMiwgMWZyKX0udGItZ2FsbGVyeS0tY29sbGFnZSAudGItYnJpY2tfX2NvbnRlbnR7aGVpZ2h0OjEwMCV9LnRiLWdhbGxlcnktLWNvbGxhZ2UgaW1ne2hlaWdodDoxMDAlICFpbXBvcnRhbnR9LnRiLWdhbGxlcnktLW1hc29ucnl7ZGlzcGxheTpncmlkO2dyaWQtcm93LWdhcDowO2dyaWQtYXV0by1yb3dzOjFweDtvcGFjaXR5OjB9LnRiLWdhbGxlcnktLW1hc29ucnkgLnRiLWJyaWNrX19jb250ZW50e3Bvc2l0aW9uOnJlbGF0aXZlfS50Yi1nYWxsZXJ5LS1tYXNvbnJ5IC50Yi1icmlja19fY29udGVudCBpbWcsLnRiLWdhbGxlcnktLW1hc29ucnkgLnRiLWJyaWNrX19jb250ZW50IGlmcmFtZSwudGItZ2FsbGVyeS0tbWFzb25yeSAudGItYnJpY2tfX2NvbnRlbnQgdmlkZW97LW8tb2JqZWN0LWZpdDpjb3ZlcjtvYmplY3QtZml0OmNvdmVyO3dpZHRoOjEwMCUgIWltcG9ydGFudDtkaXNwbGF5OmJsb2NrfS50Yi1nYWxsZXJ5X19jYXB0aW9ue3Bvc2l0aW9uOmFic29sdXRlO2JvdHRvbTowO3dpZHRoOjEwMCU7YmFja2dyb3VuZDpyZ2JhKDI1NSwyNTUsMjU1LDAuNik7cGFkZGluZzo1cHggMnB4O3RleHQtYWxpZ246Y2VudGVyO2NvbG9yOiMzMzN9LnRiLWdhbGxlcnlfX2NhcHRpb246ZW1wdHl7YmFja2dyb3VuZDp0cmFuc3BhcmVudCAhaW1wb3J0YW50fS50Yi1nYWxsZXJ5IC50Yi1icmlja19fY29udGVudCBmaWd1cmV7aGVpZ2h0OjEwMCV9LnRiLWdhbGxlcnkgaW1ne3dpZHRoOjEwMCU7aGVpZ2h0OjEwMCU7LW8tb2JqZWN0LWZpdDpjb3ZlcjtvYmplY3QtZml0OmNvdmVyO3ZlcnRpY2FsLWFsaWduOmJvdHRvbX0jbGVmdC1hcmVhIHVsLnRiLWdhbGxlcnl7bGlzdC1zdHlsZS10eXBlOm5vbmU7cGFkZGluZzowfSAudGItZ2FsbGVyeVtkYXRhLXRvb2xzZXQtYmxvY2tzLWdhbGxlcnk9IjcwOGVjMDFjYWZhMDJjYjRkZjJlYTI3NDNhNGM5Yjg3Il0gLnRiLWdhbGxlcnktLWdyaWQgeyBncmlkLXRlbXBsYXRlLWNvbHVtbnM6IG1pbm1heCgwLCAxZnIpIG1pbm1heCgwLCAxZnIpIG1pbm1heCgwLCAxZnIpIG1pbm1heCgwLCAxZnIpIG1pbm1heCgwLCAxZnIpO2dyaWQtcm93LWdhcDogMTVweDtncmlkLWNvbHVtbi1nYXA6IDE1cHg7IH0gQG1lZGlhIG9ubHkgc2NyZWVuIGFuZCAobWF4LXdpZHRoOiA3ODFweCkgeyAudGItZ2FsbGVyeSB1bHtsaXN0LXN0eWxlOm5vbmU7bWFyZ2luOjAgMCAxLjVlbSAwO3BhZGRpbmc6MH0udGItZ2FsbGVyeV9fY2VsbHttYXJnaW46MCAhaW1wb3J0YW50O3Bvc2l0aW9uOnJlbGF0aXZlfS50Yi1nYWxsZXJ5LS1ncmlke2Rpc3BsYXk6Z3JpZDtncmlkLWF1dG8tcm93czphdXRvICFpbXBvcnRhbnR9LnRiLWdhbGxlcnktLWdyaWQ6bm90KC50Yi1nYWxsZXJ5LS1ncmlkLS1ub2Nyb3ApIC50Yi1icmlja19fY29udGVudHtoZWlnaHQ6MTAwJTtwb3NpdGlvbjphYnNvbHV0ZTt0b3A6MH0udGItZ2FsbGVyeS0tZ3JpZDpub3QoLnRiLWdhbGxlcnktLWdyaWQtLW5vY3JvcCkgLnRiLWdhbGxlcnlfX2NlbGx7Z3JpZC1yb3ctZW5kOnVuc2V0ICFpbXBvcnRhbnQ7cG9zaXRpb246cmVsYXRpdmV9LnRiLWdhbGxlcnktLWdyaWQ6bm90KC50Yi1nYWxsZXJ5LS1ncmlkLS1ub2Nyb3ApIC50Yi1nYWxsZXJ5X19jZWxsOjpiZWZvcmV7Y29udGVudDoiIjtkaXNwbGF5OmlubGluZS1ibG9jaztwYWRkaW5nLWJvdHRvbToxMDAlfS50Yi1nYWxsZXJ5LS1ncmlkOm5vdCgudGItZ2FsbGVyeS0tZ3JpZC0tbm9jcm9wKSAudGItZ2FsbGVyeV9fY2VsbDo6bWFya2Vye2NvbnRlbnQ6IiJ9LnRiLWdhbGxlcnktLWdyaWQ6bm90KC50Yi1nYWxsZXJ5LS1ncmlkLS1ub2Nyb3ApIGltZ3t3aWR0aDoxMDAlO2hlaWdodDoxMDAlOy1vLW9iamVjdC1maXQ6Y292ZXI7b2JqZWN0LWZpdDpjb3Zlcn0udGItZ2FsbGVyeS0tZ3JpZC0tbm9jcm9wIGltZ3toZWlnaHQ6YXV0byAhaW1wb3J0YW50O3dpZHRoOmF1dG8gIWltcG9ydGFudH0udGItZ2FsbGVyeS0tZ3JpZC0tbm9jcm9wIC50Yi1nYWxsZXJ5X19jZWxse2FsaWduLXNlbGY6ZW5kfS50Yi1nYWxsZXJ5LS1ncmlkLS1ub2Nyb3AgLnRiLWJyaWNrX19jb250ZW50e2hlaWdodDoxMDAlfS50Yi1nYWxsZXJ5LS1jb2xsYWdle2Rpc3BsYXk6Z3JpZDtncmlkLXRlbXBsYXRlLWNvbHVtbnM6cmVwZWF0KDEyLCAxZnIpfS50Yi1nYWxsZXJ5LS1jb2xsYWdlIC50Yi1icmlja19fY29udGVudHtoZWlnaHQ6MTAwJX0udGItZ2FsbGVyeS0tY29sbGFnZSBpbWd7aGVpZ2h0OjEwMCUgIWltcG9ydGFudH0udGItZ2FsbGVyeS0tbWFzb25yeXtkaXNwbGF5OmdyaWQ7Z3JpZC1yb3ctZ2FwOjA7Z3JpZC1hdXRvLXJvd3M6MXB4O29wYWNpdHk6MH0udGItZ2FsbGVyeS0tbWFzb25yeSAudGItYnJpY2tfX2NvbnRlbnR7cG9zaXRpb246cmVsYXRpdmV9LnRiLWdhbGxlcnktLW1hc29ucnkgLnRiLWJyaWNrX19jb250ZW50IGltZywudGItZ2FsbGVyeS0tbWFzb25yeSAudGItYnJpY2tfX2NvbnRlbnQgaWZyYW1lLC50Yi1nYWxsZXJ5LS1tYXNvbnJ5IC50Yi1icmlja19fY29udGVudCB2aWRlb3stby1vYmplY3QtZml0OmNvdmVyO29iamVjdC1maXQ6Y292ZXI7d2lkdGg6MTAwJSAhaW1wb3J0YW50O2Rpc3BsYXk6YmxvY2t9LnRiLWdhbGxlcnlfX2NhcHRpb257cG9zaXRpb246YWJzb2x1dGU7Ym90dG9tOjA7d2lkdGg6MTAwJTtiYWNrZ3JvdW5kOnJnYmEoMjU1LDI1NSwyNTUsMC42KTtwYWRkaW5nOjVweCAycHg7dGV4dC1hbGlnbjpjZW50ZXI7Y29sb3I6IzMzM30udGItZ2FsbGVyeV9fY2FwdGlvbjplbXB0eXtiYWNrZ3JvdW5kOnRyYW5zcGFyZW50ICFpbXBvcnRhbnR9LnRiLWdhbGxlcnkgLnRiLWJyaWNrX19jb250ZW50IGZpZ3VyZXtoZWlnaHQ6MTAwJX0udGItZ2FsbGVyeSBpbWd7d2lkdGg6MTAwJTtoZWlnaHQ6MTAwJTstby1vYmplY3QtZml0OmNvdmVyO29iamVjdC1maXQ6Y292ZXI7dmVydGljYWwtYWxpZ246Ym90dG9tfSNsZWZ0LWFyZWEgdWwudGItZ2FsbGVyeXtsaXN0LXN0eWxlLXR5cGU6bm9uZTtwYWRkaW5nOjB9IC50Yi1nYWxsZXJ5W2RhdGEtdG9vbHNldC1ibG9ja3MtZ2FsbGVyeT0iNGQ1MzI0OWRkMTIyMmUyYmNlNTExYmJhMjI3OGM0ZmIiXSAudGItZ2FsbGVyeS0tZ3JpZCB7IGdyaWQtdGVtcGxhdGUtY29sdW1uczogbWlubWF4KDAsIDFmcikgbWlubWF4KDAsIDFmcikgbWlubWF4KDAsIDFmcik7Z3JpZC1yb3ctZ2FwOiAxMHB4O2dyaWQtY29sdW1uLWdhcDogMTBweDsgfSAudGItZ2FsbGVyeSB1bHtsaXN0LXN0eWxlOm5vbmU7bWFyZ2luOjAgMCAxLjVlbSAwO3BhZGRpbmc6MH0udGItZ2FsbGVyeV9fY2VsbHttYXJnaW46MCAhaW1wb3J0YW50O3Bvc2l0aW9uOnJlbGF0aXZlfS50Yi1nYWxsZXJ5LS1ncmlke2Rpc3BsYXk6Z3JpZDtncmlkLWF1dG8tcm93czphdXRvICFpbXBvcnRhbnR9LnRiLWdhbGxlcnktLWdyaWQ6bm90KC50Yi1nYWxsZXJ5LS1ncmlkLS1ub2Nyb3ApIC50Yi1icmlja19fY29udGVudHtoZWlnaHQ6MTAwJTtwb3NpdGlvbjphYnNvbHV0ZTt0b3A6MH0udGItZ2FsbGVyeS0tZ3JpZDpub3QoLnRiLWdhbGxlcnktLWdyaWQtLW5vY3JvcCkgLnRiLWdhbGxlcnlfX2NlbGx7Z3JpZC1yb3ctZW5kOnVuc2V0ICFpbXBvcnRhbnQ7cG9zaXRpb246cmVsYXRpdmV9LnRiLWdhbGxlcnktLWdyaWQ6bm90KC50Yi1nYWxsZXJ5LS1ncmlkLS1ub2Nyb3ApIC50Yi1nYWxsZXJ5X19jZWxsOjpiZWZvcmV7Y29udGVudDoiIjtkaXNwbGF5OmlubGluZS1ibG9jaztwYWRkaW5nLWJvdHRvbToxMDAlfS50Yi1nYWxsZXJ5LS1ncmlkOm5vdCgudGItZ2FsbGVyeS0tZ3JpZC0tbm9jcm9wKSAudGItZ2FsbGVyeV9fY2VsbDo6bWFya2Vye2NvbnRlbnQ6IiJ9LnRiLWdhbGxlcnktLWdyaWQ6bm90KC50Yi1nYWxsZXJ5LS1ncmlkLS1ub2Nyb3ApIGltZ3t3aWR0aDoxMDAlO2hlaWdodDoxMDAlOy1vLW9iamVjdC1maXQ6Y292ZXI7b2JqZWN0LWZpdDpjb3Zlcn0udGItZ2FsbGVyeS0tZ3JpZC0tbm9jcm9wIGltZ3toZWlnaHQ6YXV0byAhaW1wb3J0YW50O3dpZHRoOmF1dG8gIWltcG9ydGFudH0udGItZ2FsbGVyeS0tZ3JpZC0tbm9jcm9wIC50Yi1nYWxsZXJ5X19jZWxse2FsaWduLXNlbGY6ZW5kfS50Yi1nYWxsZXJ5LS1ncmlkLS1ub2Nyb3AgLnRiLWJyaWNrX19jb250ZW50e2hlaWdodDoxMDAlfS50Yi1nYWxsZXJ5LS1jb2xsYWdle2Rpc3BsYXk6Z3JpZDtncmlkLXRlbXBsYXRlLWNvbHVtbnM6cmVwZWF0KDEyLCAxZnIpfS50Yi1nYWxsZXJ5LS1jb2xsYWdlIC50Yi1icmlja19fY29udGVudHtoZWlnaHQ6MTAwJX0udGItZ2FsbGVyeS0tY29sbGFnZSBpbWd7aGVpZ2h0OjEwMCUgIWltcG9ydGFudH0udGItZ2FsbGVyeS0tbWFzb25yeXtkaXNwbGF5OmdyaWQ7Z3JpZC1yb3ctZ2FwOjA7Z3JpZC1hdXRvLXJvd3M6MXB4O29wYWNpdHk6MH0udGItZ2FsbGVyeS0tbWFzb25yeSAudGItYnJpY2tfX2NvbnRlbnR7cG9zaXRpb246cmVsYXRpdmV9LnRiLWdhbGxlcnktLW1hc29ucnkgLnRiLWJyaWNrX19jb250ZW50IGltZywudGItZ2FsbGVyeS0tbWFzb25yeSAudGItYnJpY2tfX2NvbnRlbnQgaWZyYW1lLC50Yi1nYWxsZXJ5LS1tYXNvbnJ5IC50Yi1icmlja19fY29udGVudCB2aWRlb3stby1vYmplY3QtZml0OmNvdmVyO29iamVjdC1maXQ6Y292ZXI7d2lkdGg6MTAwJSAhaW1wb3J0YW50O2Rpc3BsYXk6YmxvY2t9LnRiLWdhbGxlcnlfX2NhcHRpb257cG9zaXRpb246YWJzb2x1dGU7Ym90dG9tOjA7d2lkdGg6MTAwJTtiYWNrZ3JvdW5kOnJnYmEoMjU1LDI1NSwyNTUsMC42KTtwYWRkaW5nOjVweCAycHg7dGV4dC1hbGlnbjpjZW50ZXI7Y29sb3I6IzMzM30udGItZ2FsbGVyeV9fY2FwdGlvbjplbXB0eXtiYWNrZ3JvdW5kOnRyYW5zcGFyZW50ICFpbXBvcnRhbnR9LnRiLWdhbGxlcnkgLnRiLWJyaWNrX19jb250ZW50IGZpZ3VyZXtoZWlnaHQ6MTAwJX0udGItZ2FsbGVyeSBpbWd7d2lkdGg6MTAwJTtoZWlnaHQ6MTAwJTstby1vYmplY3QtZml0OmNvdmVyO29iamVjdC1maXQ6Y292ZXI7dmVydGljYWwtYWxpZ246Ym90dG9tfSNsZWZ0LWFyZWEgdWwudGItZ2FsbGVyeXtsaXN0LXN0eWxlLXR5cGU6bm9uZTtwYWRkaW5nOjB9IC50Yi1nYWxsZXJ5W2RhdGEtdG9vbHNldC1ibG9ja3MtZ2FsbGVyeT0iMzFiYTFjNTVmOTdmZmU4ODI5MTExNGU4N2M3NmVkMTkiXSAudGItZ2FsbGVyeS0tZ3JpZCB7IGdyaWQtdGVtcGxhdGUtY29sdW1uczogbWlubWF4KDAsIDFmcikgbWlubWF4KDAsIDFmcikgbWlubWF4KDAsIDFmcik7Z3JpZC1yb3ctZ2FwOiAxMHB4O2dyaWQtY29sdW1uLWdhcDogMTBweDsgfSAudGItZ2FsbGVyeSB1bHtsaXN0LXN0eWxlOm5vbmU7bWFyZ2luOjAgMCAxLjVlbSAwO3BhZGRpbmc6MH0udGItZ2FsbGVyeV9fY2VsbHttYXJnaW46MCAhaW1wb3J0YW50O3Bvc2l0aW9uOnJlbGF0aXZlfS50Yi1nYWxsZXJ5LS1ncmlke2Rpc3BsYXk6Z3JpZDtncmlkLWF1dG8tcm93czphdXRvICFpbXBvcnRhbnR9LnRiLWdhbGxlcnktLWdyaWQ6bm90KC50Yi1nYWxsZXJ5LS1ncmlkLS1ub2Nyb3ApIC50Yi1icmlja19fY29udGVudHtoZWlnaHQ6MTAwJTtwb3NpdGlvbjphYnNvbHV0ZTt0b3A6MH0udGItZ2FsbGVyeS0tZ3JpZDpub3QoLnRiLWdhbGxlcnktLWdyaWQtLW5vY3JvcCkgLnRiLWdhbGxlcnlfX2NlbGx7Z3JpZC1yb3ctZW5kOnVuc2V0ICFpbXBvcnRhbnQ7cG9zaXRpb246cmVsYXRpdmV9LnRiLWdhbGxlcnktLWdyaWQ6bm90KC50Yi1nYWxsZXJ5LS1ncmlkLS1ub2Nyb3ApIC50Yi1nYWxsZXJ5X19jZWxsOjpiZWZvcmV7Y29udGVudDoiIjtkaXNwbGF5OmlubGluZS1ibG9jaztwYWRkaW5nLWJvdHRvbToxMDAlfS50Yi1nYWxsZXJ5LS1ncmlkOm5vdCgudGItZ2FsbGVyeS0tZ3JpZC0tbm9jcm9wKSAudGItZ2FsbGVyeV9fY2VsbDo6bWFya2Vye2NvbnRlbnQ6IiJ9LnRiLWdhbGxlcnktLWdyaWQ6bm90KC50Yi1nYWxsZXJ5LS1ncmlkLS1ub2Nyb3ApIGltZ3t3aWR0aDoxMDAlO2hlaWdodDoxMDAlOy1vLW9iamVjdC1maXQ6Y292ZXI7b2JqZWN0LWZpdDpjb3Zlcn0udGItZ2FsbGVyeS0tZ3JpZC0tbm9jcm9wIGltZ3toZWlnaHQ6YXV0byAhaW1wb3J0YW50O3dpZHRoOmF1dG8gIWltcG9ydGFudH0udGItZ2FsbGVyeS0tZ3JpZC0tbm9jcm9wIC50Yi1nYWxsZXJ5X19jZWxse2FsaWduLXNlbGY6ZW5kfS50Yi1nYWxsZXJ5LS1ncmlkLS1ub2Nyb3AgLnRiLWJyaWNrX19jb250ZW50e2hlaWdodDoxMDAlfS50Yi1nYWxsZXJ5LS1jb2xsYWdle2Rpc3BsYXk6Z3JpZDtncmlkLXRlbXBsYXRlLWNvbHVtbnM6cmVwZWF0KDEyLCAxZnIpfS50Yi1nYWxsZXJ5LS1jb2xsYWdlIC50Yi1icmlja19fY29udGVudHtoZWlnaHQ6MTAwJX0udGItZ2FsbGVyeS0tY29sbGFnZSBpbWd7aGVpZ2h0OjEwMCUgIWltcG9ydGFudH0udGItZ2FsbGVyeS0tbWFzb25yeXtkaXNwbGF5OmdyaWQ7Z3JpZC1yb3ctZ2FwOjA7Z3JpZC1hdXRvLXJvd3M6MXB4O29wYWNpdHk6MH0udGItZ2FsbGVyeS0tbWFzb25yeSAudGItYnJpY2tfX2NvbnRlbnR7cG9zaXRpb246cmVsYXRpdmV9LnRiLWdhbGxlcnktLW1hc29ucnkgLnRiLWJyaWNrX19jb250ZW50IGltZywudGItZ2FsbGVyeS0tbWFzb25yeSAudGItYnJpY2tfX2NvbnRlbnQgaWZyYW1lLC50Yi1nYWxsZXJ5LS1tYXNvbnJ5IC50Yi1icmlja19fY29udGVudCB2aWRlb3stby1vYmplY3QtZml0OmNvdmVyO29iamVjdC1maXQ6Y292ZXI7d2lkdGg6MTAwJSAhaW1wb3J0YW50O2Rpc3BsYXk6YmxvY2t9LnRiLWdhbGxlcnlfX2NhcHRpb257cG9zaXRpb246YWJzb2x1dGU7Ym90dG9tOjA7d2lkdGg6MTAwJTtiYWNrZ3JvdW5kOnJnYmEoMjU1LDI1NSwyNTUsMC42KTtwYWRkaW5nOjVweCAycHg7dGV4dC1hbGlnbjpjZW50ZXI7Y29sb3I6IzMzM30udGItZ2FsbGVyeV9fY2FwdGlvbjplbXB0eXtiYWNrZ3JvdW5kOnRyYW5zcGFyZW50ICFpbXBvcnRhbnR9LnRiLWdhbGxlcnkgLnRiLWJyaWNrX19jb250ZW50IGZpZ3VyZXtoZWlnaHQ6MTAwJX0udGItZ2FsbGVyeSBpbWd7d2lkdGg6MTAwJTtoZWlnaHQ6MTAwJTstby1vYmplY3QtZml0OmNvdmVyO29iamVjdC1maXQ6Y292ZXI7dmVydGljYWwtYWxpZ246Ym90dG9tfSNsZWZ0LWFyZWEgdWwudGItZ2FsbGVyeXtsaXN0LXN0eWxlLXR5cGU6bm9uZTtwYWRkaW5nOjB9IC50Yi1nYWxsZXJ5W2RhdGEtdG9vbHNldC1ibG9ja3MtZ2FsbGVyeT0iOGNlNDllZTgwYmQ0YTRjZjFmNTdmOGRiNjc4Mzg5ZTEiXSAudGItZ2FsbGVyeS0tZ3JpZCB7IGdyaWQtdGVtcGxhdGUtY29sdW1uczogbWlubWF4KDAsIDFmcikgbWlubWF4KDAsIDFmcikgbWlubWF4KDAsIDFmcik7Z3JpZC1yb3ctZ2FwOiAxMHB4O2dyaWQtY29sdW1uLWdhcDogMTBweDsgfSAudGItZ2FsbGVyeSB1bHtsaXN0LXN0eWxlOm5vbmU7bWFyZ2luOjAgMCAxLjVlbSAwO3BhZGRpbmc6MH0udGItZ2FsbGVyeV9fY2VsbHttYXJnaW46MCAhaW1wb3J0YW50O3Bvc2l0aW9uOnJlbGF0aXZlfS50Yi1nYWxsZXJ5LS1ncmlke2Rpc3BsYXk6Z3JpZDtncmlkLWF1dG8tcm93czphdXRvICFpbXBvcnRhbnR9LnRiLWdhbGxlcnktLWdyaWQ6bm90KC50Yi1nYWxsZXJ5LS1ncmlkLS1ub2Nyb3ApIC50Yi1icmlja19fY29udGVudHtoZWlnaHQ6MTAwJTtwb3NpdGlvbjphYnNvbHV0ZTt0b3A6MH0udGItZ2FsbGVyeS0tZ3JpZDpub3QoLnRiLWdhbGxlcnktLWdyaWQtLW5vY3JvcCkgLnRiLWdhbGxlcnlfX2NlbGx7Z3JpZC1yb3ctZW5kOnVuc2V0ICFpbXBvcnRhbnQ7cG9zaXRpb246cmVsYXRpdmV9LnRiLWdhbGxlcnktLWdyaWQ6bm90KC50Yi1nYWxsZXJ5LS1ncmlkLS1ub2Nyb3ApIC50Yi1nYWxsZXJ5X19jZWxsOjpiZWZvcmV7Y29udGVudDoiIjtkaXNwbGF5OmlubGluZS1ibG9jaztwYWRkaW5nLWJvdHRvbToxMDAlfS50Yi1nYWxsZXJ5LS1ncmlkOm5vdCgudGItZ2FsbGVyeS0tZ3JpZC0tbm9jcm9wKSAudGItZ2FsbGVyeV9fY2VsbDo6bWFya2Vye2NvbnRlbnQ6IiJ9LnRiLWdhbGxlcnktLWdyaWQ6bm90KC50Yi1nYWxsZXJ5LS1ncmlkLS1ub2Nyb3ApIGltZ3t3aWR0aDoxMDAlO2hlaWdodDoxMDAlOy1vLW9iamVjdC1maXQ6Y292ZXI7b2JqZWN0LWZpdDpjb3Zlcn0udGItZ2FsbGVyeS0tZ3JpZC0tbm9jcm9wIGltZ3toZWlnaHQ6YXV0byAhaW1wb3J0YW50O3dpZHRoOmF1dG8gIWltcG9ydGFudH0udGItZ2FsbGVyeS0tZ3JpZC0tbm9jcm9wIC50Yi1nYWxsZXJ5X19jZWxse2FsaWduLXNlbGY6ZW5kfS50Yi1nYWxsZXJ5LS1ncmlkLS1ub2Nyb3AgLnRiLWJyaWNrX19jb250ZW50e2hlaWdodDoxMDAlfS50Yi1nYWxsZXJ5LS1jb2xsYWdle2Rpc3BsYXk6Z3JpZDtncmlkLXRlbXBsYXRlLWNvbHVtbnM6cmVwZWF0KDEyLCAxZnIpfS50Yi1nYWxsZXJ5LS1jb2xsYWdlIC50Yi1icmlja19fY29udGVudHtoZWlnaHQ6MTAwJX0udGItZ2FsbGVyeS0tY29sbGFnZSBpbWd7aGVpZ2h0OjEwMCUgIWltcG9ydGFudH0udGItZ2FsbGVyeS0tbWFzb25yeXtkaXNwbGF5OmdyaWQ7Z3JpZC1yb3ctZ2FwOjA7Z3JpZC1hdXRvLXJvd3M6MXB4O29wYWNpdHk6MH0udGItZ2FsbGVyeS0tbWFzb25yeSAudGItYnJpY2tfX2NvbnRlbnR7cG9zaXRpb246cmVsYXRpdmV9LnRiLWdhbGxlcnktLW1hc29ucnkgLnRiLWJyaWNrX19jb250ZW50IGltZywudGItZ2FsbGVyeS0tbWFzb25yeSAudGItYnJpY2tfX2NvbnRlbnQgaWZyYW1lLC50Yi1nYWxsZXJ5LS1tYXNvbnJ5IC50Yi1icmlja19fY29udGVudCB2aWRlb3stby1vYmplY3QtZml0OmNvdmVyO29iamVjdC1maXQ6Y292ZXI7d2lkdGg6MTAwJSAhaW1wb3J0YW50O2Rpc3BsYXk6YmxvY2t9LnRiLWdhbGxlcnlfX2NhcHRpb257cG9zaXRpb246YWJzb2x1dGU7Ym90dG9tOjA7d2lkdGg6MTAwJTtiYWNrZ3JvdW5kOnJnYmEoMjU1LDI1NSwyNTUsMC42KTtwYWRkaW5nOjVweCAycHg7dGV4dC1hbGlnbjpjZW50ZXI7Y29sb3I6IzMzM30udGItZ2FsbGVyeV9fY2FwdGlvbjplbXB0eXtiYWNrZ3JvdW5kOnRyYW5zcGFyZW50ICFpbXBvcnRhbnR9LnRiLWdhbGxlcnkgLnRiLWJyaWNrX19jb250ZW50IGZpZ3VyZXtoZWlnaHQ6MTAwJX0udGItZ2FsbGVyeSBpbWd7d2lkdGg6MTAwJTtoZWlnaHQ6MTAwJTstby1vYmplY3QtZml0OmNvdmVyO29iamVjdC1maXQ6Y292ZXI7dmVydGljYWwtYWxpZ246Ym90dG9tfSNsZWZ0LWFyZWEgdWwudGItZ2FsbGVyeXtsaXN0LXN0eWxlLXR5cGU6bm9uZTtwYWRkaW5nOjB9IC50Yi1nYWxsZXJ5W2RhdGEtdG9vbHNldC1ibG9ja3MtZ2FsbGVyeT0iNzRhYzgxMjMwMTNjNjVmNTFmNWJlNmNlZDE3Mjc4OTkiXSAudGItZ2FsbGVyeS0tZ3JpZCB7IGdyaWQtdGVtcGxhdGUtY29sdW1uczogbWlubWF4KDAsIDFmcikgbWlubWF4KDAsIDFmcikgbWlubWF4KDAsIDFmcik7Z3JpZC1yb3ctZ2FwOiAxMHB4O2dyaWQtY29sdW1uLWdhcDogMTBweDsgfSAudGItZ2FsbGVyeSB1bHtsaXN0LXN0eWxlOm5vbmU7bWFyZ2luOjAgMCAxLjVlbSAwO3BhZGRpbmc6MH0udGItZ2FsbGVyeV9fY2VsbHttYXJnaW46MCAhaW1wb3J0YW50O3Bvc2l0aW9uOnJlbGF0aXZlfS50Yi1nYWxsZXJ5LS1ncmlke2Rpc3BsYXk6Z3JpZDtncmlkLWF1dG8tcm93czphdXRvICFpbXBvcnRhbnR9LnRiLWdhbGxlcnktLWdyaWQ6bm90KC50Yi1nYWxsZXJ5LS1ncmlkLS1ub2Nyb3ApIC50Yi1icmlja19fY29udGVudHtoZWlnaHQ6MTAwJTtwb3NpdGlvbjphYnNvbHV0ZTt0b3A6MH0udGItZ2FsbGVyeS0tZ3JpZDpub3QoLnRiLWdhbGxlcnktLWdyaWQtLW5vY3JvcCkgLnRiLWdhbGxlcnlfX2NlbGx7Z3JpZC1yb3ctZW5kOnVuc2V0ICFpbXBvcnRhbnQ7cG9zaXRpb246cmVsYXRpdmV9LnRiLWdhbGxlcnktLWdyaWQ6bm90KC50Yi1nYWxsZXJ5LS1ncmlkLS1ub2Nyb3ApIC50Yi1nYWxsZXJ5X19jZWxsOjpiZWZvcmV7Y29udGVudDoiIjtkaXNwbGF5OmlubGluZS1ibG9jaztwYWRkaW5nLWJvdHRvbToxMDAlfS50Yi1nYWxsZXJ5LS1ncmlkOm5vdCgudGItZ2FsbGVyeS0tZ3JpZC0tbm9jcm9wKSAudGItZ2FsbGVyeV9fY2VsbDo6bWFya2Vye2NvbnRlbnQ6IiJ9LnRiLWdhbGxlcnktLWdyaWQ6bm90KC50Yi1nYWxsZXJ5LS1ncmlkLS1ub2Nyb3ApIGltZ3t3aWR0aDoxMDAlO2hlaWdodDoxMDAlOy1vLW9iamVjdC1maXQ6Y292ZXI7b2JqZWN0LWZpdDpjb3Zlcn0udGItZ2FsbGVyeS0tZ3JpZC0tbm9jcm9wIGltZ3toZWlnaHQ6YXV0byAhaW1wb3J0YW50O3dpZHRoOmF1dG8gIWltcG9ydGFudH0udGItZ2FsbGVyeS0tZ3JpZC0tbm9jcm9wIC50Yi1nYWxsZXJ5X19jZWxse2FsaWduLXNlbGY6ZW5kfS50Yi1nYWxsZXJ5LS1ncmlkLS1ub2Nyb3AgLnRiLWJyaWNrX19jb250ZW50e2hlaWdodDoxMDAlfS50Yi1nYWxsZXJ5LS1jb2xsYWdle2Rpc3BsYXk6Z3JpZDtncmlkLXRlbXBsYXRlLWNvbHVtbnM6cmVwZWF0KDEyLCAxZnIpfS50Yi1nYWxsZXJ5LS1jb2xsYWdlIC50Yi1icmlja19fY29udGVudHtoZWlnaHQ6MTAwJX0udGItZ2FsbGVyeS0tY29sbGFnZSBpbWd7aGVpZ2h0OjEwMCUgIWltcG9ydGFudH0udGItZ2FsbGVyeS0tbWFzb25yeXtkaXNwbGF5OmdyaWQ7Z3JpZC1yb3ctZ2FwOjA7Z3JpZC1hdXRvLXJvd3M6MXB4O29wYWNpdHk6MH0udGItZ2FsbGVyeS0tbWFzb25yeSAudGItYnJpY2tfX2NvbnRlbnR7cG9zaXRpb246cmVsYXRpdmV9LnRiLWdhbGxlcnktLW1hc29ucnkgLnRiLWJyaWNrX19jb250ZW50IGltZywudGItZ2FsbGVyeS0tbWFzb25yeSAudGItYnJpY2tfX2NvbnRlbnQgaWZyYW1lLC50Yi1nYWxsZXJ5LS1tYXNvbnJ5IC50Yi1icmlja19fY29udGVudCB2aWRlb3stby1vYmplY3QtZml0OmNvdmVyO29iamVjdC1maXQ6Y292ZXI7d2lkdGg6MTAwJSAhaW1wb3J0YW50O2Rpc3BsYXk6YmxvY2t9LnRiLWdhbGxlcnlfX2NhcHRpb257cG9zaXRpb246YWJzb2x1dGU7Ym90dG9tOjA7d2lkdGg6MTAwJTtiYWNrZ3JvdW5kOnJnYmEoMjU1LDI1NSwyNTUsMC42KTtwYWRkaW5nOjVweCAycHg7dGV4dC1hbGlnbjpjZW50ZXI7Y29sb3I6IzMzM30udGItZ2FsbGVyeV9fY2FwdGlvbjplbXB0eXtiYWNrZ3JvdW5kOnRyYW5zcGFyZW50ICFpbXBvcnRhbnR9LnRiLWdhbGxlcnkgLnRiLWJyaWNrX19jb250ZW50IGZpZ3VyZXtoZWlnaHQ6MTAwJX0udGItZ2FsbGVyeSBpbWd7d2lkdGg6MTAwJTtoZWlnaHQ6MTAwJTstby1vYmplY3QtZml0OmNvdmVyO29iamVjdC1maXQ6Y292ZXI7dmVydGljYWwtYWxpZ246Ym90dG9tfSNsZWZ0LWFyZWEgdWwudGItZ2FsbGVyeXtsaXN0LXN0eWxlLXR5cGU6bm9uZTtwYWRkaW5nOjB9IC50Yi1nYWxsZXJ5W2RhdGEtdG9vbHNldC1ibG9ja3MtZ2FsbGVyeT0iMTk5NWI5YzczMzg0ZDcyMTk0MWI0NmEwYmFmOTJjNDQiXSAudGItZ2FsbGVyeS0tZ3JpZCB7IGdyaWQtdGVtcGxhdGUtY29sdW1uczogbWlubWF4KDAsIDFmcikgbWlubWF4KDAsIDFmcikgbWlubWF4KDAsIDFmcik7Z3JpZC1yb3ctZ2FwOiAxMHB4O2dyaWQtY29sdW1uLWdhcDogMTBweDsgfSAudGItZ2FsbGVyeSB1bHtsaXN0LXN0eWxlOm5vbmU7bWFyZ2luOjAgMCAxLjVlbSAwO3BhZGRpbmc6MH0udGItZ2FsbGVyeV9fY2VsbHttYXJnaW46MCAhaW1wb3J0YW50O3Bvc2l0aW9uOnJlbGF0aXZlfS50Yi1nYWxsZXJ5LS1ncmlke2Rpc3BsYXk6Z3JpZDtncmlkLWF1dG8tcm93czphdXRvICFpbXBvcnRhbnR9LnRiLWdhbGxlcnktLWdyaWQ6bm90KC50Yi1nYWxsZXJ5LS1ncmlkLS1ub2Nyb3ApIC50Yi1icmlja19fY29udGVudHtoZWlnaHQ6MTAwJTtwb3NpdGlvbjphYnNvbHV0ZTt0b3A6MH0udGItZ2FsbGVyeS0tZ3JpZDpub3QoLnRiLWdhbGxlcnktLWdyaWQtLW5vY3JvcCkgLnRiLWdhbGxlcnlfX2NlbGx7Z3JpZC1yb3ctZW5kOnVuc2V0ICFpbXBvcnRhbnQ7cG9zaXRpb246cmVsYXRpdmV9LnRiLWdhbGxlcnktLWdyaWQ6bm90KC50Yi1nYWxsZXJ5LS1ncmlkLS1ub2Nyb3ApIC50Yi1nYWxsZXJ5X19jZWxsOjpiZWZvcmV7Y29udGVudDoiIjtkaXNwbGF5OmlubGluZS1ibG9jaztwYWRkaW5nLWJvdHRvbToxMDAlfS50Yi1nYWxsZXJ5LS1ncmlkOm5vdCgudGItZ2FsbGVyeS0tZ3JpZC0tbm9jcm9wKSAudGItZ2FsbGVyeV9fY2VsbDo6bWFya2Vye2NvbnRlbnQ6IiJ9LnRiLWdhbGxlcnktLWdyaWQ6bm90KC50Yi1nYWxsZXJ5LS1ncmlkLS1ub2Nyb3ApIGltZ3t3aWR0aDoxMDAlO2hlaWdodDoxMDAlOy1vLW9iamVjdC1maXQ6Y292ZXI7b2JqZWN0LWZpdDpjb3Zlcn0udGItZ2FsbGVyeS0tZ3JpZC0tbm9jcm9wIGltZ3toZWlnaHQ6YXV0byAhaW1wb3J0YW50O3dpZHRoOmF1dG8gIWltcG9ydGFudH0udGItZ2FsbGVyeS0tZ3JpZC0tbm9jcm9wIC50Yi1nYWxsZXJ5X19jZWxse2FsaWduLXNlbGY6ZW5kfS50Yi1nYWxsZXJ5LS1ncmlkLS1ub2Nyb3AgLnRiLWJyaWNrX19jb250ZW50e2hlaWdodDoxMDAlfS50Yi1nYWxsZXJ5LS1jb2xsYWdle2Rpc3BsYXk6Z3JpZDtncmlkLXRlbXBsYXRlLWNvbHVtbnM6cmVwZWF0KDEyLCAxZnIpfS50Yi1nYWxsZXJ5LS1jb2xsYWdlIC50Yi1icmlja19fY29udGVudHtoZWlnaHQ6MTAwJX0udGItZ2FsbGVyeS0tY29sbGFnZSBpbWd7aGVpZ2h0OjEwMCUgIWltcG9ydGFudH0udGItZ2FsbGVyeS0tbWFzb25yeXtkaXNwbGF5OmdyaWQ7Z3JpZC1yb3ctZ2FwOjA7Z3JpZC1hdXRvLXJvd3M6MXB4O29wYWNpdHk6MH0udGItZ2FsbGVyeS0tbWFzb25yeSAudGItYnJpY2tfX2NvbnRlbnR7cG9zaXRpb246cmVsYXRpdmV9LnRiLWdhbGxlcnktLW1hc29ucnkgLnRiLWJyaWNrX19jb250ZW50IGltZywudGItZ2FsbGVyeS0tbWFzb25yeSAudGItYnJpY2tfX2NvbnRlbnQgaWZyYW1lLC50Yi1nYWxsZXJ5LS1tYXNvbnJ5IC50Yi1icmlja19fY29udGVudCB2aWRlb3stby1vYmplY3QtZml0OmNvdmVyO29iamVjdC1maXQ6Y292ZXI7d2lkdGg6MTAwJSAhaW1wb3J0YW50O2Rpc3BsYXk6YmxvY2t9LnRiLWdhbGxlcnlfX2NhcHRpb257cG9zaXRpb246YWJzb2x1dGU7Ym90dG9tOjA7d2lkdGg6MTAwJTtiYWNrZ3JvdW5kOnJnYmEoMjU1LDI1NSwyNTUsMC42KTtwYWRkaW5nOjVweCAycHg7dGV4dC1hbGlnbjpjZW50ZXI7Y29sb3I6IzMzM30udGItZ2FsbGVyeV9fY2FwdGlvbjplbXB0eXtiYWNrZ3JvdW5kOnRyYW5zcGFyZW50ICFpbXBvcnRhbnR9LnRiLWdhbGxlcnkgLnRiLWJyaWNrX19jb250ZW50IGZpZ3VyZXtoZWlnaHQ6MTAwJX0udGItZ2FsbGVyeSBpbWd7d2lkdGg6MTAwJTtoZWlnaHQ6MTAwJTstby1vYmplY3QtZml0OmNvdmVyO29iamVjdC1maXQ6Y292ZXI7dmVydGljYWwtYWxpZ246Ym90dG9tfSNsZWZ0LWFyZWEgdWwudGItZ2FsbGVyeXtsaXN0LXN0eWxlLXR5cGU6bm9uZTtwYWRkaW5nOjB9IC50Yi1nYWxsZXJ5W2RhdGEtdG9vbHNldC1ibG9ja3MtZ2FsbGVyeT0iNzA4ZWMwMWNhZmEwMmNiNGRmMmVhMjc0M2E0YzliODciXSAudGItZ2FsbGVyeS0tZ3JpZCB7IGdyaWQtdGVtcGxhdGUtY29sdW1uczogbWlubWF4KDAsIDFmcikgbWlubWF4KDAsIDFmcikgbWlubWF4KDAsIDFmcik7Z3JpZC1yb3ctZ2FwOiAxMHB4O2dyaWQtY29sdW1uLWdhcDogMTBweDsgfSAgfSBAbWVkaWEgb25seSBzY3JlZW4gYW5kIChtYXgtd2lkdGg6IDU5OXB4KSB7IC50Yi1nYWxsZXJ5IHVse2xpc3Qtc3R5bGU6bm9uZTttYXJnaW46MCAwIDEuNWVtIDA7cGFkZGluZzowfS50Yi1nYWxsZXJ5X19jZWxse21hcmdpbjowICFpbXBvcnRhbnQ7cG9zaXRpb246cmVsYXRpdmV9LnRiLWdhbGxlcnktLWdyaWR7ZGlzcGxheTpncmlkO2dyaWQtYXV0by1yb3dzOmF1dG8gIWltcG9ydGFudH0udGItZ2FsbGVyeS0tZ3JpZDpub3QoLnRiLWdhbGxlcnktLWdyaWQtLW5vY3JvcCkgLnRiLWJyaWNrX19jb250ZW50e2hlaWdodDoxMDAlO3Bvc2l0aW9uOmFic29sdXRlO3RvcDowfS50Yi1nYWxsZXJ5LS1ncmlkOm5vdCgudGItZ2FsbGVyeS0tZ3JpZC0tbm9jcm9wKSAudGItZ2FsbGVyeV9fY2VsbHtncmlkLXJvdy1lbmQ6dW5zZXQgIWltcG9ydGFudDtwb3NpdGlvbjpyZWxhdGl2ZX0udGItZ2FsbGVyeS0tZ3JpZDpub3QoLnRiLWdhbGxlcnktLWdyaWQtLW5vY3JvcCkgLnRiLWdhbGxlcnlfX2NlbGw6OmJlZm9yZXtjb250ZW50OiIiO2Rpc3BsYXk6aW5saW5lLWJsb2NrO3BhZGRpbmctYm90dG9tOjEwMCV9LnRiLWdhbGxlcnktLWdyaWQ6bm90KC50Yi1nYWxsZXJ5LS1ncmlkLS1ub2Nyb3ApIC50Yi1nYWxsZXJ5X19jZWxsOjptYXJrZXJ7Y29udGVudDoiIn0udGItZ2FsbGVyeS0tZ3JpZDpub3QoLnRiLWdhbGxlcnktLWdyaWQtLW5vY3JvcCkgaW1ne3dpZHRoOjEwMCU7aGVpZ2h0OjEwMCU7LW8tb2JqZWN0LWZpdDpjb3ZlcjtvYmplY3QtZml0OmNvdmVyfS50Yi1nYWxsZXJ5LS1ncmlkLS1ub2Nyb3AgaW1ne2hlaWdodDphdXRvICFpbXBvcnRhbnQ7d2lkdGg6YXV0byAhaW1wb3J0YW50fS50Yi1nYWxsZXJ5LS1ncmlkLS1ub2Nyb3AgLnRiLWdhbGxlcnlfX2NlbGx7YWxpZ24tc2VsZjplbmR9LnRiLWdhbGxlcnktLWdyaWQtLW5vY3JvcCAudGItYnJpY2tfX2NvbnRlbnR7aGVpZ2h0OjEwMCV9LnRiLWdhbGxlcnktLWNvbGxhZ2V7ZGlzcGxheTpncmlkO2dyaWQtdGVtcGxhdGUtY29sdW1uczpyZXBlYXQoMTIsIDFmcil9LnRiLWdhbGxlcnktLWNvbGxhZ2UgLnRiLWJyaWNrX19jb250ZW50e2hlaWdodDoxMDAlfS50Yi1nYWxsZXJ5LS1jb2xsYWdlIGltZ3toZWlnaHQ6MTAwJSAhaW1wb3J0YW50fS50Yi1nYWxsZXJ5LS1tYXNvbnJ5e2Rpc3BsYXk6Z3JpZDtncmlkLXJvdy1nYXA6MDtncmlkLWF1dG8tcm93czoxcHg7b3BhY2l0eTowfS50Yi1nYWxsZXJ5LS1tYXNvbnJ5IC50Yi1icmlja19fY29udGVudHtwb3NpdGlvbjpyZWxhdGl2ZX0udGItZ2FsbGVyeS0tbWFzb25yeSAudGItYnJpY2tfX2NvbnRlbnQgaW1nLC50Yi1nYWxsZXJ5LS1tYXNvbnJ5IC50Yi1icmlja19fY29udGVudCBpZnJhbWUsLnRiLWdhbGxlcnktLW1hc29ucnkgLnRiLWJyaWNrX19jb250ZW50IHZpZGVvey1vLW9iamVjdC1maXQ6Y292ZXI7b2JqZWN0LWZpdDpjb3Zlcjt3aWR0aDoxMDAlICFpbXBvcnRhbnQ7ZGlzcGxheTpibG9ja30udGItZ2FsbGVyeV9fY2FwdGlvbntwb3NpdGlvbjphYnNvbHV0ZTtib3R0b206MDt3aWR0aDoxMDAlO2JhY2tncm91bmQ6cmdiYSgyNTUsMjU1LDI1NSwwLjYpO3BhZGRpbmc6NXB4IDJweDt0ZXh0LWFsaWduOmNlbnRlcjtjb2xvcjojMzMzfS50Yi1nYWxsZXJ5X19jYXB0aW9uOmVtcHR5e2JhY2tncm91bmQ6dHJhbnNwYXJlbnQgIWltcG9ydGFudH0udGItZ2FsbGVyeSAudGItYnJpY2tfX2NvbnRlbnQgZmlndXJle2hlaWdodDoxMDAlfS50Yi1nYWxsZXJ5IGltZ3t3aWR0aDoxMDAlO2hlaWdodDoxMDAlOy1vLW9iamVjdC1maXQ6Y292ZXI7b2JqZWN0LWZpdDpjb3Zlcjt2ZXJ0aWNhbC1hbGlnbjpib3R0b219I2xlZnQtYXJlYSB1bC50Yi1nYWxsZXJ5e2xpc3Qtc3R5bGUtdHlwZTpub25lO3BhZGRpbmc6MH0gLnRiLWdhbGxlcnlbZGF0YS10b29sc2V0LWJsb2Nrcy1nYWxsZXJ5PSI0ZDUzMjQ5ZGQxMjIyZTJiY2U1MTFiYmEyMjc4YzRmYiJdIC50Yi1nYWxsZXJ5LS1ncmlkIHsgZ3JpZC10ZW1wbGF0ZS1jb2x1bW5zOiBtaW5tYXgoMCwgMWZyKSBtaW5tYXgoMCwgMWZyKTtncmlkLXJvdy1nYXA6IDVweDtncmlkLWNvbHVtbi1nYXA6IDVweDsgfSAudGItZ2FsbGVyeSB1bHtsaXN0LXN0eWxlOm5vbmU7bWFyZ2luOjAgMCAxLjVlbSAwO3BhZGRpbmc6MH0udGItZ2FsbGVyeV9fY2VsbHttYXJnaW46MCAhaW1wb3J0YW50O3Bvc2l0aW9uOnJlbGF0aXZlfS50Yi1nYWxsZXJ5LS1ncmlke2Rpc3BsYXk6Z3JpZDtncmlkLWF1dG8tcm93czphdXRvICFpbXBvcnRhbnR9LnRiLWdhbGxlcnktLWdyaWQ6bm90KC50Yi1nYWxsZXJ5LS1ncmlkLS1ub2Nyb3ApIC50Yi1icmlja19fY29udGVudHtoZWlnaHQ6MTAwJTtwb3NpdGlvbjphYnNvbHV0ZTt0b3A6MH0udGItZ2FsbGVyeS0tZ3JpZDpub3QoLnRiLWdhbGxlcnktLWdyaWQtLW5vY3JvcCkgLnRiLWdhbGxlcnlfX2NlbGx7Z3JpZC1yb3ctZW5kOnVuc2V0ICFpbXBvcnRhbnQ7cG9zaXRpb246cmVsYXRpdmV9LnRiLWdhbGxlcnktLWdyaWQ6bm90KC50Yi1nYWxsZXJ5LS1ncmlkLS1ub2Nyb3ApIC50Yi1nYWxsZXJ5X19jZWxsOjpiZWZvcmV7Y29udGVudDoiIjtkaXNwbGF5OmlubGluZS1ibG9jaztwYWRkaW5nLWJvdHRvbToxMDAlfS50Yi1nYWxsZXJ5LS1ncmlkOm5vdCgudGItZ2FsbGVyeS0tZ3JpZC0tbm9jcm9wKSAudGItZ2FsbGVyeV9fY2VsbDo6bWFya2Vye2NvbnRlbnQ6IiJ9LnRiLWdhbGxlcnktLWdyaWQ6bm90KC50Yi1nYWxsZXJ5LS1ncmlkLS1ub2Nyb3ApIGltZ3t3aWR0aDoxMDAlO2hlaWdodDoxMDAlOy1vLW9iamVjdC1maXQ6Y292ZXI7b2JqZWN0LWZpdDpjb3Zlcn0udGItZ2FsbGVyeS0tZ3JpZC0tbm9jcm9wIGltZ3toZWlnaHQ6YXV0byAhaW1wb3J0YW50O3dpZHRoOmF1dG8gIWltcG9ydGFudH0udGItZ2FsbGVyeS0tZ3JpZC0tbm9jcm9wIC50Yi1nYWxsZXJ5X19jZWxse2FsaWduLXNlbGY6ZW5kfS50Yi1nYWxsZXJ5LS1ncmlkLS1ub2Nyb3AgLnRiLWJyaWNrX19jb250ZW50e2hlaWdodDoxMDAlfS50Yi1nYWxsZXJ5LS1jb2xsYWdle2Rpc3BsYXk6Z3JpZDtncmlkLXRlbXBsYXRlLWNvbHVtbnM6cmVwZWF0KDEyLCAxZnIpfS50Yi1nYWxsZXJ5LS1jb2xsYWdlIC50Yi1icmlja19fY29udGVudHtoZWlnaHQ6MTAwJX0udGItZ2FsbGVyeS0tY29sbGFnZSBpbWd7aGVpZ2h0OjEwMCUgIWltcG9ydGFudH0udGItZ2FsbGVyeS0tbWFzb25yeXtkaXNwbGF5OmdyaWQ7Z3JpZC1yb3ctZ2FwOjA7Z3JpZC1hdXRvLXJvd3M6MXB4O29wYWNpdHk6MH0udGItZ2FsbGVyeS0tbWFzb25yeSAudGItYnJpY2tfX2NvbnRlbnR7cG9zaXRpb246cmVsYXRpdmV9LnRiLWdhbGxlcnktLW1hc29ucnkgLnRiLWJyaWNrX19jb250ZW50IGltZywudGItZ2FsbGVyeS0tbWFzb25yeSAudGItYnJpY2tfX2NvbnRlbnQgaWZyYW1lLC50Yi1nYWxsZXJ5LS1tYXNvbnJ5IC50Yi1icmlja19fY29udGVudCB2aWRlb3stby1vYmplY3QtZml0OmNvdmVyO29iamVjdC1maXQ6Y292ZXI7d2lkdGg6MTAwJSAhaW1wb3J0YW50O2Rpc3BsYXk6YmxvY2t9LnRiLWdhbGxlcnlfX2NhcHRpb257cG9zaXRpb246YWJzb2x1dGU7Ym90dG9tOjA7d2lkdGg6MTAwJTtiYWNrZ3JvdW5kOnJnYmEoMjU1LDI1NSwyNTUsMC42KTtwYWRkaW5nOjVweCAycHg7dGV4dC1hbGlnbjpjZW50ZXI7Y29sb3I6IzMzM30udGItZ2FsbGVyeV9fY2FwdGlvbjplbXB0eXtiYWNrZ3JvdW5kOnRyYW5zcGFyZW50ICFpbXBvcnRhbnR9LnRiLWdhbGxlcnkgLnRiLWJyaWNrX19jb250ZW50IGZpZ3VyZXtoZWlnaHQ6MTAwJX0udGItZ2FsbGVyeSBpbWd7d2lkdGg6MTAwJTtoZWlnaHQ6MTAwJTstby1vYmplY3QtZml0OmNvdmVyO29iamVjdC1maXQ6Y292ZXI7dmVydGljYWwtYWxpZ246Ym90dG9tfSNsZWZ0LWFyZWEgdWwudGItZ2FsbGVyeXtsaXN0LXN0eWxlLXR5cGU6bm9uZTtwYWRkaW5nOjB9IC50Yi1nYWxsZXJ5W2RhdGEtdG9vbHNldC1ibG9ja3MtZ2FsbGVyeT0iMzFiYTFjNTVmOTdmZmU4ODI5MTExNGU4N2M3NmVkMTkiXSAudGItZ2FsbGVyeS0tZ3JpZCB7IGdyaWQtdGVtcGxhdGUtY29sdW1uczogbWlubWF4KDAsIDFmcikgbWlubWF4KDAsIDFmcik7Z3JpZC1yb3ctZ2FwOiA1cHg7Z3JpZC1jb2x1bW4tZ2FwOiA1cHg7IH0gLnRiLWdhbGxlcnkgdWx7bGlzdC1zdHlsZTpub25lO21hcmdpbjowIDAgMS41ZW0gMDtwYWRkaW5nOjB9LnRiLWdhbGxlcnlfX2NlbGx7bWFyZ2luOjAgIWltcG9ydGFudDtwb3NpdGlvbjpyZWxhdGl2ZX0udGItZ2FsbGVyeS0tZ3JpZHtkaXNwbGF5OmdyaWQ7Z3JpZC1hdXRvLXJvd3M6YXV0byAhaW1wb3J0YW50fS50Yi1nYWxsZXJ5LS1ncmlkOm5vdCgudGItZ2FsbGVyeS0tZ3JpZC0tbm9jcm9wKSAudGItYnJpY2tfX2NvbnRlbnR7aGVpZ2h0OjEwMCU7cG9zaXRpb246YWJzb2x1dGU7dG9wOjB9LnRiLWdhbGxlcnktLWdyaWQ6bm90KC50Yi1nYWxsZXJ5LS1ncmlkLS1ub2Nyb3ApIC50Yi1nYWxsZXJ5X19jZWxse2dyaWQtcm93LWVuZDp1bnNldCAhaW1wb3J0YW50O3Bvc2l0aW9uOnJlbGF0aXZlfS50Yi1nYWxsZXJ5LS1ncmlkOm5vdCgudGItZ2FsbGVyeS0tZ3JpZC0tbm9jcm9wKSAudGItZ2FsbGVyeV9fY2VsbDo6YmVmb3Jle2NvbnRlbnQ6IiI7ZGlzcGxheTppbmxpbmUtYmxvY2s7cGFkZGluZy1ib3R0b206MTAwJX0udGItZ2FsbGVyeS0tZ3JpZDpub3QoLnRiLWdhbGxlcnktLWdyaWQtLW5vY3JvcCkgLnRiLWdhbGxlcnlfX2NlbGw6Om1hcmtlcntjb250ZW50OiIifS50Yi1nYWxsZXJ5LS1ncmlkOm5vdCgudGItZ2FsbGVyeS0tZ3JpZC0tbm9jcm9wKSBpbWd7d2lkdGg6MTAwJTtoZWlnaHQ6MTAwJTstby1vYmplY3QtZml0OmNvdmVyO29iamVjdC1maXQ6Y292ZXJ9LnRiLWdhbGxlcnktLWdyaWQtLW5vY3JvcCBpbWd7aGVpZ2h0OmF1dG8gIWltcG9ydGFudDt3aWR0aDphdXRvICFpbXBvcnRhbnR9LnRiLWdhbGxlcnktLWdyaWQtLW5vY3JvcCAudGItZ2FsbGVyeV9fY2VsbHthbGlnbi1zZWxmOmVuZH0udGItZ2FsbGVyeS0tZ3JpZC0tbm9jcm9wIC50Yi1icmlja19fY29udGVudHtoZWlnaHQ6MTAwJX0udGItZ2FsbGVyeS0tY29sbGFnZXtkaXNwbGF5OmdyaWQ7Z3JpZC10ZW1wbGF0ZS1jb2x1bW5zOnJlcGVhdCgxMiwgMWZyKX0udGItZ2FsbGVyeS0tY29sbGFnZSAudGItYnJpY2tfX2NvbnRlbnR7aGVpZ2h0OjEwMCV9LnRiLWdhbGxlcnktLWNvbGxhZ2UgaW1ne2hlaWdodDoxMDAlICFpbXBvcnRhbnR9LnRiLWdhbGxlcnktLW1hc29ucnl7ZGlzcGxheTpncmlkO2dyaWQtcm93LWdhcDowO2dyaWQtYXV0by1yb3dzOjFweDtvcGFjaXR5OjB9LnRiLWdhbGxlcnktLW1hc29ucnkgLnRiLWJyaWNrX19jb250ZW50e3Bvc2l0aW9uOnJlbGF0aXZlfS50Yi1nYWxsZXJ5LS1tYXNvbnJ5IC50Yi1icmlja19fY29udGVudCBpbWcsLnRiLWdhbGxlcnktLW1hc29ucnkgLnRiLWJyaWNrX19jb250ZW50IGlmcmFtZSwudGItZ2FsbGVyeS0tbWFzb25yeSAudGItYnJpY2tfX2NvbnRlbnQgdmlkZW97LW8tb2JqZWN0LWZpdDpjb3ZlcjtvYmplY3QtZml0OmNvdmVyO3dpZHRoOjEwMCUgIWltcG9ydGFudDtkaXNwbGF5OmJsb2NrfS50Yi1nYWxsZXJ5X19jYXB0aW9ue3Bvc2l0aW9uOmFic29sdXRlO2JvdHRvbTowO3dpZHRoOjEwMCU7YmFja2dyb3VuZDpyZ2JhKDI1NSwyNTUsMjU1LDAuNik7cGFkZGluZzo1cHggMnB4O3RleHQtYWxpZ246Y2VudGVyO2NvbG9yOiMzMzN9LnRiLWdhbGxlcnlfX2NhcHRpb246ZW1wdHl7YmFja2dyb3VuZDp0cmFuc3BhcmVudCAhaW1wb3J0YW50fS50Yi1nYWxsZXJ5IC50Yi1icmlja19fY29udGVudCBmaWd1cmV7aGVpZ2h0OjEwMCV9LnRiLWdhbGxlcnkgaW1ne3dpZHRoOjEwMCU7aGVpZ2h0OjEwMCU7LW8tb2JqZWN0LWZpdDpjb3ZlcjtvYmplY3QtZml0OmNvdmVyO3ZlcnRpY2FsLWFsaWduOmJvdHRvbX0jbGVmdC1hcmVhIHVsLnRiLWdhbGxlcnl7bGlzdC1zdHlsZS10eXBlOm5vbmU7cGFkZGluZzowfSAudGItZ2FsbGVyeVtkYXRhLXRvb2xzZXQtYmxvY2tzLWdhbGxlcnk9IjhjZTQ5ZWU4MGJkNGE0Y2YxZjU3ZjhkYjY3ODM4OWUxIl0gLnRiLWdhbGxlcnktLWdyaWQgeyBncmlkLXRlbXBsYXRlLWNvbHVtbnM6IG1pbm1heCgwLCAxZnIpIG1pbm1heCgwLCAxZnIpO2dyaWQtcm93LWdhcDogNXB4O2dyaWQtY29sdW1uLWdhcDogNXB4OyB9IC50Yi1nYWxsZXJ5IHVse2xpc3Qtc3R5bGU6bm9uZTttYXJnaW46MCAwIDEuNWVtIDA7cGFkZGluZzowfS50Yi1nYWxsZXJ5X19jZWxse21hcmdpbjowICFpbXBvcnRhbnQ7cG9zaXRpb246cmVsYXRpdmV9LnRiLWdhbGxlcnktLWdyaWR7ZGlzcGxheTpncmlkO2dyaWQtYXV0by1yb3dzOmF1dG8gIWltcG9ydGFudH0udGItZ2FsbGVyeS0tZ3JpZDpub3QoLnRiLWdhbGxlcnktLWdyaWQtLW5vY3JvcCkgLnRiLWJyaWNrX19jb250ZW50e2hlaWdodDoxMDAlO3Bvc2l0aW9uOmFic29sdXRlO3RvcDowfS50Yi1nYWxsZXJ5LS1ncmlkOm5vdCgudGItZ2FsbGVyeS0tZ3JpZC0tbm9jcm9wKSAudGItZ2FsbGVyeV9fY2VsbHtncmlkLXJvdy1lbmQ6dW5zZXQgIWltcG9ydGFudDtwb3NpdGlvbjpyZWxhdGl2ZX0udGItZ2FsbGVyeS0tZ3JpZDpub3QoLnRiLWdhbGxlcnktLWdyaWQtLW5vY3JvcCkgLnRiLWdhbGxlcnlfX2NlbGw6OmJlZm9yZXtjb250ZW50OiIiO2Rpc3BsYXk6aW5saW5lLWJsb2NrO3BhZGRpbmctYm90dG9tOjEwMCV9LnRiLWdhbGxlcnktLWdyaWQ6bm90KC50Yi1nYWxsZXJ5LS1ncmlkLS1ub2Nyb3ApIC50Yi1nYWxsZXJ5X19jZWxsOjptYXJrZXJ7Y29udGVudDoiIn0udGItZ2FsbGVyeS0tZ3JpZDpub3QoLnRiLWdhbGxlcnktLWdyaWQtLW5vY3JvcCkgaW1ne3dpZHRoOjEwMCU7aGVpZ2h0OjEwMCU7LW8tb2JqZWN0LWZpdDpjb3ZlcjtvYmplY3QtZml0OmNvdmVyfS50Yi1nYWxsZXJ5LS1ncmlkLS1ub2Nyb3AgaW1ne2hlaWdodDphdXRvICFpbXBvcnRhbnQ7d2lkdGg6YXV0byAhaW1wb3J0YW50fS50Yi1nYWxsZXJ5LS1ncmlkLS1ub2Nyb3AgLnRiLWdhbGxlcnlfX2NlbGx7YWxpZ24tc2VsZjplbmR9LnRiLWdhbGxlcnktLWdyaWQtLW5vY3JvcCAudGItYnJpY2tfX2NvbnRlbnR7aGVpZ2h0OjEwMCV9LnRiLWdhbGxlcnktLWNvbGxhZ2V7ZGlzcGxheTpncmlkO2dyaWQtdGVtcGxhdGUtY29sdW1uczpyZXBlYXQoMTIsIDFmcil9LnRiLWdhbGxlcnktLWNvbGxhZ2UgLnRiLWJyaWNrX19jb250ZW50e2hlaWdodDoxMDAlfS50Yi1nYWxsZXJ5LS1jb2xsYWdlIGltZ3toZWlnaHQ6MTAwJSAhaW1wb3J0YW50fS50Yi1nYWxsZXJ5LS1tYXNvbnJ5e2Rpc3BsYXk6Z3JpZDtncmlkLXJvdy1nYXA6MDtncmlkLWF1dG8tcm93czoxcHg7b3BhY2l0eTowfS50Yi1nYWxsZXJ5LS1tYXNvbnJ5IC50Yi1icmlja19fY29udGVudHtwb3NpdGlvbjpyZWxhdGl2ZX0udGItZ2FsbGVyeS0tbWFzb25yeSAudGItYnJpY2tfX2NvbnRlbnQgaW1nLC50Yi1nYWxsZXJ5LS1tYXNvbnJ5IC50Yi1icmlja19fY29udGVudCBpZnJhbWUsLnRiLWdhbGxlcnktLW1hc29ucnkgLnRiLWJyaWNrX19jb250ZW50IHZpZGVvey1vLW9iamVjdC1maXQ6Y292ZXI7b2JqZWN0LWZpdDpjb3Zlcjt3aWR0aDoxMDAlICFpbXBvcnRhbnQ7ZGlzcGxheTpibG9ja30udGItZ2FsbGVyeV9fY2FwdGlvbntwb3NpdGlvbjphYnNvbHV0ZTtib3R0b206MDt3aWR0aDoxMDAlO2JhY2tncm91bmQ6cmdiYSgyNTUsMjU1LDI1NSwwLjYpO3BhZGRpbmc6NXB4IDJweDt0ZXh0LWFsaWduOmNlbnRlcjtjb2xvcjojMzMzfS50Yi1nYWxsZXJ5X19jYXB0aW9uOmVtcHR5e2JhY2tncm91bmQ6dHJhbnNwYXJlbnQgIWltcG9ydGFudH0udGItZ2FsbGVyeSAudGItYnJpY2tfX2NvbnRlbnQgZmlndXJle2hlaWdodDoxMDAlfS50Yi1nYWxsZXJ5IGltZ3t3aWR0aDoxMDAlO2hlaWdodDoxMDAlOy1vLW9iamVjdC1maXQ6Y292ZXI7b2JqZWN0LWZpdDpjb3Zlcjt2ZXJ0aWNhbC1hbGlnbjpib3R0b219I2xlZnQtYXJlYSB1bC50Yi1nYWxsZXJ5e2xpc3Qtc3R5bGUtdHlwZTpub25lO3BhZGRpbmc6MH0gLnRiLWdhbGxlcnlbZGF0YS10b29sc2V0LWJsb2Nrcy1nYWxsZXJ5PSI3NGFjODEyMzAxM2M2NWY1MWY1YmU2Y2VkMTcyNzg5OSJdIC50Yi1nYWxsZXJ5LS1ncmlkIHsgZ3JpZC10ZW1wbGF0ZS1jb2x1bW5zOiBtaW5tYXgoMCwgMWZyKSBtaW5tYXgoMCwgMWZyKTtncmlkLXJvdy1nYXA6IDVweDtncmlkLWNvbHVtbi1nYXA6IDVweDsgfSAudGItZ2FsbGVyeSB1bHtsaXN0LXN0eWxlOm5vbmU7bWFyZ2luOjAgMCAxLjVlbSAwO3BhZGRpbmc6MH0udGItZ2FsbGVyeV9fY2VsbHttYXJnaW46MCAhaW1wb3J0YW50O3Bvc2l0aW9uOnJlbGF0aXZlfS50Yi1nYWxsZXJ5LS1ncmlke2Rpc3BsYXk6Z3JpZDtncmlkLWF1dG8tcm93czphdXRvICFpbXBvcnRhbnR9LnRiLWdhbGxlcnktLWdyaWQ6bm90KC50Yi1nYWxsZXJ5LS1ncmlkLS1ub2Nyb3ApIC50Yi1icmlja19fY29udGVudHtoZWlnaHQ6MTAwJTtwb3NpdGlvbjphYnNvbHV0ZTt0b3A6MH0udGItZ2FsbGVyeS0tZ3JpZDpub3QoLnRiLWdhbGxlcnktLWdyaWQtLW5vY3JvcCkgLnRiLWdhbGxlcnlfX2NlbGx7Z3JpZC1yb3ctZW5kOnVuc2V0ICFpbXBvcnRhbnQ7cG9zaXRpb246cmVsYXRpdmV9LnRiLWdhbGxlcnktLWdyaWQ6bm90KC50Yi1nYWxsZXJ5LS1ncmlkLS1ub2Nyb3ApIC50Yi1nYWxsZXJ5X19jZWxsOjpiZWZvcmV7Y29udGVudDoiIjtkaXNwbGF5OmlubGluZS1ibG9jaztwYWRkaW5nLWJvdHRvbToxMDAlfS50Yi1nYWxsZXJ5LS1ncmlkOm5vdCgudGItZ2FsbGVyeS0tZ3JpZC0tbm9jcm9wKSAudGItZ2FsbGVyeV9fY2VsbDo6bWFya2Vye2NvbnRlbnQ6IiJ9LnRiLWdhbGxlcnktLWdyaWQ6bm90KC50Yi1nYWxsZXJ5LS1ncmlkLS1ub2Nyb3ApIGltZ3t3aWR0aDoxMDAlO2hlaWdodDoxMDAlOy1vLW9iamVjdC1maXQ6Y292ZXI7b2JqZWN0LWZpdDpjb3Zlcn0udGItZ2FsbGVyeS0tZ3JpZC0tbm9jcm9wIGltZ3toZWlnaHQ6YXV0byAhaW1wb3J0YW50O3dpZHRoOmF1dG8gIWltcG9ydGFudH0udGItZ2FsbGVyeS0tZ3JpZC0tbm9jcm9wIC50Yi1nYWxsZXJ5X19jZWxse2FsaWduLXNlbGY6ZW5kfS50Yi1nYWxsZXJ5LS1ncmlkLS1ub2Nyb3AgLnRiLWJyaWNrX19jb250ZW50e2hlaWdodDoxMDAlfS50Yi1nYWxsZXJ5LS1jb2xsYWdle2Rpc3BsYXk6Z3JpZDtncmlkLXRlbXBsYXRlLWNvbHVtbnM6cmVwZWF0KDEyLCAxZnIpfS50Yi1nYWxsZXJ5LS1jb2xsYWdlIC50Yi1icmlja19fY29udGVudHtoZWlnaHQ6MTAwJX0udGItZ2FsbGVyeS0tY29sbGFnZSBpbWd7aGVpZ2h0OjEwMCUgIWltcG9ydGFudH0udGItZ2FsbGVyeS0tbWFzb25yeXtkaXNwbGF5OmdyaWQ7Z3JpZC1yb3ctZ2FwOjA7Z3JpZC1hdXRvLXJvd3M6MXB4O29wYWNpdHk6MH0udGItZ2FsbGVyeS0tbWFzb25yeSAudGItYnJpY2tfX2NvbnRlbnR7cG9zaXRpb246cmVsYXRpdmV9LnRiLWdhbGxlcnktLW1hc29ucnkgLnRiLWJyaWNrX19jb250ZW50IGltZywudGItZ2FsbGVyeS0tbWFzb25yeSAudGItYnJpY2tfX2NvbnRlbnQgaWZyYW1lLC50Yi1nYWxsZXJ5LS1tYXNvbnJ5IC50Yi1icmlja19fY29udGVudCB2aWRlb3stby1vYmplY3QtZml0OmNvdmVyO29iamVjdC1maXQ6Y292ZXI7d2lkdGg6MTAwJSAhaW1wb3J0YW50O2Rpc3BsYXk6YmxvY2t9LnRiLWdhbGxlcnlfX2NhcHRpb257cG9zaXRpb246YWJzb2x1dGU7Ym90dG9tOjA7d2lkdGg6MTAwJTtiYWNrZ3JvdW5kOnJnYmEoMjU1LDI1NSwyNTUsMC42KTtwYWRkaW5nOjVweCAycHg7dGV4dC1hbGlnbjpjZW50ZXI7Y29sb3I6IzMzM30udGItZ2FsbGVyeV9fY2FwdGlvbjplbXB0eXtiYWNrZ3JvdW5kOnRyYW5zcGFyZW50ICFpbXBvcnRhbnR9LnRiLWdhbGxlcnkgLnRiLWJyaWNrX19jb250ZW50IGZpZ3VyZXtoZWlnaHQ6MTAwJX0udGItZ2FsbGVyeSBpbWd7d2lkdGg6MTAwJTtoZWlnaHQ6MTAwJTstby1vYmplY3QtZml0OmNvdmVyO29iamVjdC1maXQ6Y292ZXI7dmVydGljYWwtYWxpZ246Ym90dG9tfSNsZWZ0LWFyZWEgdWwudGItZ2FsbGVyeXtsaXN0LXN0eWxlLXR5cGU6bm9uZTtwYWRkaW5nOjB9IC50Yi1nYWxsZXJ5W2RhdGEtdG9vbHNldC1ibG9ja3MtZ2FsbGVyeT0iMTk5NWI5YzczMzg0ZDcyMTk0MWI0NmEwYmFmOTJjNDQiXSAudGItZ2FsbGVyeS0tZ3JpZCB7IGdyaWQtdGVtcGxhdGUtY29sdW1uczogbWlubWF4KDAsIDFmcikgbWlubWF4KDAsIDFmcik7Z3JpZC1yb3ctZ2FwOiA1cHg7Z3JpZC1jb2x1bW4tZ2FwOiA1cHg7IH0gLnRiLWdhbGxlcnkgdWx7bGlzdC1zdHlsZTpub25lO21hcmdpbjowIDAgMS41ZW0gMDtwYWRkaW5nOjB9LnRiLWdhbGxlcnlfX2NlbGx7bWFyZ2luOjAgIWltcG9ydGFudDtwb3NpdGlvbjpyZWxhdGl2ZX0udGItZ2FsbGVyeS0tZ3JpZHtkaXNwbGF5OmdyaWQ7Z3JpZC1hdXRvLXJvd3M6YXV0byAhaW1wb3J0YW50fS50Yi1nYWxsZXJ5LS1ncmlkOm5vdCgudGItZ2FsbGVyeS0tZ3JpZC0tbm9jcm9wKSAudGItYnJpY2tfX2NvbnRlbnR7aGVpZ2h0OjEwMCU7cG9zaXRpb246YWJzb2x1dGU7dG9wOjB9LnRiLWdhbGxlcnktLWdyaWQ6bm90KC50Yi1nYWxsZXJ5LS1ncmlkLS1ub2Nyb3ApIC50Yi1nYWxsZXJ5X19jZWxse2dyaWQtcm93LWVuZDp1bnNldCAhaW1wb3J0YW50O3Bvc2l0aW9uOnJlbGF0aXZlfS50Yi1nYWxsZXJ5LS1ncmlkOm5vdCgudGItZ2FsbGVyeS0tZ3JpZC0tbm9jcm9wKSAudGItZ2FsbGVyeV9fY2VsbDo6YmVmb3Jle2NvbnRlbnQ6IiI7ZGlzcGxheTppbmxpbmUtYmxvY2s7cGFkZGluZy1ib3R0b206MTAwJX0udGItZ2FsbGVyeS0tZ3JpZDpub3QoLnRiLWdhbGxlcnktLWdyaWQtLW5vY3JvcCkgLnRiLWdhbGxlcnlfX2NlbGw6Om1hcmtlcntjb250ZW50OiIifS50Yi1nYWxsZXJ5LS1ncmlkOm5vdCgudGItZ2FsbGVyeS0tZ3JpZC0tbm9jcm9wKSBpbWd7d2lkdGg6MTAwJTtoZWlnaHQ6MTAwJTstby1vYmplY3QtZml0OmNvdmVyO29iamVjdC1maXQ6Y292ZXJ9LnRiLWdhbGxlcnktLWdyaWQtLW5vY3JvcCBpbWd7aGVpZ2h0OmF1dG8gIWltcG9ydGFudDt3aWR0aDphdXRvICFpbXBvcnRhbnR9LnRiLWdhbGxlcnktLWdyaWQtLW5vY3JvcCAudGItZ2FsbGVyeV9fY2VsbHthbGlnbi1zZWxmOmVuZH0udGItZ2FsbGVyeS0tZ3JpZC0tbm9jcm9wIC50Yi1icmlja19fY29udGVudHtoZWlnaHQ6MTAwJX0udGItZ2FsbGVyeS0tY29sbGFnZXtkaXNwbGF5OmdyaWQ7Z3JpZC10ZW1wbGF0ZS1jb2x1bW5zOnJlcGVhdCgxMiwgMWZyKX0udGItZ2FsbGVyeS0tY29sbGFnZSAudGItYnJpY2tfX2NvbnRlbnR7aGVpZ2h0OjEwMCV9LnRiLWdhbGxlcnktLWNvbGxhZ2UgaW1ne2hlaWdodDoxMDAlICFpbXBvcnRhbnR9LnRiLWdhbGxlcnktLW1hc29ucnl7ZGlzcGxheTpncmlkO2dyaWQtcm93LWdhcDowO2dyaWQtYXV0by1yb3dzOjFweDtvcGFjaXR5OjB9LnRiLWdhbGxlcnktLW1hc29ucnkgLnRiLWJyaWNrX19jb250ZW50e3Bvc2l0aW9uOnJlbGF0aXZlfS50Yi1nYWxsZXJ5LS1tYXNvbnJ5IC50Yi1icmlja19fY29udGVudCBpbWcsLnRiLWdhbGxlcnktLW1hc29ucnkgLnRiLWJyaWNrX19jb250ZW50IGlmcmFtZSwudGItZ2FsbGVyeS0tbWFzb25yeSAudGItYnJpY2tfX2NvbnRlbnQgdmlkZW97LW8tb2JqZWN0LWZpdDpjb3ZlcjtvYmplY3QtZml0OmNvdmVyO3dpZHRoOjEwMCUgIWltcG9ydGFudDtkaXNwbGF5OmJsb2NrfS50Yi1nYWxsZXJ5X19jYXB0aW9ue3Bvc2l0aW9uOmFic29sdXRlO2JvdHRvbTowO3dpZHRoOjEwMCU7YmFja2dyb3VuZDpyZ2JhKDI1NSwyNTUsMjU1LDAuNik7cGFkZGluZzo1cHggMnB4O3RleHQtYWxpZ246Y2VudGVyO2NvbG9yOiMzMzN9LnRiLWdhbGxlcnlfX2NhcHRpb246ZW1wdHl7YmFja2dyb3VuZDp0cmFuc3BhcmVudCAhaW1wb3J0YW50fS50Yi1nYWxsZXJ5IC50Yi1icmlja19fY29udGVudCBmaWd1cmV7aGVpZ2h0OjEwMCV9LnRiLWdhbGxlcnkgaW1ne3dpZHRoOjEwMCU7aGVpZ2h0OjEwMCU7LW8tb2JqZWN0LWZpdDpjb3ZlcjtvYmplY3QtZml0OmNvdmVyO3ZlcnRpY2FsLWFsaWduOmJvdHRvbX0jbGVmdC1hcmVhIHVsLnRiLWdhbGxlcnl7bGlzdC1zdHlsZS10eXBlOm5vbmU7cGFkZGluZzowfSAudGItZ2FsbGVyeVtkYXRhLXRvb2xzZXQtYmxvY2tzLWdhbGxlcnk9IjcwOGVjMDFjYWZhMDJjYjRkZjJlYTI3NDNhNGM5Yjg3Il0gLnRiLWdhbGxlcnktLWdyaWQgeyBncmlkLXRlbXBsYXRlLWNvbHVtbnM6IG1pbm1heCgwLCAxZnIpIG1pbm1heCgwLCAxZnIpO2dyaWQtcm93LWdhcDogNXB4O2dyaWQtY29sdW1uLWdhcDogNXB4OyB9ICB9IA==
I was thinking long and hard about a replacement for my old stainless steel braai chimney starter that I bought back in the late ‘70s, lost its fire grate (which I replaced with a gerrymandered mesh arrangement) about 10 years ago, and has finally given up the ghost, having burned through the side.
I looked at what’s on the market and while there is a good range of good products available, across a range of prices, many carry a limited warranty, or guarantee of anything from 6 months to a couple of years or so.
So I decided to make my own…
It would be from sheet stainless steel, and I decided on 1.6mm gauge (thick) 316 grade (marine) and a square shape, rather than the round versions on the market as this would make it easier for me to devise its fire grate – the grid that separates the paper used to get the charcoal or briquettes going and on which the charcoal or briquettes rest.
All the parts – the box chimney itself, the heat shield, the grate bars and the fixing bolts would be stainless steel.
I chose bolts specifically as I wanted the unit to be modular in construction so that if for some reason a part had to be replaced, it could be. Specifically, the fire grate is usually the component that takes a pounding and the beauty of this design is that if any bar should burn away or ablate too much over time, only that bar need be replaced.
This, I reckon would ensure that my braai chimney starter though way more expensive than a store-bought version would have a virtually unlimited life… going into the decades and very likely outliving this old coffin dodger.
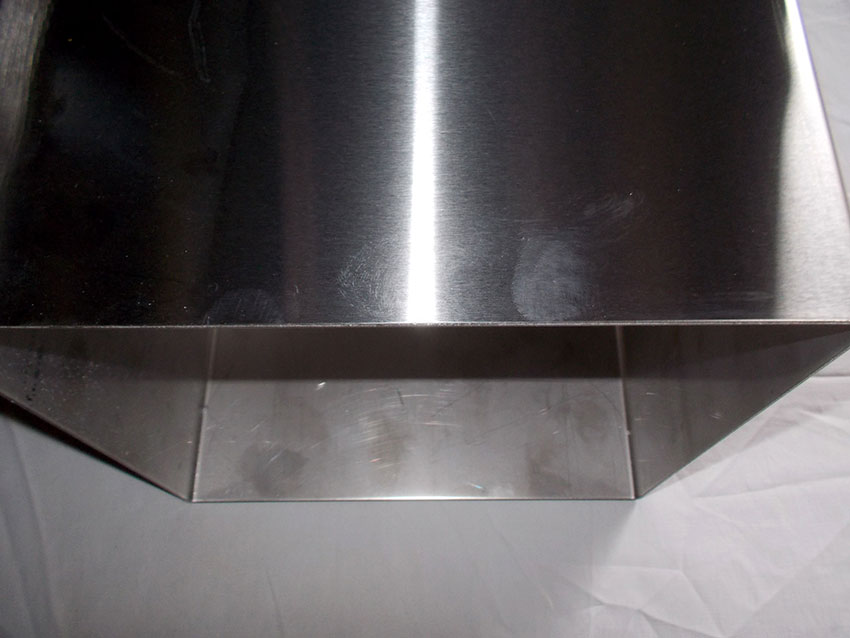
The result is a very heavy unit – weighing in at exactly 3.8kg (far heavier than anything on the market). Part of the reason is that I underestimated the size a bit. This version is 200mm on each side and 300mm high; I could have got away with 180mm or so on each side, but I still like the result (even if I have to go to gym for a few sessions before I am able to lift it! Joke! It is easy to pick up, but a bit of a heft is still required).
Materials:
- Stainless steel* 316 (marine) grade sheet, 1.6mm gauge:
- One 300x800mm length folded and welded down one corner to form chimney box
- One 200x150mm plate to act as heat shield
- Stainless steel bolts:
- Four 50x6mmØ
- Two 100x8mmØ
- Three 5mmØ threaded rods, 1m lengths, cut to make fire grate (in this case nine lengths of 220mm each
- Stainless steel washers:
- Four 38x8mm fender washers – used on handle
- Four 25x8mm fender washers – used on handle
- Four 20x6mm fender washers – used on heat shield
- Four 30x6mm fender washers – used on heat shield
- Eight 6mm flat washers – used on heat shield
- Stainless steel hex nuts:
- Eight 6mm hex nuts – used on heat shield
- Four 8mm hex nuts – used on handle
- Stainless steel dome nuts:
- Eighteen 5mm – used to secure fire grate bars
- Four 6mm – used on heat shield
- Two 8mm – used on handle
- Stainless steel rope:
- Aluminium:
- Wire rope ferrules – four 4mm
- Meranti:
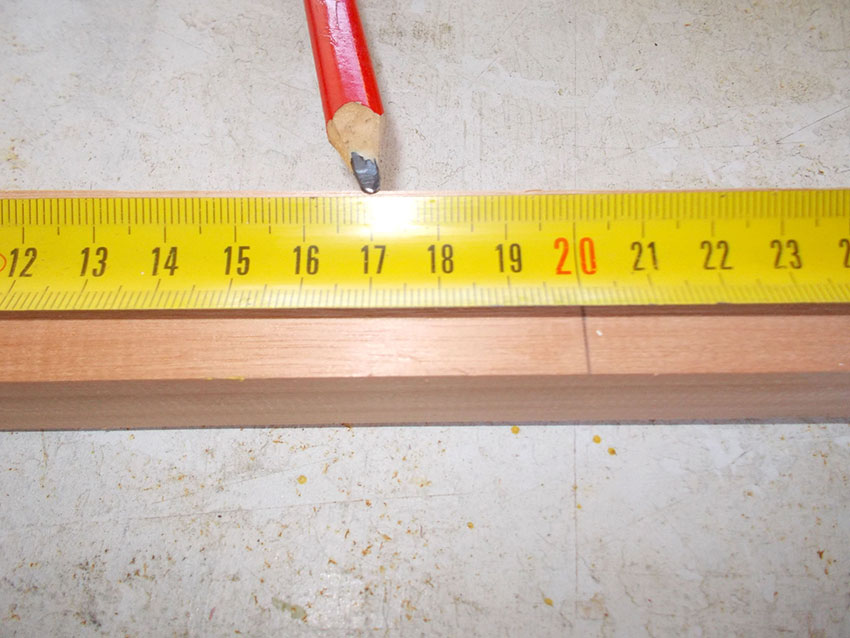
- One 200mm length 32x32mm – for main handle
- One 100mm length of 25mmØ dowel, drilled down the centre – for use as the cable-mounted tipping handle
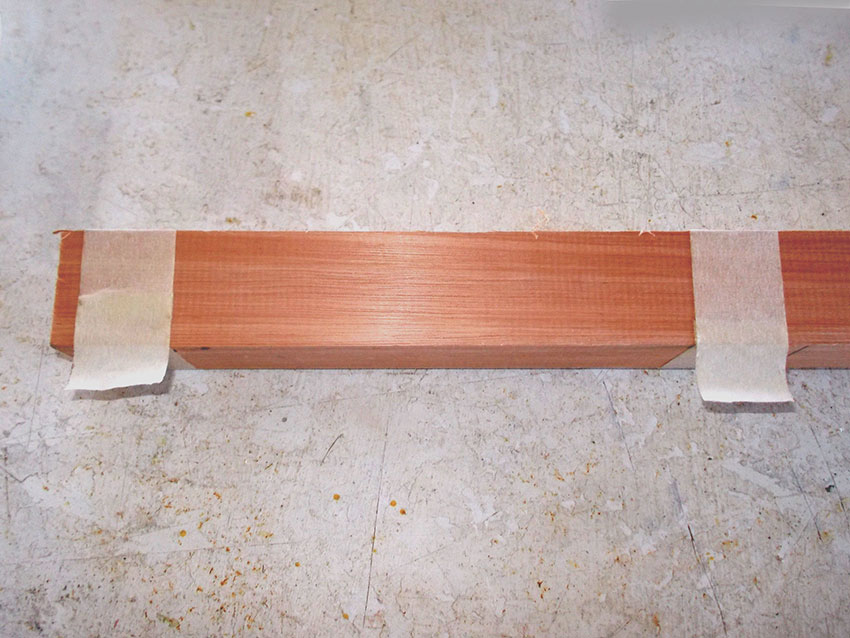
- Masking tape – used to mark drill hole positions and prevent the drill bit tip from skittering across the steel’s surface
*Naturally you may decide on different dimensions, different materials – such as a different grade of stainless steel, or gauge thereof and/or a different design; all of these would of course affect the cost of the final unit.
Method:
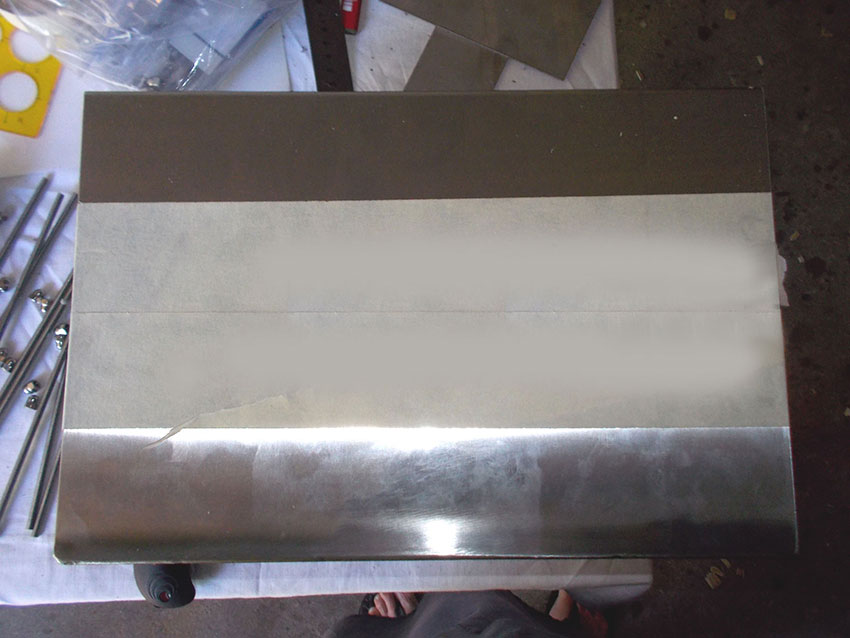
- Here are the basic material, less the fasteners… nuts, bolts and washers
- I had the box main body folded and welded by the supplier.
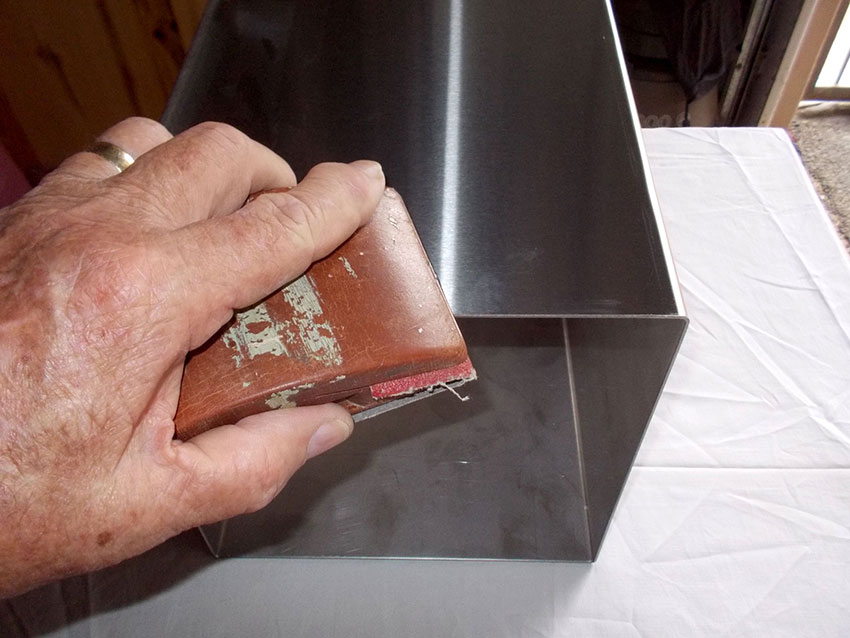
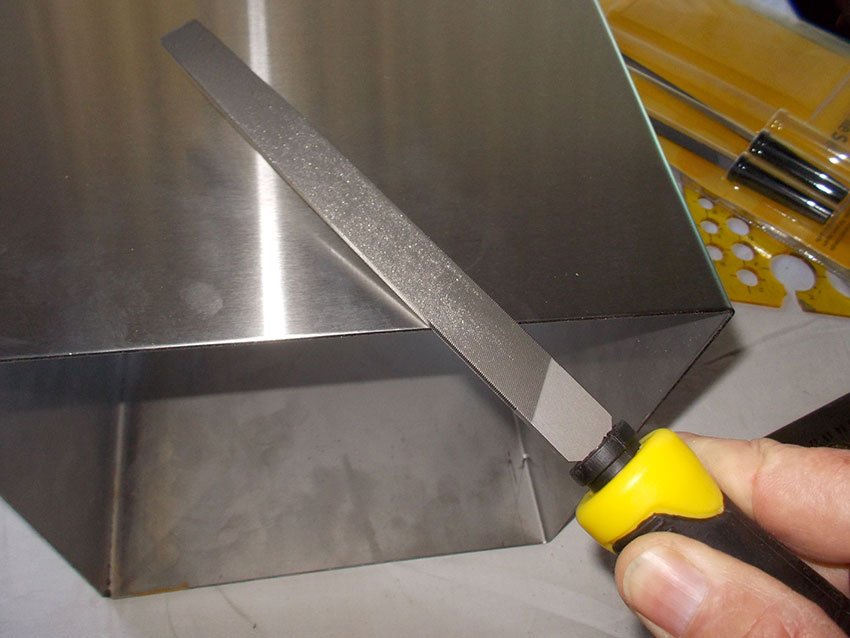
- This is somewhat exaggerated, but what is shows is how a sharp edge is left on a sheet where is has been guillotined – this is depicted on the lower outline. It is probably not pronounced enough to cause very serious injury, but perhaps it could. So what is required is to round off that edge so that it does not present a cutting edge.
- You can use sandpaper, or a sanding disk mounted on a drill or angle grinder, but I did not want to mar the surface of the sheet in any way.
- So I used a metal file. It took only a few minutes but made a significant difference. At the same time, the guillotining results in very sharp 90° corners on the heat shield, so I took the opportunity to round off each corner with a curve of about 3mm radius, making the shield’s corners far less lethal.
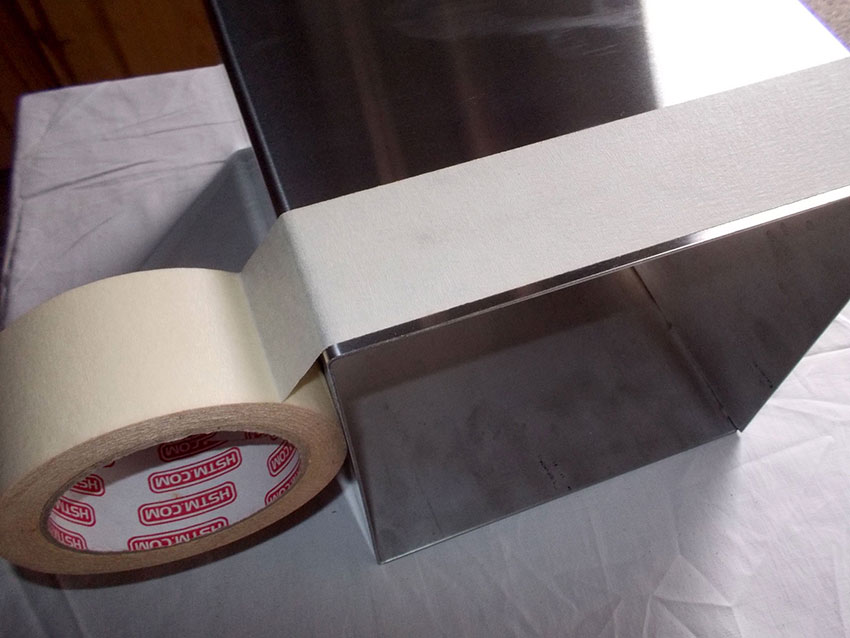
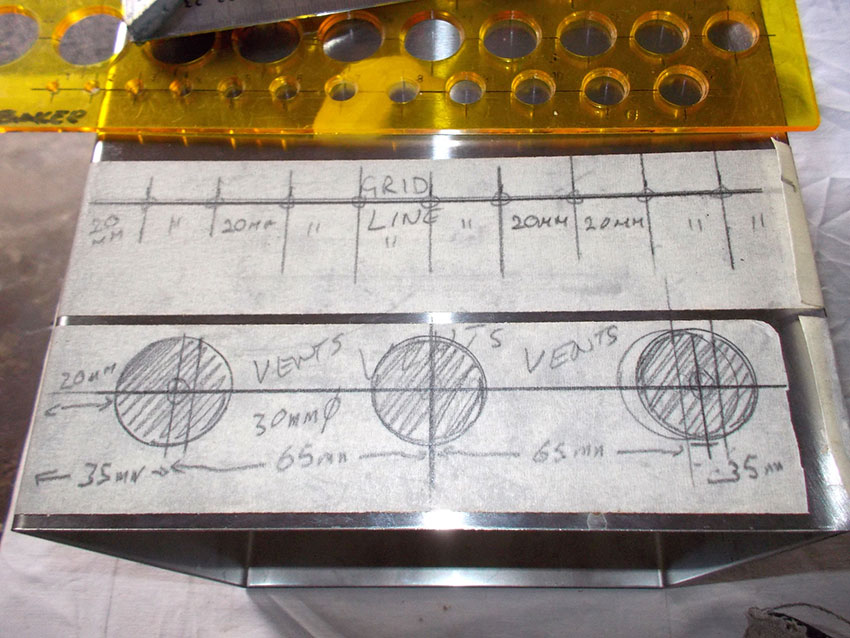
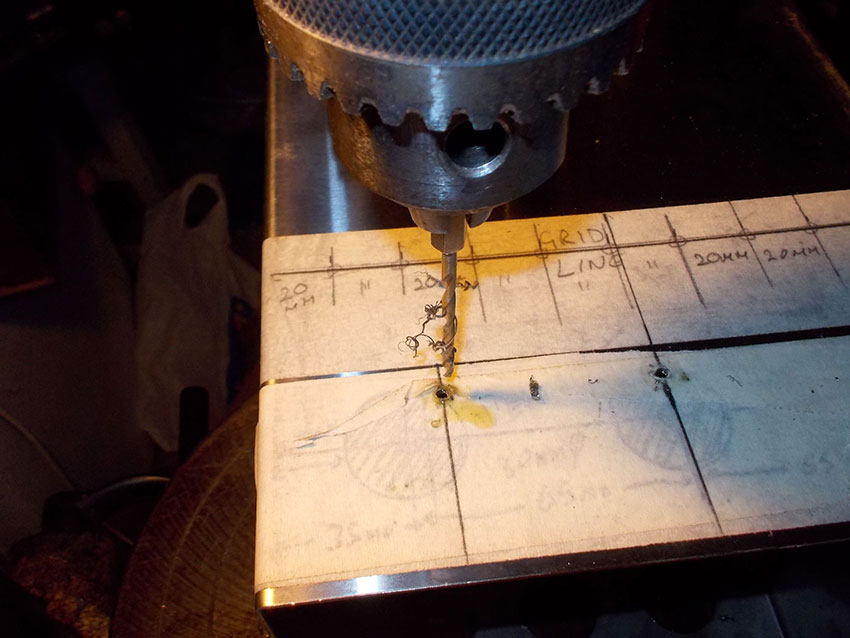
- To mark off the various positions for the many drill holes required, I used wide masking tape across the areas to be drilled. The only area of this project that requires extreme care and precision is the drilling of the various holes … if you are out by even a little, it will be very visible.
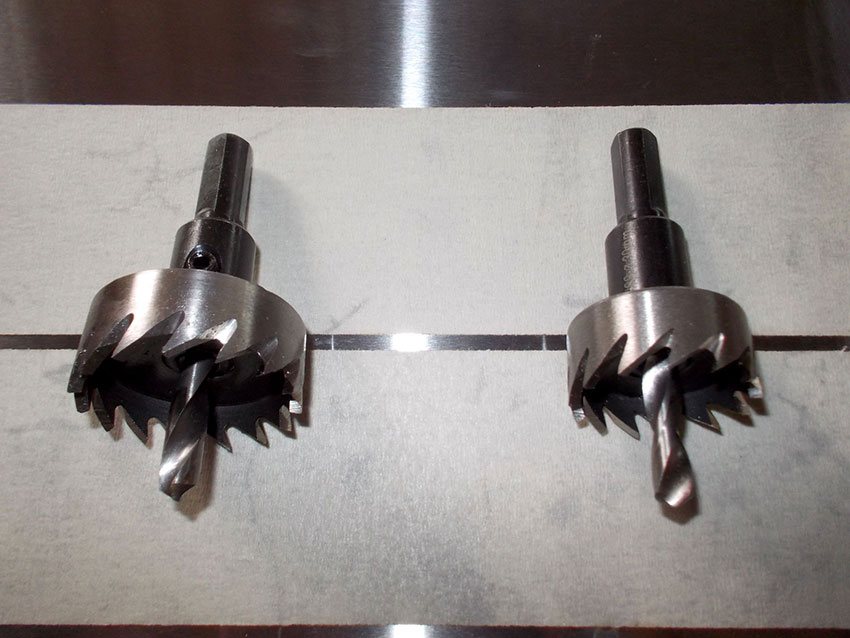
- I had the choice of two vent hole diameters – 30mmØ and 35Ø.
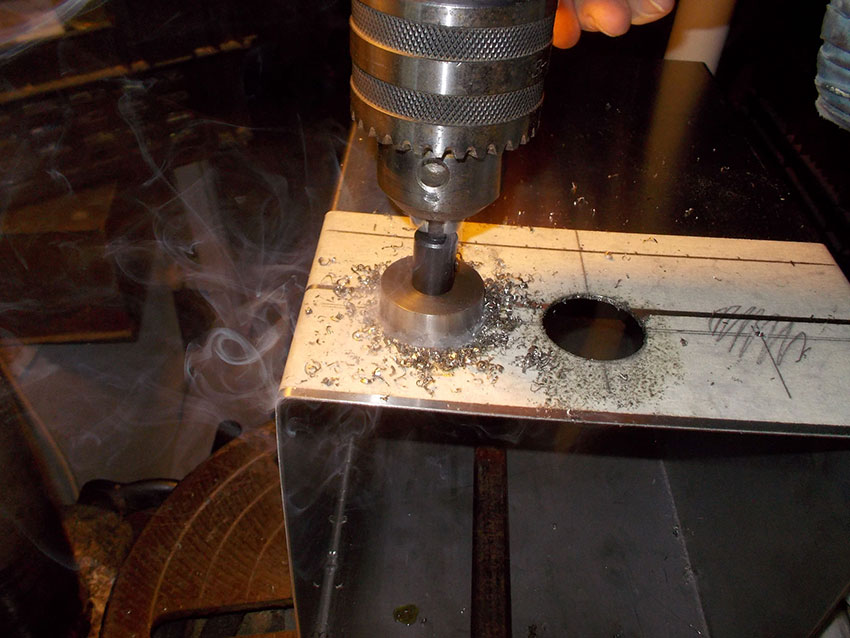
- Each saw is supplied with an Allen key to replace the pilot hole drill bit in the mandrel if it ever becomes blunt and needs to be replaced or resharpened.
- This is where you again need to be careful… drilling speed.
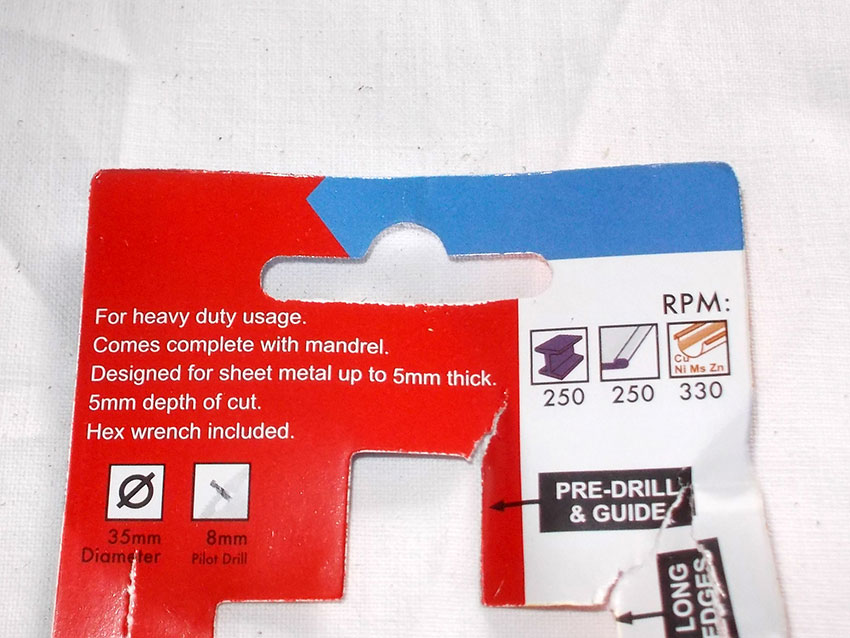
- Maximum cutting depth capacity in steel is 5mm and maximum drilling speed is 250rpm in the case of the 35mmØ hole saw.
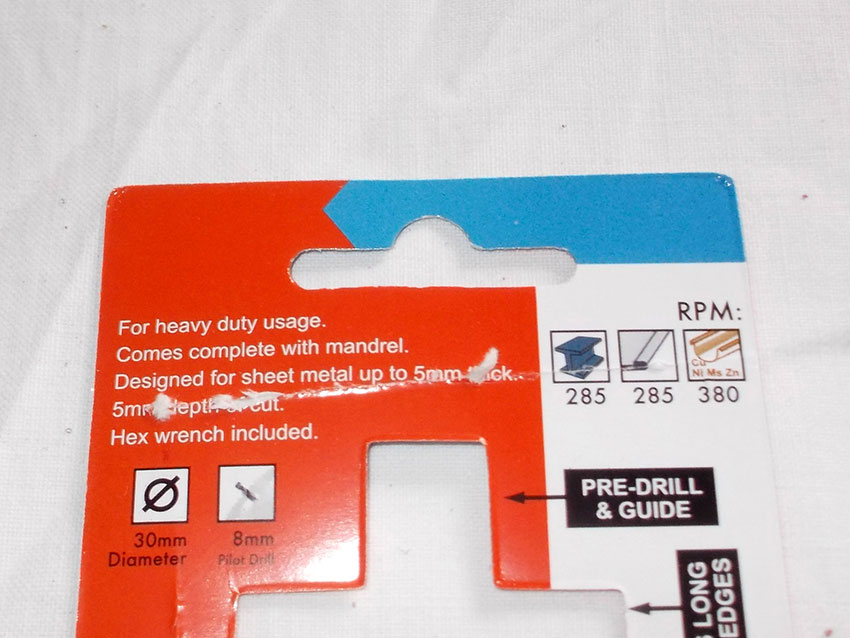
- Maximum cutting depth in steel when using the 30mmØ hole saw is also 5mm.
- The 30mmØ hole saw maximum speed is slightly higher, however – 285rpm. It is best to keep the packaging with their respective hole saws – possibly in a small plastic bank coin bag – so that you never exceed the maximum rotational speed for whatever material on which you are working.
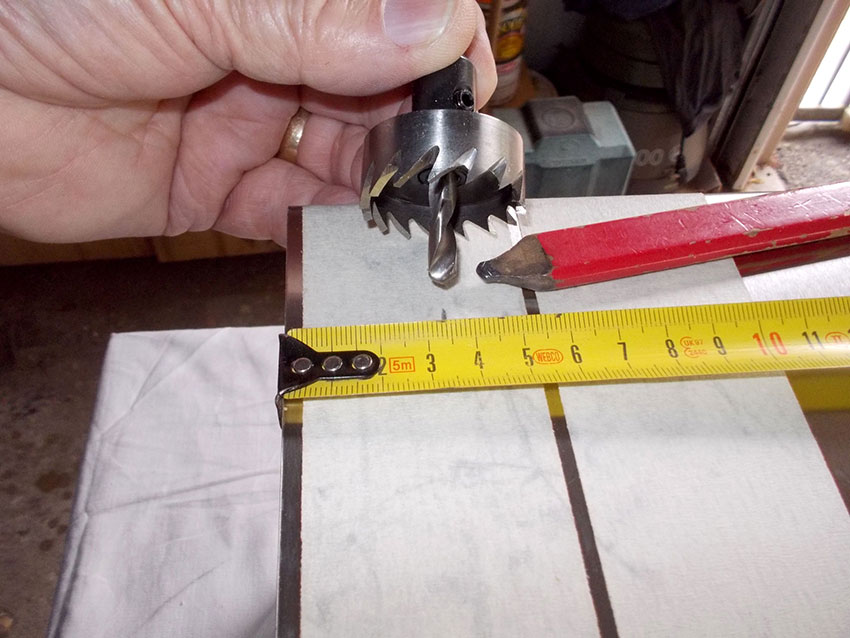
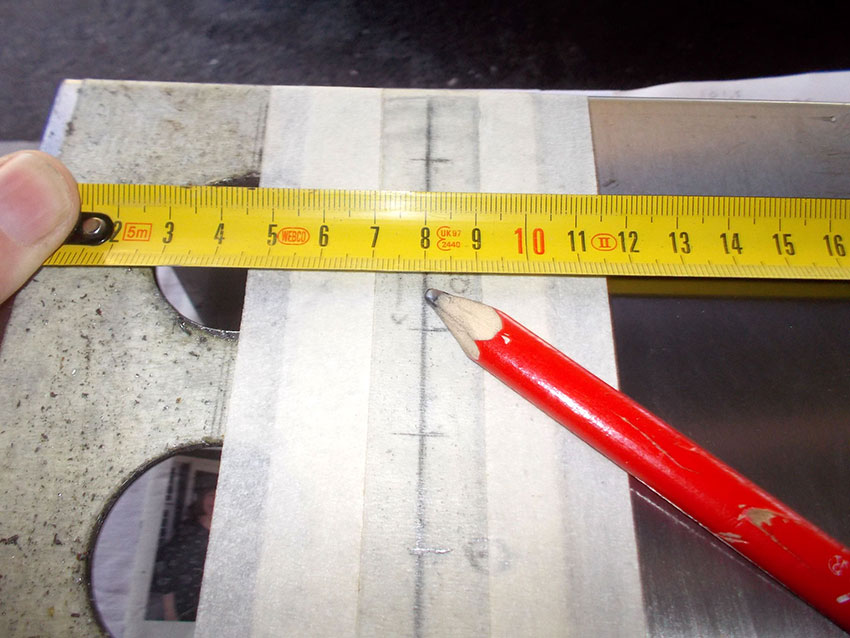
- At first I experimented by eye with the 30mmØ hole saw, setting the centre point height at 35mm above the bottom edge of the chimney box. That would have left 17.5mm of metal between the bottom of the vent holes and the chimney box’s bottom edge.
- It looks a bit messy, but the tape allows you to do a bit of ‘hole here?’ or ‘hole there?’ trial and error before deciding on the final positions.
- I eventually set on the 35mmØ hole saw, centres at 45mm from the base (giving 27.5mm between the bottom of each vent hole and the bottom edge of the fire chimney, and just three of them, a central one, and one on either side at 60mm centre to centre. That resulted in 27.5mm of metal from the chimney box corner to the outer edge of the outer vent holes, and approximately 22mm of metal between each vent hole. I began by carefully drilling 3mmØ pilot holes at each drilling point. It is much easier to centre the tip of the bit of the intersections of the marking-up lines than if you go straight into using the hole saw – which has an 8mmØ pilot hole drill bit fitted but the tip of which can be a little hard to see under the saw.
- Drilling the vent holes… note the smoke from the liberal amounts of oil I applied to keep the saw as cool as possible… the cutting action creates a lot of heat.
- I collected the swarf (the fine filings of metal produced when it is drilled or machined) in a dustpan for later disposal. In this case, I could not pick it up with a magnet as it is not magnetic – being stainless steel. You can vacuum it up, but then use a machine with a disposable paper bag, or put a cloth ‘sock’ over a cloth vacuum bag, otherwise you will end up with tiny bits embedded in the cloth bag. Once done, you can peel the cloth ‘sock’ off and discard it in recycling.
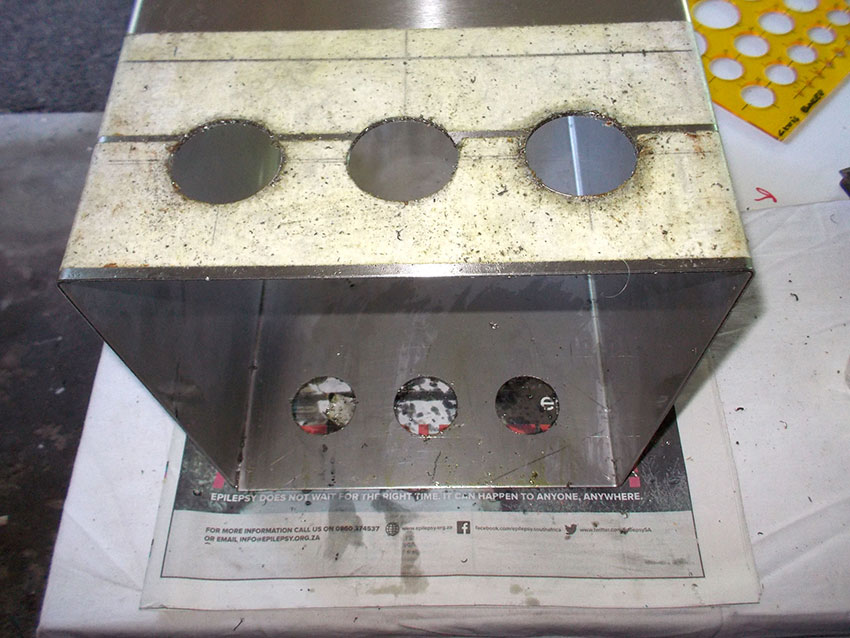
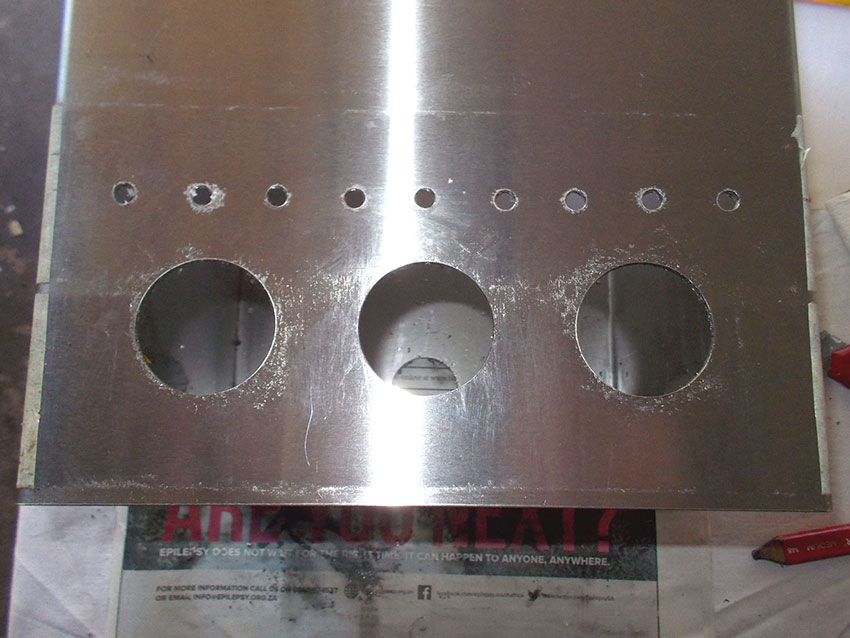
- A view of the six vent holes drilled. I did just the six – three per opposite side that would be adjacent to the handle side.
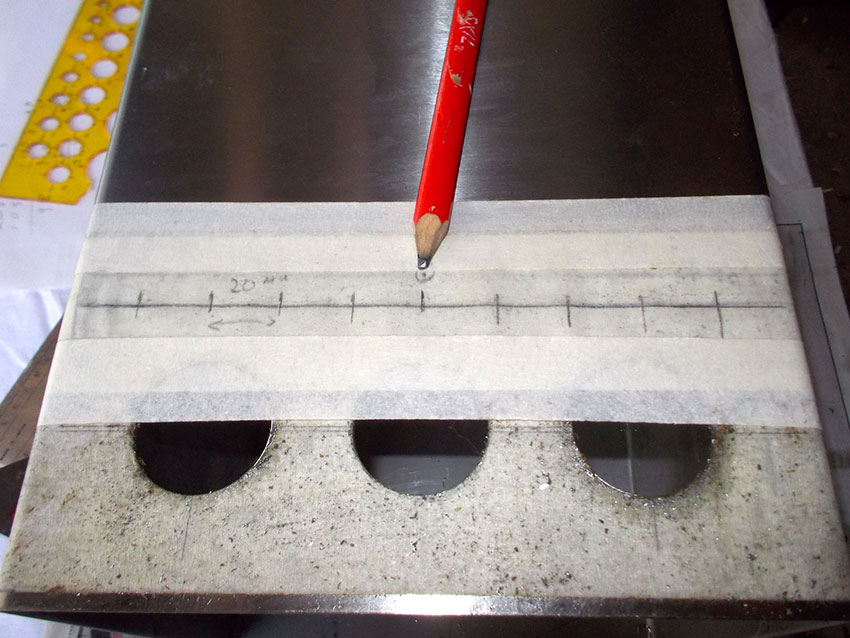
- Now for the 5mm fire grate rod holes… I centred them on a line 80mm up from bottom edge of the chimney box.
- Then I spaced them at 20mm. this gave a total of nine bars – so their spacing would be sufficient to keep even smallish lumps of charcoal and certainly briquettes above them from falling through.
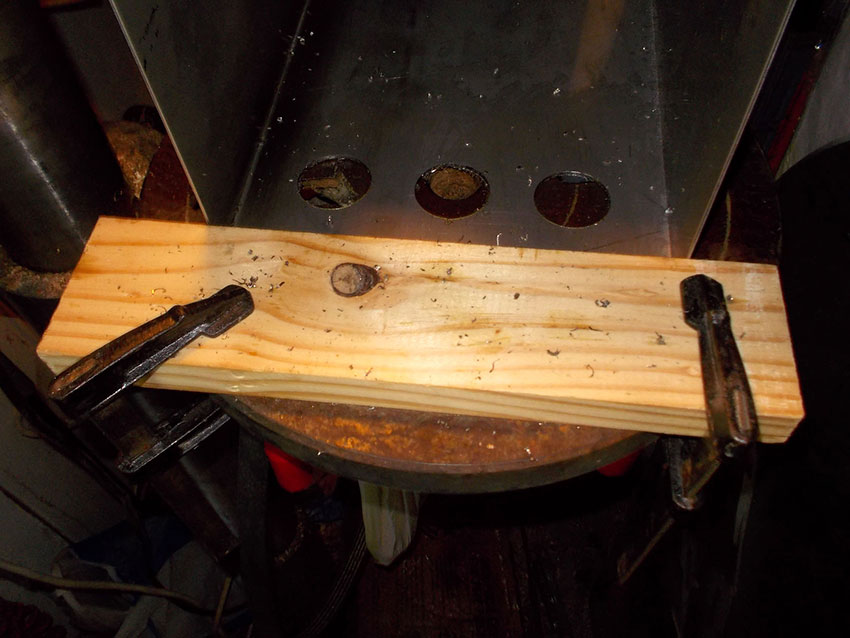
- I used a drill press for this job and set up a ‘stop’ on the drill base along which I could move the chimney box while holding it firmly against the ‘stop’.
- In this case, I went straight to the 5mmØ drill bit as it was easy to centre the tip on each drilling position
- Here is the final result with all the vent holes and grate holes drilled – and looking quite neat without the dirty, oily tape in the way.
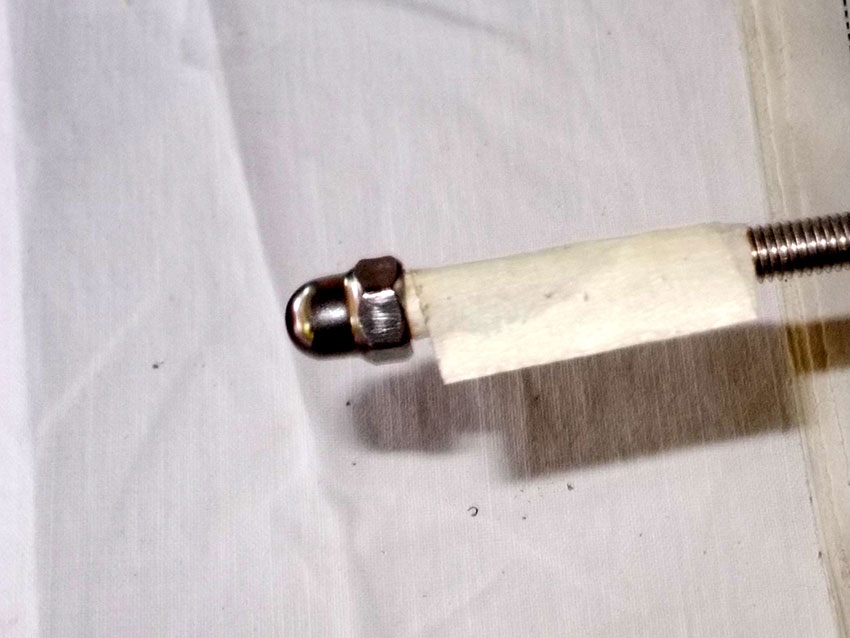
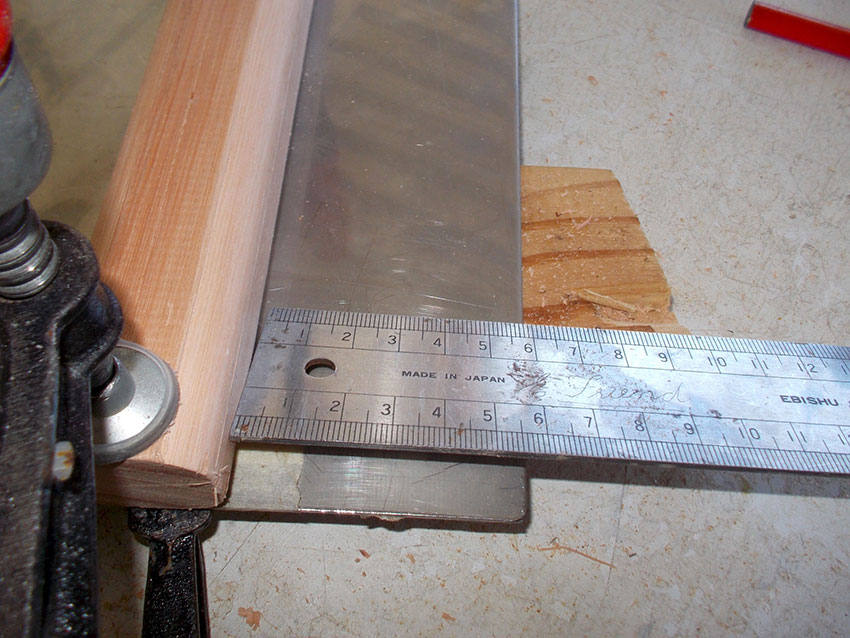
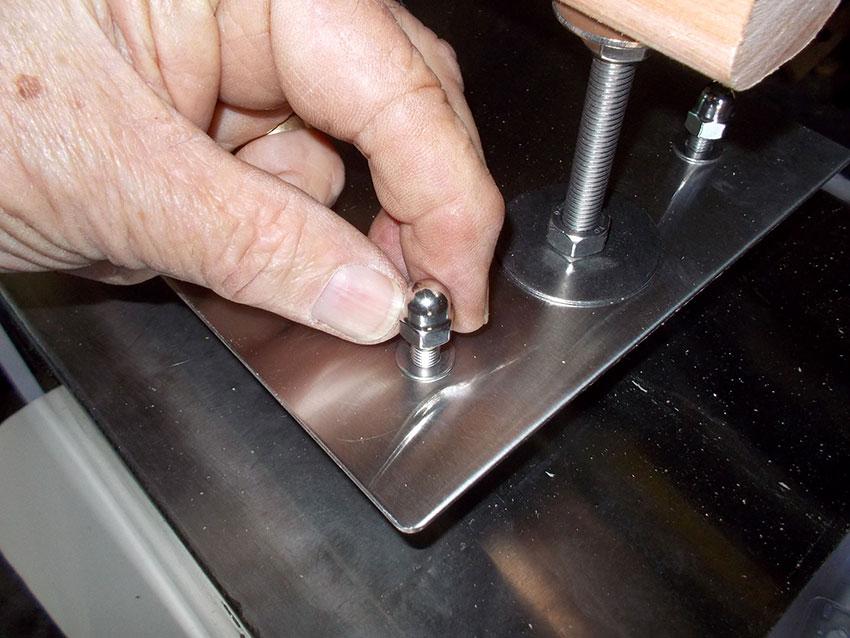
- To set the length of each fire grate bar, I turned a dome nut onto the end of one end of the threaded rod until it was tight. Then I wound a little masking tape around the threaded rod. And removed the dome nut.
- The result is 8mm of threaded bar within the dome nut.
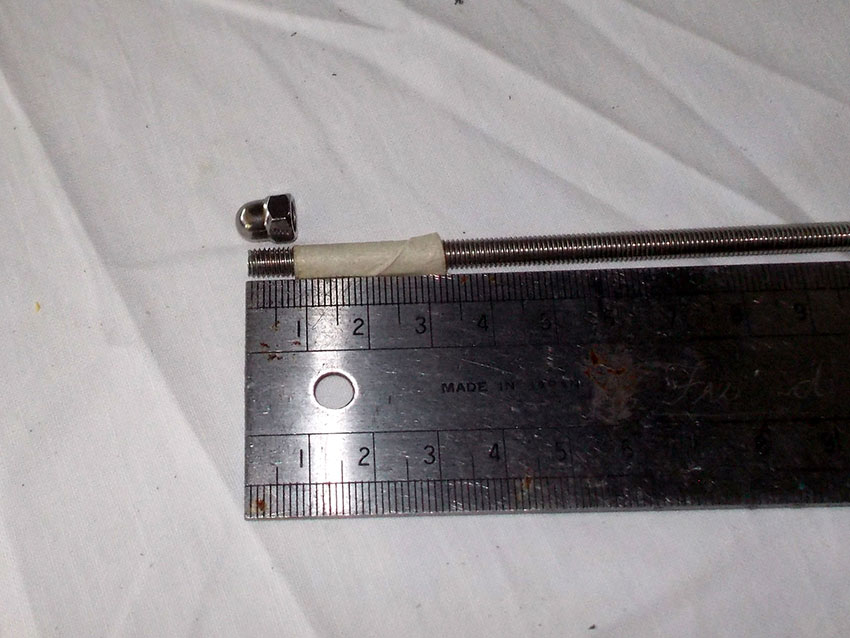
- Hence I set up a mitre box and length stop at 218mm as my fire bar cut lengths… 8+8 = 16+width of chimney box (200mm) = 216mm. So as the bars would be 219mm each that would give a little clearance of 1.5mm on either end of each bar between the bottom edge of the dome nut and the outer surface of the chimney box. That should take care of any linear expansion issues when the starter is being used and the chimney box and bars expand as they heat up.
- Cut one and check – perfect!
- Here are all nine cut and temporarily inserted into their holes.
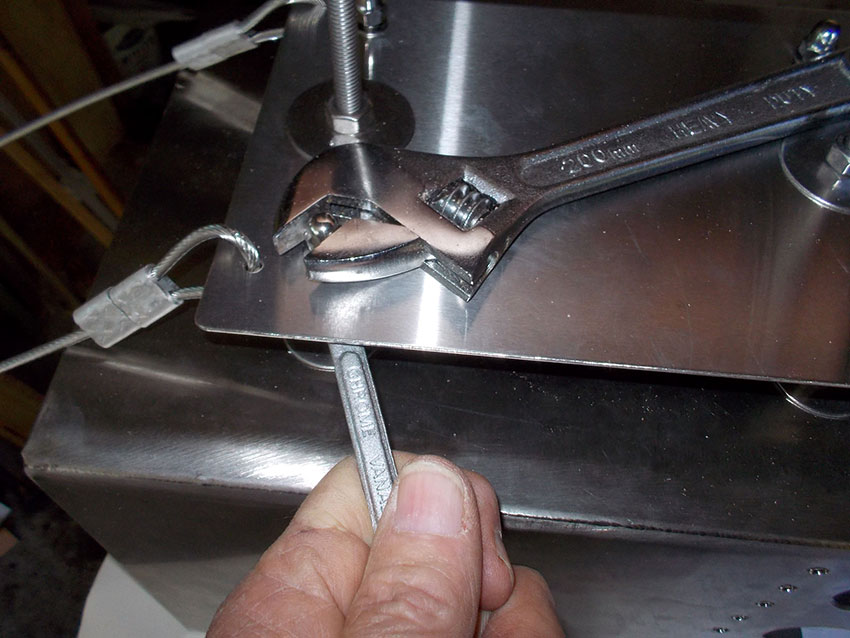
- To confirm at this stage that everything was fine, I lightly turned each dome nut on to each end to check for clearance and fit. All well.
- A view of the fire grate from the top.
- One or two were about 0.5mm out, but otherwise pretty well lined up. I then removed the grate bars for later final securing – it makes the whole thing a little lighter to handle and they will not get in the way of any heat shield securing bolt heads.
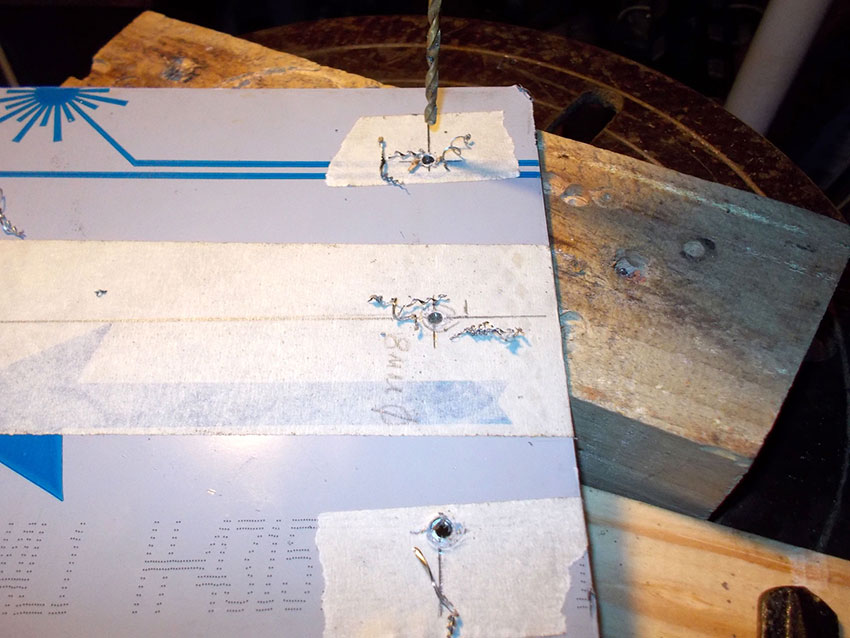
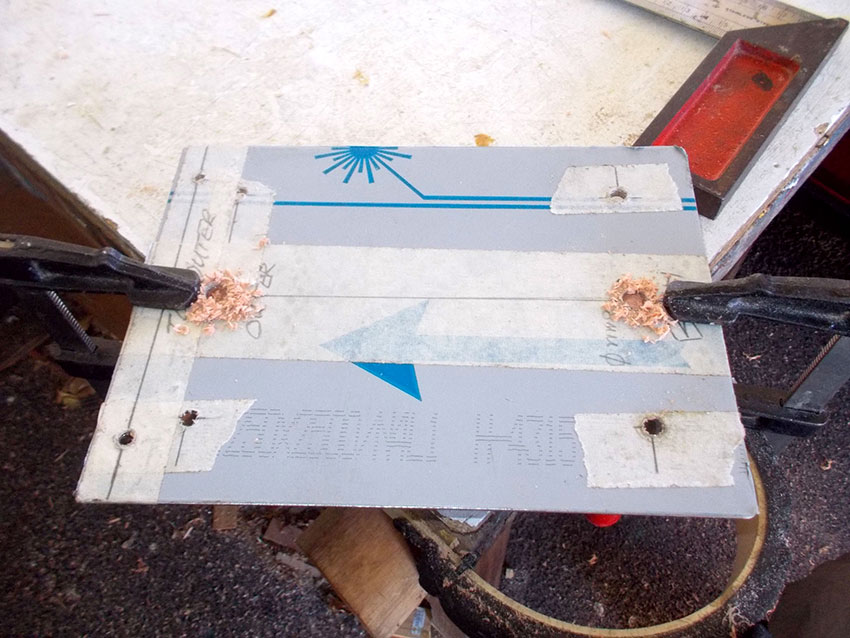
- Now for the heat shield. I applied a couple of lengths of the masking tape up the middle of the chosen side.
- Then I laid another length along the centreline of the heat shield. Note the protective grey film covering on the sheet. It is there to protect the surface from scratches and later on is simply peeled off. I marked off the centreline of the shield at 75mm, and also, with smaller lengths of masking tape applied in their positions, the positions of the shield securing bolts. The handle bolts would be145mm apart, and the shield securing bolts 30mm from top and bottom edge, and 25mm in from left and right edges. Not shown here, but at the same time I marked the positions of the two holes for the tipping handle cable ends – 5mmØ 10mm from top edge and 18mm in from each outer edge so that the cable ends would be roughly parallel when tipping the burning charcoal into the braai.
- I drilled a 3mmØ pilot hole in each position.
- And then I drilled the 8mmØ handle bolt holes and the 6mmØ heat shield attachment bolt holes. The design is such the heat shield is attached to the chimney box, and the handle is in turn attached to the shield. This is designed this way so that there is no direct heat transfer from the box directly to the handle bolts. Hopefully this keeps them cooler (and as it turns out, it does work well).
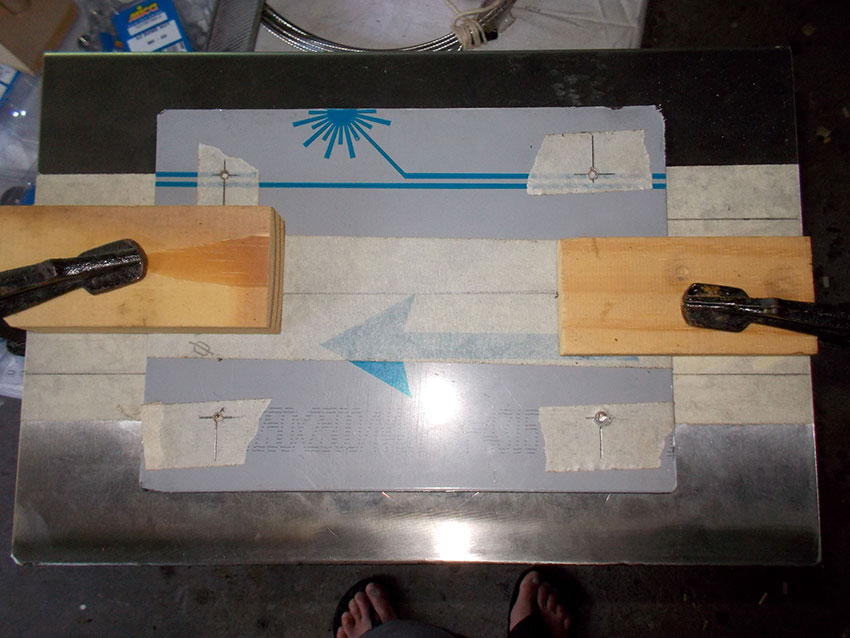
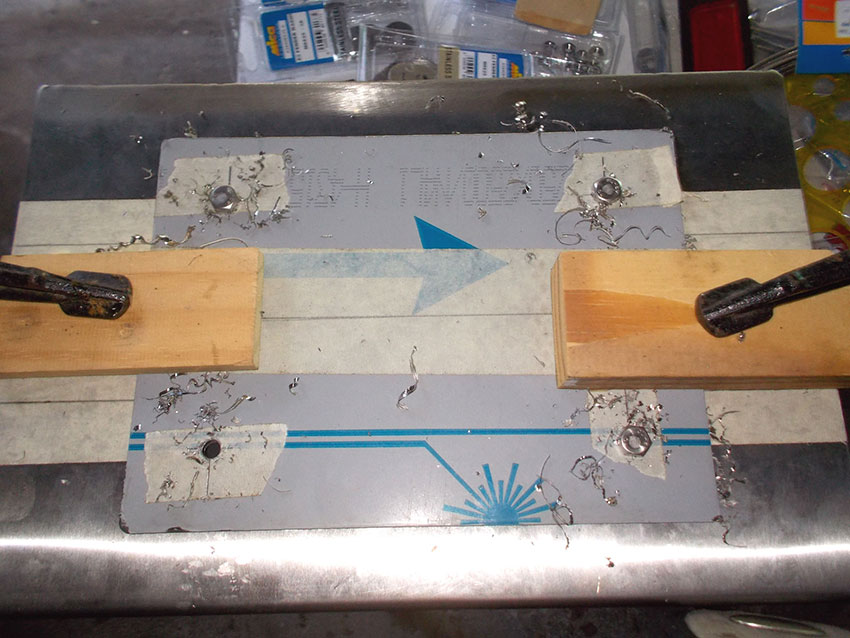
- I centred the shield on the side of the chimney box, clamping it very firmly in position.
- Then I drilled through the attachment holes already drilled in the heat shield and through the side of the box. After drilling the first hole, I dropped a 6mmØ bolt into it, and then repeated the same with the second hole and then finally the third. This helps ensure that even though the shield is firmly clamped in place, there is absolutely no chance of it shifting even half a millimetre – so all the holes are precisely aligned.
- Now for the 32x32mm meranti handle… I made it 200mm long, to match the shield and also give sufficient timber to the attachment bolts.
- At first I was going to leave the ends squared off and just round off the central length.
- Then I changed my mind and simply routed the entire 200mm. it is as well to leave the handle length uncut on the full 1.8m length of the meranti and only then cut it to length. This is far easier than trying to keep a 200mm length in check as you can clamp the whole beam down securely, well out of the way of the router.
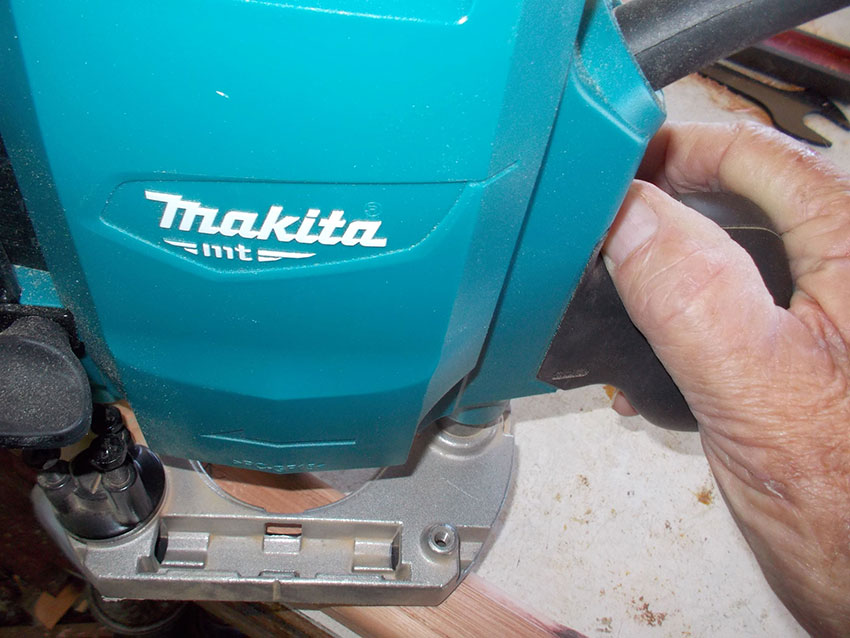
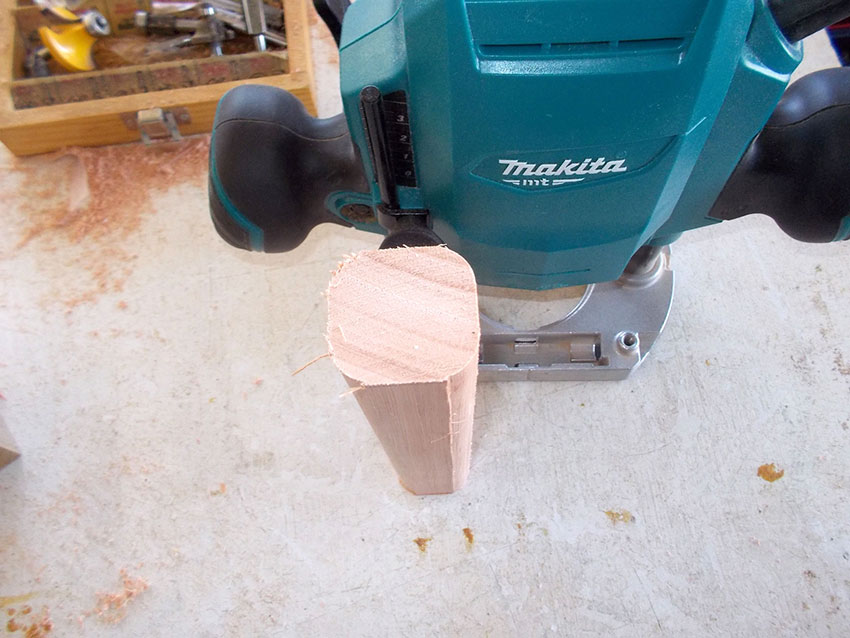
- I used a rounding-off bit to round off the corners so that the handle would be more comfortable in the hand.
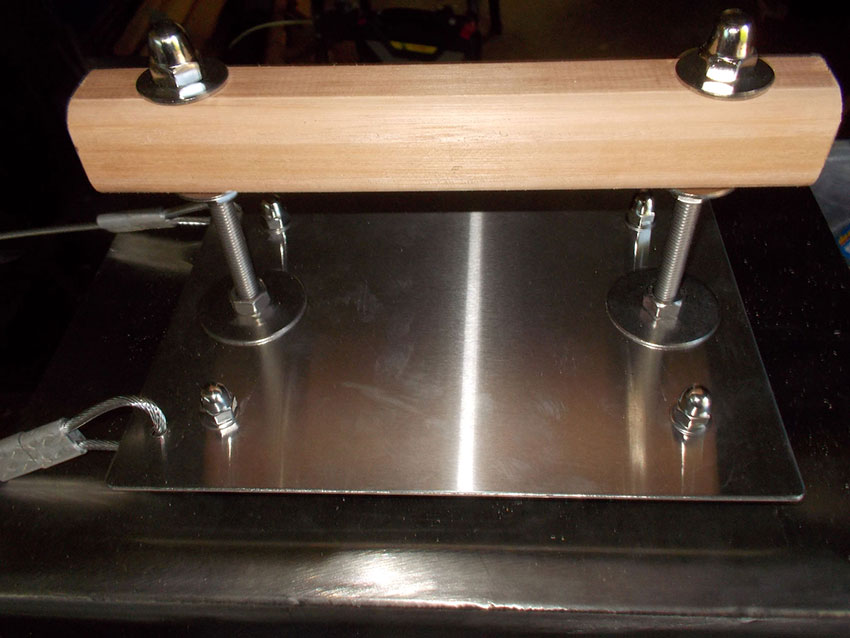
- I then clamped the handle on to the centreline of the heat shield…
- …Flipped it over and drilled 8mmØ holes for the attachment bolts.
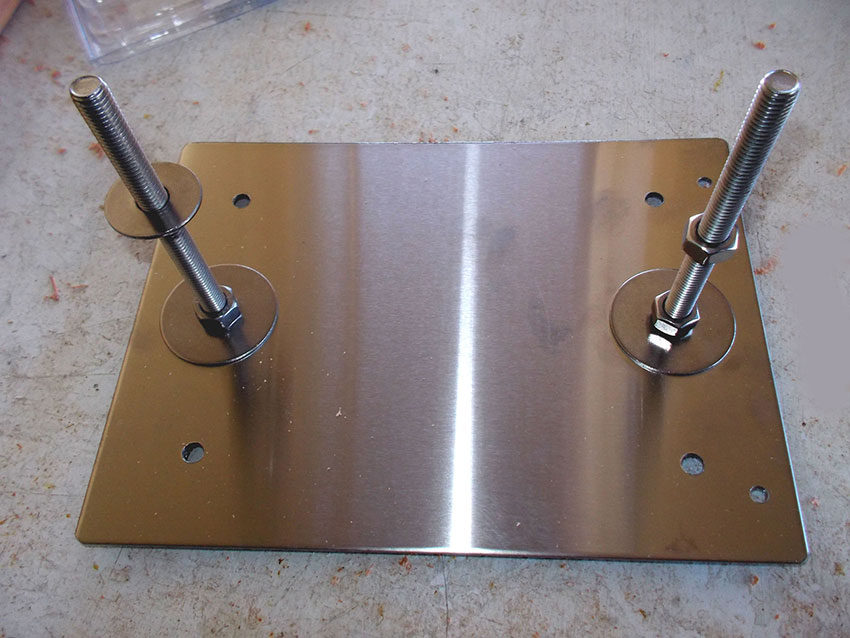
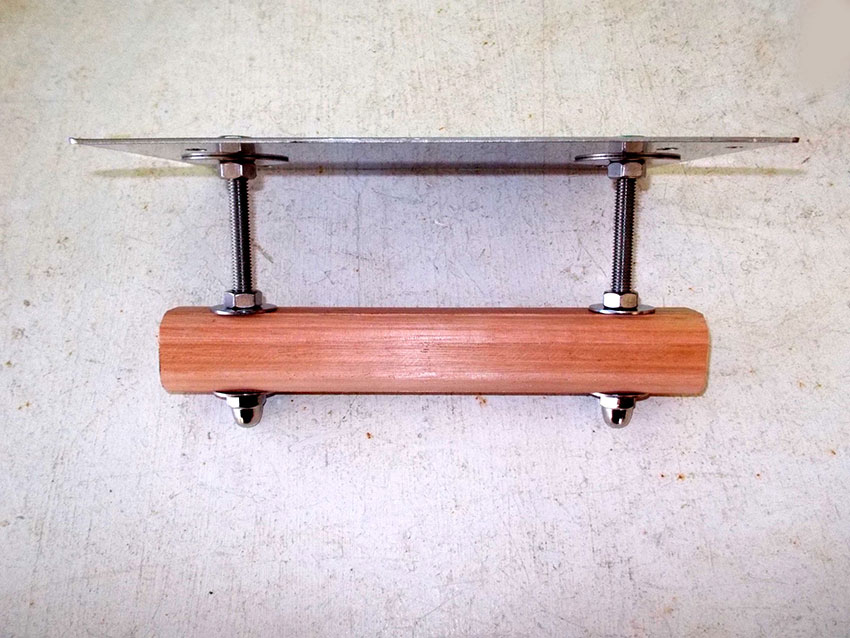
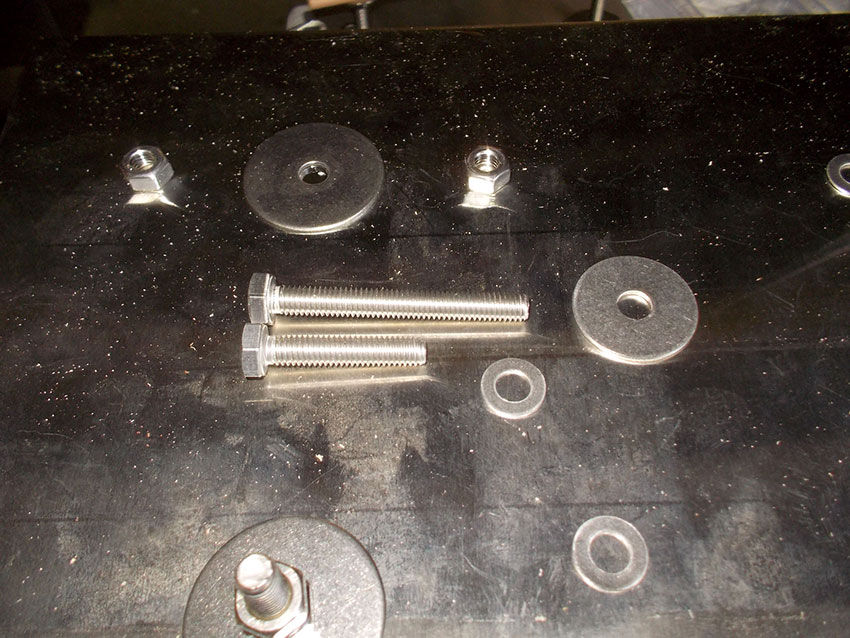
- Then I inserted the 100x8mmØ handle attachment bolts with 32mm fender washers sandwiching the shield (bolt head) end, and turned hex nuts down the bolts and slipped on the two 25x8mm fender washers. Then I popped the handle on, the other two 25x8mm fender washers, and finally tightened down the dome nuts.
- Then I turned the locking hex nuts up to the underside of the handle and tightened them securely, and finally tightened down the locking hex nuts on the shield end. And this is the final result. Because the dome nuts are a precise depth and the bolts are a precise length, and the former is tightened first, the handle ends up absolutely parallel with the shield.
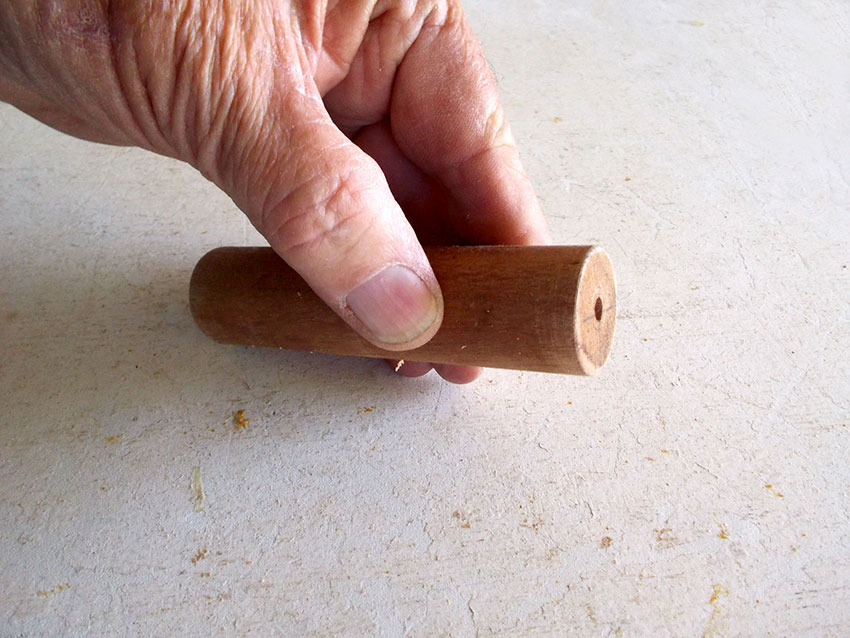
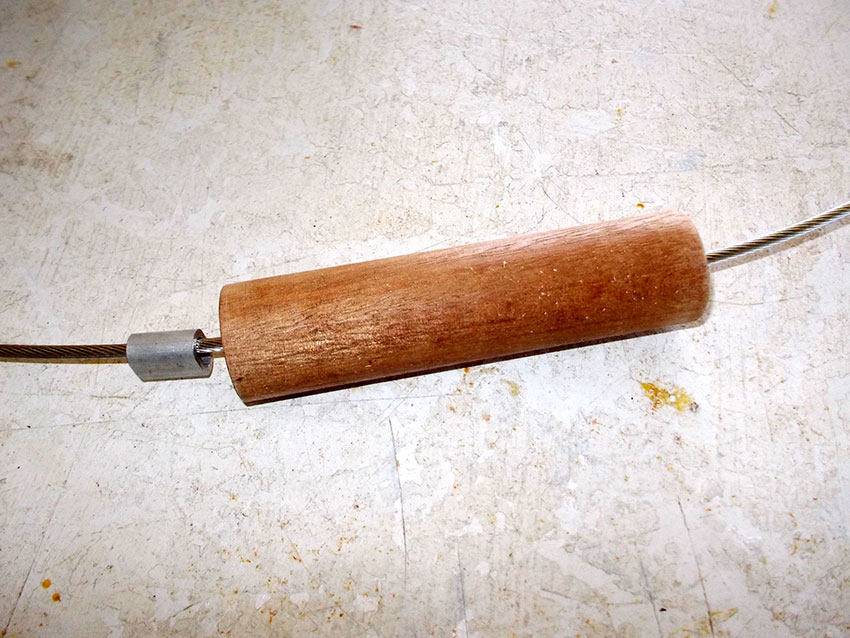
- Now for the tipping handle, which is a 100mm length of 25mmØ dowel, with a 5mmØ hole drilled right through its centre.
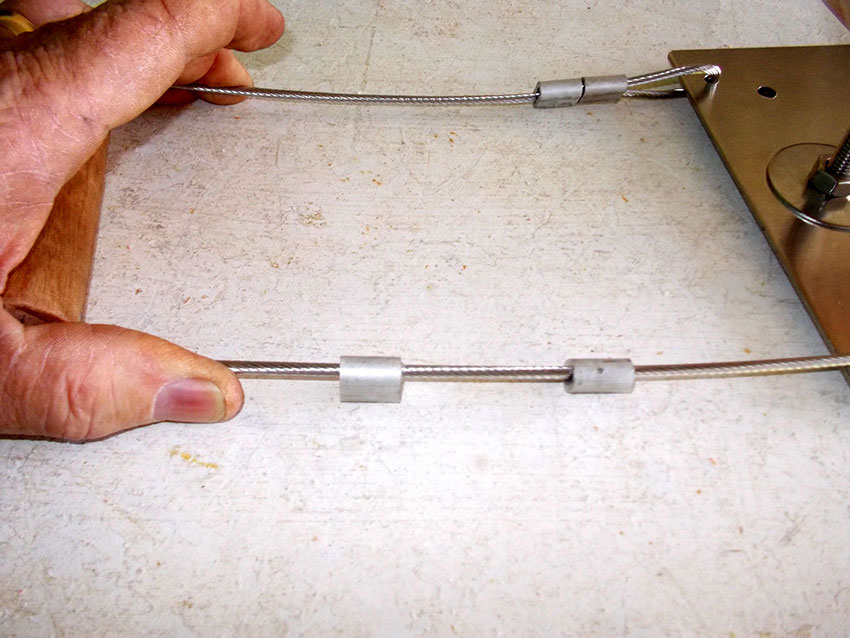
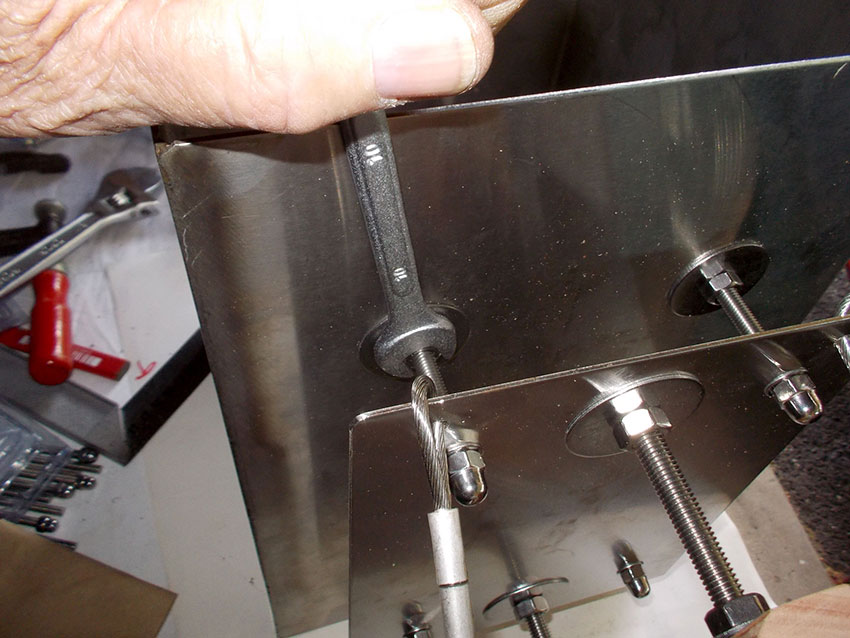
- I slipped the cable on to it – note the ferrule.
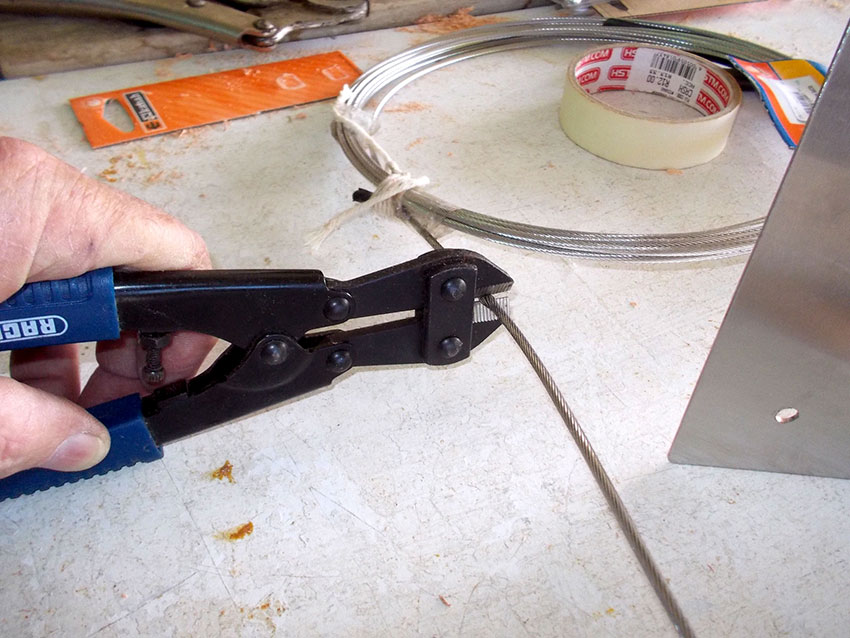
- I measured off the length of cable I wanted and cut it to length – in my case about 500mm.
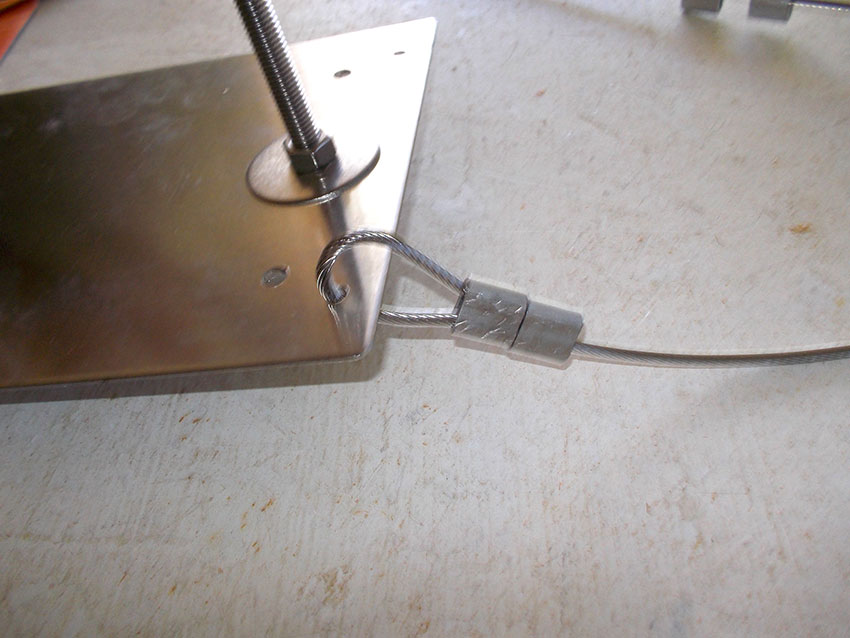
- Then I slipped the two ferrules on to the cable, passed the end through the one hole in the shield, formed a loop and inserted the end of the cable into the one ferrule, with about 10mmm protruding beyond it. Then, as I do not have a crimper, I secured the first ferrule in place by clamping and squeezing it in a vice, locking it on the cable… I then followed up with the second ferrule for an extra-secure fixing, and also to cover the end of the cable.
- I flexed the cable though 180° (90° on either end of the tipping handle, to ensure that both cable ‘arms’ were in the same orientation. This is important… if there is any twist in the cable it will be skewed one way or the other.
- I secured the other end of the cable in the same way as the first and then set about bolting the shield to the chimney box.
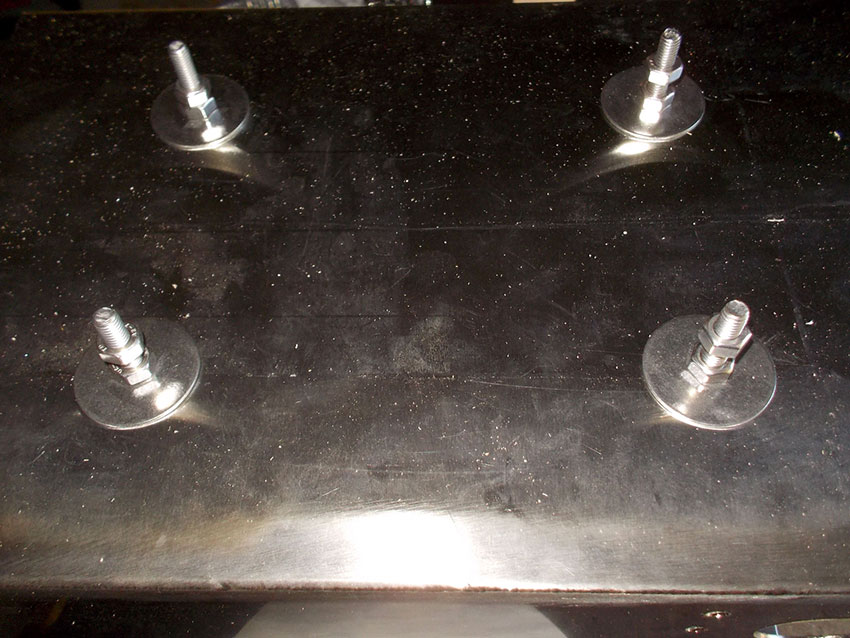
- At first I used 6x30mm bolts but thought that this held the shield too close to the side of the box, and hence more heat transfer.
- So I changed the 30mm bolts for 50mm.
- I used exactly the same procedure with these securing bolts as I did with the handle securing bolts… I turned the dome nuts on to each bolt, with a 6mm flat washer in place. Then I tightened it securely.
- Holding it stationary, I turned the hex nut under it up to the underside of the shield and tightened it securely. As with the handle, this tightens the lower hex nut up against the dome nut, thus ensuring that the shield (and before that the handle) is in proper alignment.
- Then I tightened the bottom hex nuts hard up against the side of the chimney box – note the 20x6mm fender washer under the nut (the 30x6mm fender washer is on the inner surface of the chimney box. I used the washers to essentially increase the gauge of the steel at the attachment points, making the chimney box side far less likely to distort either under the weight of the chimney box or due to being heated while the starter is in use. Finally I reinserted and secured the fire grate bars.
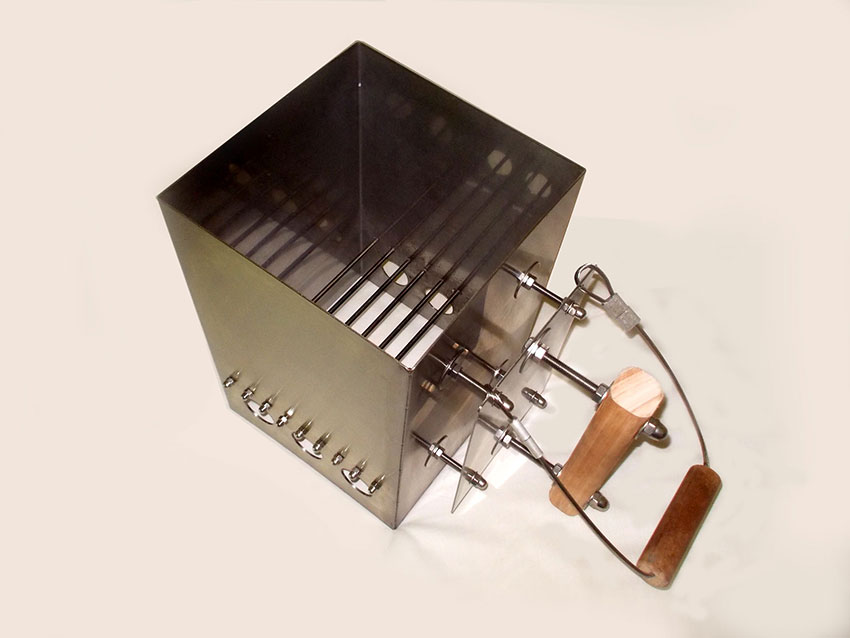
- A top view of the completed braai chimney starter.
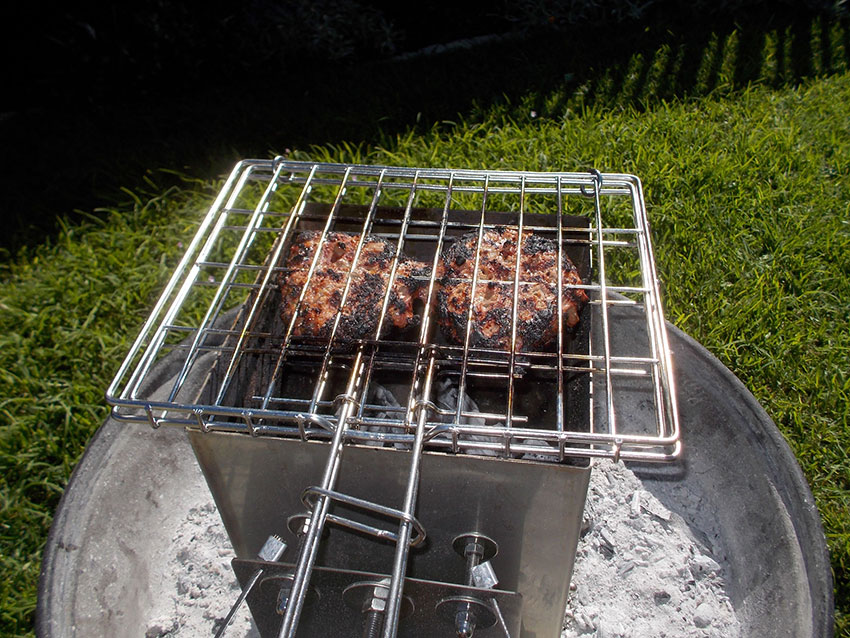
- Then I had a thought – I have them occasionally… the starter is big – and that makes it an ideal little braai in its own right. The stainless steel grid shown here is 230x280mm and sits on top of the starter as though made for it. That makes it ideal for braaiing a couple of sausages or lengths of wors, or even a steak or two. And once done, you can simply pop the grid (its handles slide into the grid) into the dishwasher. Job done!
- Here I tried doing a couple of hamburger patties – and it worked like a charm…and very quickly as well.
- And here it is working as designed… getting the charcoal going ready for the main braai – and probably hundreds if not thousands more over the years and – I hope – decades. In passing, I timed it, and it took 7 minutes to get the coals going and poured out after lighting just some newspaper under the fire grate – so it works very well and very fast.
Panel:
These materials are available at Selected Mica Stores. To find your closest Mica and whether or not they stock the items required, please go to www.mica.co.za, find your store and call them. If your local Mica does not stock exactly what you need they will be able to order it for you or suggest a source of the product or an alternative product or a reputable source in either case.
*You may find that your Mica store does not stock stainless steel sheet and in all likelihood would not offer a breaking (bending) or welding service. You would then need to find a company that does offer these services. However, the other parts, such as the stainless steel nuts, bolt and washers should be available in most Mica stores
Project guide
TIME: A week
COST: R600-R1000 (depending on the materials you use and the cost of the breaking and welding – unless you can do both yourself)
Tools required:
Mains power drill, hacksaw, router (to shape handle), socket set and spanner/s or adjustable spanner, vice grips or crimping tool (to crimp the ferrules on the cable) 35mmØ hole cutter for metal; 3mmØ HSS drill bit for drilling pilot holes and/or centre-punch to indent steel prior to drilling.


